Renault Clio: High pressure pump: Removal - Refitting
K9K, and 764 or 772
WARNING
Before starting work on the vehicle, obtain:
- a new plug kit (PART NO. 77 01 476 857),
- cleaning cloths (PART NO. 77 11 211 707),
- cleaning product (PART NO. 77 11 224 188).
WARNING
Parts always to be replaced:
- the high pressure pipe between the injector rail and the high pressure pump.
REMOVAL
I - REMOVAL PREPARATION OPERATION
- Position the vehicle on a two-post lift (see Vehicle: Towing and lifting) (MR 392, 02A, Lifting equipment).
IMPORTANT
Use the diagnostic tool before any operation is carried out on the injection circuit to check:
- that the rail is not under pressure,
- that the fuel temperature is not too high.
It is essential to respect the safety and cleanliness advice whenever work is carried out on this system.
Working on the circuit with the engine running is strictly forbidden.
- Disconnect the battery (see Battery: Removal - Refitting) (MR 392, 80A, Battery).
- Remove:
- the engine protector,
- the engine undertray,
- the timing belt (see 11A, Top and front of engine, Timing belt: Removal - Refitting, 11A-48).
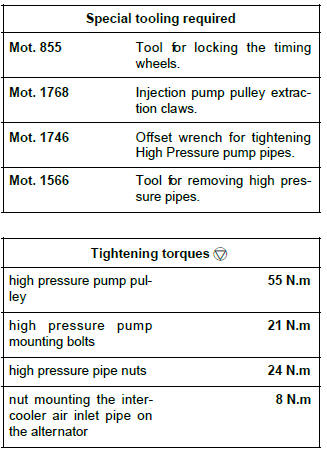
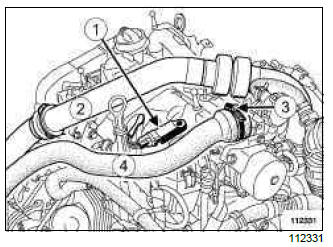
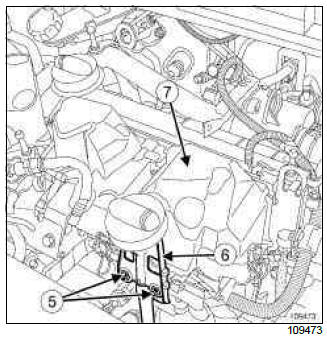
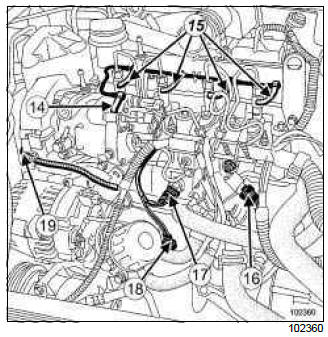
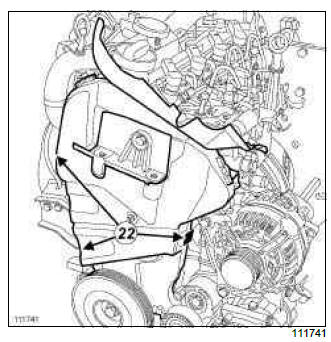
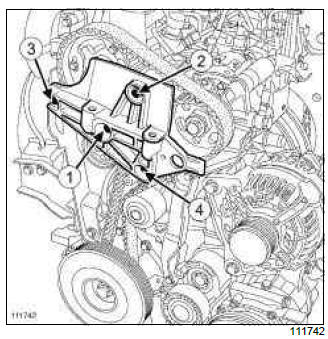
- Remove the upper part of the turbocharging duct (1).
- Disconnect the inlet air pressure sensor (2)
- Loosen the clip (3).
- Move the inlet duct to one side (4).
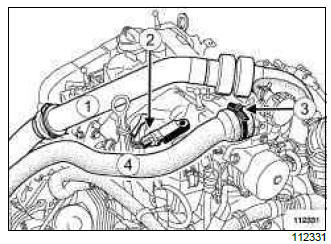
- Unclip the clips (5) from the injector rail protector cover.
- Remove:
- the injector rail protector cover mounting bolts (6),
- the injector rail protector cover (7),
- the dipstick,
- the dipstick tube mounting bolts (8).
- Move the dipstick duct to one side.
- Remove:
- the injector rail protector mounting bolts (9),
- the injector rail protector.
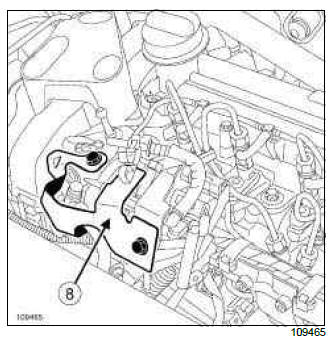
- Protect the alternator from fuel outflow.
- Pour cleaning product into a clean container.
IMPORTANT
Wear protective glasses when using cleaning product.
- Soak a brush with cleaning product, then clean the
unions:
- of the fuel supply pipe fuel on the high pressure pump,
- on the high pressure pump fuel return pipe, taking care not to soak the diesel fuel temperature sensor,
- on the high-pressure pipe and the injector rail.
- Blow compressed air into the cleaned areas, then wipe them with new wipes.
IMPORTANT
Wear protective glasses.
WARNING
To prevent impurities from entering, once the fuel circuit is opened, it must not be blasted with compressed air. Use wipes if necessary.
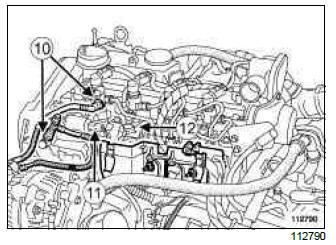
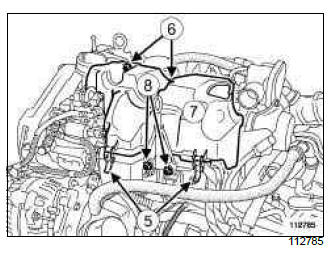
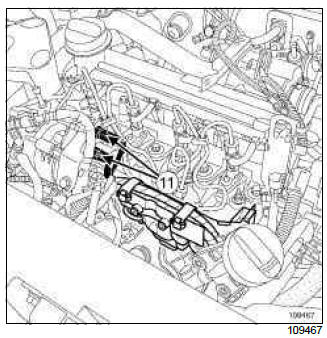
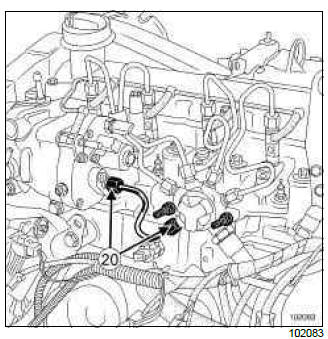
- Disconnect the high pressure pump from:
- the diesel fuel supply and return pipes (10),
- the fuel pressure regulating valve connector (11),
- the fuel flow regulating valve connector (12).
Note: Make preparations for fuel outflow. Clean with new cloths.
- Remove the high-pressure pipe between the high-pressure pump and the injector rail and discard it.
Note: Hold the intermediate nut between the pump-rail pipe and the high pressure pump using a lock wrench.
- Insert the blanking plugs.
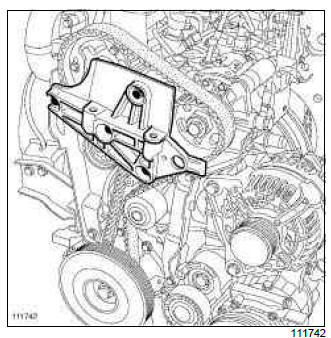
- Remove the lower mounting bolt from the alternator.
- Undo the alternator's upper mounting bolt.
- Tip the alternator towards the front of the vehicle.
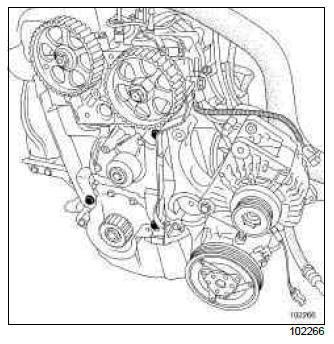
- Remove:
- the inner timing cover mounting bolts,
- the inner timing cover.
II - REMOVAL OF PART CONCERNED
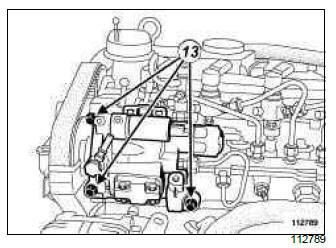
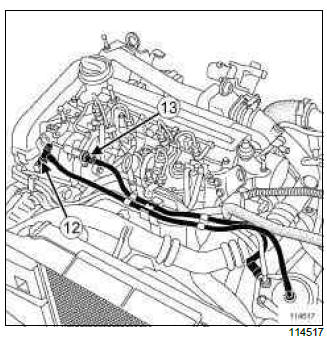
- Remove:
- the high-pressure pump mounting bolts (13),
- the high pressure pump.
WARNING
If the high-pressure pump is to be reused, keep it in a sealed plastic bag all the time it is disconnected.
Remove the high pressure pump pulley
WARNING
If the high-pressure pump is being replaced, take the high-pressure pump pulley and refit it to the new pump.
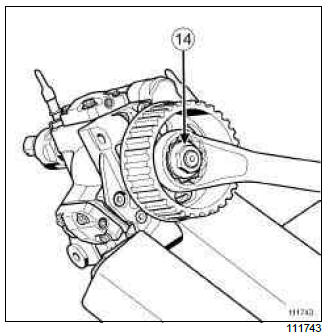
- Hold the high pressure pump in a vice, using the lower securing point on the pulley side.
WARNING
Fix jaw covers onto the vice to protect the high-pressure pump.
- Hold the high pressure pump pulley with a 32 mm offset wrench then remove the mounting nut (14) from the pulley.
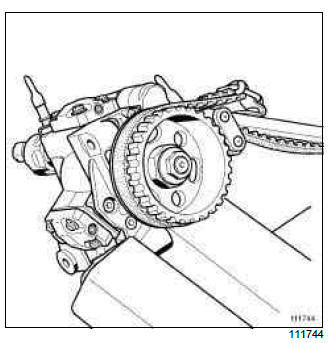
Note: The high pressure pump pulley can also be held with a (Mot. 855).
- Fit the tool (Mot. 1768), as well as the tool Mot. 1525 without the spacer at the end of threaded rod, on the high pressure pump pulley, then extract the pulley.
WARNING
Take care not to mark the high-pressure pump when removing it.
A damaged high pressure pump pulley must always be replaced.
REFITTING
I - REMOVAL PREPARATION OPERATION
WARNING
- Remove the blanking plugs only before reconnecting the fuel circuit pipes.
- The plugs are single-use. Do not reuse them and throw away the complete kit after opening.
Refitting the high pressure pump pulley
- Remove the injector rail from its plastic bag.
WARNING
If a high pressure pump is being replaced, only remove the new one from its original packaging when it is about to be fitted.
- Finger tighten the high-pressure pump pulley mounting nut as far as possible.
- Hold the high-pressure pump pulley with the previously used tool.
- Torque tighten the high pressure pump pulley (55 N.m).
II - REFITTING PART CONCERNED
- Remove the injector rail from its plastic bag.
WARNING
If a high pressure pump is being replaced, only remove the new one from its original packaging when it is about to be fitted.
- Position the high-pressure pump on the cylinder head.
- Finger tighten the high-pressure pump mounting bolts as far as possible.
- Torque tighten the high pressure pump mounting bolts (21 N.m).
III - FINAL OPERATION
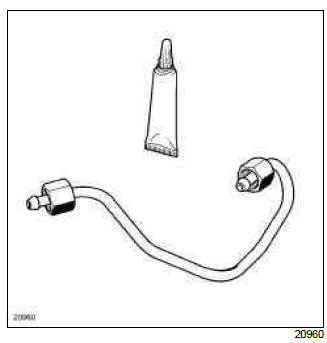
- Fit the new high pressure pipe between the injector rail and the high pressure pump.
Note: If the new pipe kit does not contain an applicator, lubrication of the high-pressure nut threads will be unnecessary (as they are self-lubricating pipes).
- Hand-tighten the nut on the high-pressure pipe on the pump end, then the one on the rail end.
- Tighten to torque the high pressure pipe nuts (24 N.m) using the (Mot. 1746) or (Mot. 1566), starting with the high pressure pump end.
- Disconnect the high pressure pump from:
- the fuel supply and return pipes,
- the fuel pressure regulating valve connector,
- the fuel flow regulating valve connector,
- Refit:
- the timing belt (see 11A, Top and front of engine, Timing belt: Removal - Refitting, 11A-48),
- loosen the nut mounting the intercooler air inlet pipe to the alternator.
- fit the air duct between the turbocharger and the intercooler air inlet pipe,
- lock the air duct onto the turbocharger and the intercooler air inlet pipe.
- tighten the air duct bolt on the rocker cover,
- torque tighten the nut mounting the intercooler air inlet pipe on the alternator (8 N.m),
- the engine undertray.
- Connect the battery (see Battery: Removal - Refitting) (MR 392, 80A, Battery).
K9K, and 750 or 752 or 760 or 762 or 766 or 768

IMPORTANT
Consult the safety and cleanliness advice and operation recommendations before carrying out any repair (see 13B, Diesel injection, Diesel injection: Precautions for the repair, 13B-1).
REMOVAL
I - PARTS AND CONSUMABLES FOR THE REPAIR
- Consumables: (see 13B, Diesel injection, Diesel
injection: Precautions for the repair, 13B-1)
- Cleaning cloths,
- Set of K9K blanking plugs (injection DELPHI).
II - REMOVAL PREPARATION OPERATION
- Position the vehicle on a two-post lift (see Vehicle: Towing and lifting) (02A, Lifting equipment).
- Disconnect the battery (see Battery: Removal - Refitting) (80A, Battery).
- Disconnect the inlet air pressure sensor (1)
K9K, and 750 or 766 or 768
- Remove the turbocharger outlet air pipe (2).
- Loosen the clip (3) on the intercooler outlet air pipe.
- Move the intercooler outlet air pipe to one side (4).
- Remove the dipstick.
- Remove the engine oil dipstick guide bolts (5).
- Put the engine oil dipstick guide (6) to one side.
- Remove the diesel fuel splash plate (7).
- Remove the high pressure pump protector (8).

- Disconnect:
- the heater plugs (9),
- the injectors (10).
- Disconnect the connectors on the high pressure pump (11).
- Protect the alternator from fuel outflow.
- Clean the union (12) on the diesel supply pipe high pressure pump (see 13B, Diesel injection, Diesel injection: Precautions for the repair, 13B-1).
- Disconnect the high pressure pump from:
- the diesel supply pipe,
- the diesel return pipe (13) to the fuel filter.
WARNING
To avoid any corrosion or damage, protect the areas on which fuel is likely to run.
- Fit the appropriate blanking plugs on the high pressure pump and on the pipes.
- Disconnect the diesel supply and return pipes from the injection rail filler neck then move them away from the high pressure pump.
- Disconnect:
- the diesel return pipe (14) on the venturi tube fitted to the high pressure pump,
- the diesel return pipes (15) on the diesel injectors,
- the rail pressure sensor connector (16),
- the accelerometer connector (17),
- the oil level sensor connector (18),
- the cylinder reference sensor (19) connector on the timing cover.
WARNING
To avoid any corrosion or damage, protect the areas on which fuel is likely to run.
- Fit suitable blanking plugs on:
- the Venturi,
- the diesel injectors.
- Unclip and move aside the electric wiring on the injection rail filler neck.
- Remove the filler neck on the injector rail.
- Clean the high pressure pipe unions (20) between the pump and the rail (see 13B, Diesel injection, Diesel injection: Precautions for the repair, 13B-1).
- Remove the high pressure pipe between the pump and the rail and discard it.
WARNING
To avoid any corrosion or damage, protect the areas on which fuel is likely to run.
- Fit suitable blanking plugs on:
- the high pressure pump,
- the injector rail.
- Remove the right-hand suspended engine mounting (see 19D, Engine mounting, Right-hand suspended engine mounting: Removal - Refitting, 19D-22) (19D, Engine mounting).
- Raise the vehicle.
- Remove the engine undertray.
- Remove the engine tie-bar.
- Lower the vehicle.
- Lift the engine a few centimetres using the (Mot.1453).
Note: Do not disconnect the right-hand driveshaft when raising the engine.
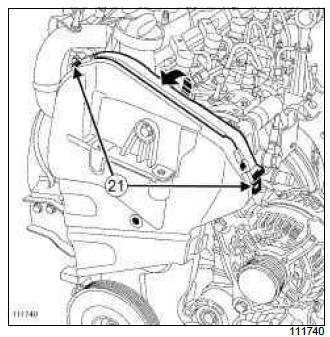
- Unclip the upper timing cover tabs (21).
- Swivel the timing cover in the direction of the arrow.
- Remove the plastic bolt.
- Unclip the three tabs (22).
- Remove the timing cover.
- Remove the suspended mounting from the cylinder head.
III - OPERATION FOR REMOVAL OF PART CONCERNED
First fitting
Second fitting
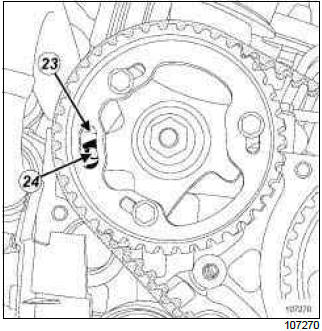
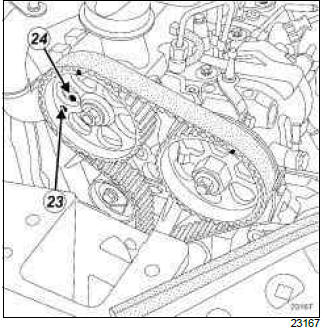
- Position the engine at Top Dead Centre. The camshaft pulley hole (23) should be opposite the cylinder head hole (24).
Note: Never turn the engine against its operating direction.
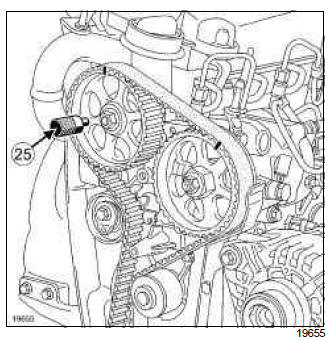
- Insert the (Mot. 1430) (25) in the camshaft pulley hole and in the cylinder head hole to check that the engine operates correctly at top dead centre.
- Remove the (Mot. 1430) once the engine is in position.
- Fit the (Mot. 1606) (26) on the cylinder head.
Note: If necessary, turn the engine slowly to adjust the position of the (Mot. 1606) on the high pressure pump pulley teeth.
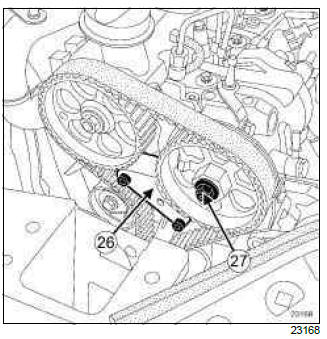
- Immobilise the high pressure pump pulley with a 32 mm spanner then remove the nut (27) from the pulley.

- Fit the (Mot. 1525) (28) with the (Mot. 1525-02) on the high pressure pump pulley.
Note: If necessary, remove the spacer at the end pushrod of the (Mot. 1525) to improve the positioning.
- Screw the (Mot. 1525) pushrod until it makes contact with the high pressure pump shaft.
Note: Check that the (Mot. 1525) pushrod is correctly orientated and is pressing against the high pressure pump shaft. adjust the tool if necessary.
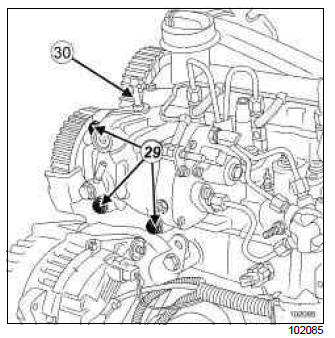
- Remove:
- the bolts (29) from the high pressure pump on the cylinder head,
- the air filter unit bracket (30).
- Gradually screw the pushrod of the (Mot. 1525) until the high pressure pump becomes detached.
Note: Guide and support the high pressure pump with one hand as it is being removed using the (Mot.1525)
- Remove the high pressure pump from the engine compartment.
Note: If the high pressure pump is being reused, keep it in a sealed bag during the removal operation.
- Remove the (Mot. 1525) and (Mot. 1525-02) from the high pressure pump pulley.
REFITTING
I - PRECAUTIONS FOR REPAIR
WARNING
Only remove the blanking plugs from the protected components at the last possible moment.
Also, do not remove the components from their packaging until just before fitting them to the vehicle.
II - PARTS AND CONSUMABLES FOR THE REPAIR
- parts always to be replaced: High pressure pipe between the pump and rail
III - REFITTING OPERATION FOR PART CONCERNED
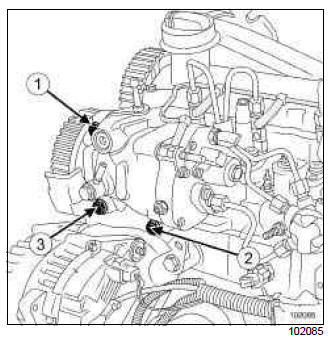
- Check that there is an indexing pin on the high pressure pump shaft.
- Position the high pressure pump on the cylinder head whilst inserting it in its pulley.
Note: Check that the high pressure pump shaft is correctly orientated in relation to the pulley.
- Fit the air filter unit bracket.
- Tighten the high pressure pump bolts until they make contact with the cylinder head.
- Tighten to torque and in order the high pressure pump bolts on the cylinder head (23 N.m).
- Fit the nut on the high pressure pump pulley.
- Torque tighten the high pressure pump pulley nut (55 N.m) holding the high pressure pump pulley with a 32 mm spanner.
Note: Check that the timing belt is operating correctly and in good condition.
- Remove the (Mot. 1606) from the cylinder head.
IV - FINAL OPERATION.
- Position the suspended mounting on the cylinder head.
- Tighten the suspended mounting bolts onto the cylinder head until they make contact.
- Tighten to torque and in order the suspended mounting bolts on the cylinder head (25 N.m).
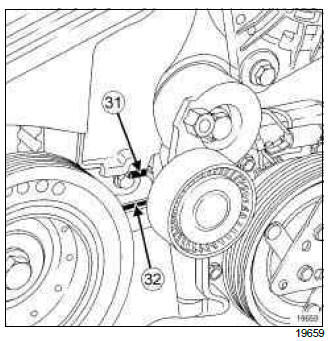
- Refit and clip on the lower timing cover.
Note: Make sure that the tab (31) is positioned opposite the mark (32).
- Refit:
- the plastic bolt on the lower timing cover,
- the cylinder position sensor,
- Torque tighten the camshaft position sensor bolt (8 N.m).
- Refit and clip on the upper timing cover.
- Lower the engine using the (Mot. 1453).
- Fit the right-hand suspended engine mounting with its bolts.
- Tighten the bolts on the straight suspended engine mounting until they make contact.
- Torque tighten the right-hand suspended engine mounting bolts (62 N.m).
- Raise the vehicle.
- Refit the engine tie-bar.
- Torque tighten the engine tie-bar bolts (105 N.m).
- Refit then tighten the protector under the engine.
- Remove tool (Mot. 1453) from the vehicle.
- Lower the vehicle.
WARNING
Before fitting a new high-pressure pipe, lightly lubricate the nut threads with the oil from the applicator provided in the new parts kit.
Be careful not to allow oil into the high-pressure pipe.
Do not lubricate high-pressure pipes supplied without an applicator, as these high-pressure pipes are self-lubricating.
- Remove and discard the blanking plugs on:
- the high pressure pump,
- the injector rail.
- Fit a new high pressure pipe between the pump and the rail.
- Tighten the high pressure pipe unions between the pump and the rail until contact is made.
- Using the (Mot. 1746), tighten to torque:
- the high pressure pipe unions between the pump and the yellow rail (24 N.m),
- the high pressure pipe unions between the pump and the silver rail (28 N.m),
- Refit the neck on the injector rail.
- Clip the wiring to the filler neck on the injector rail.
- Remove and discard the blanking plugs on:
- the Venturi,
- the diesel injectors.
- Connect:
- the cylinder position sensor connector on the timing cover,
- the oil level sensor connector,
- the accelerometer connector,
- the rail pressure sensor connector,
- the diesel return pipes on the fuel injectors,
- the diesel return pipe to the Venturi attached to the high pressure pump.
- Clip the high pressure pump diesel supply and return pipes to the filler neck.
- Remove the blanking plugs from the high pressure pump and the pipes and discard them.
- Connect to the high pressure pump:
- the diesel return pipe to the fuel filter,
- the diesel fuel supply pipe.
- Remove the protection on the alternator to prevent fuel flowing out.
- Connect the electrical connectors to:
- the diesel temperature sensor,
- the flow actuator,
- the injectors,
- of the heater plugs.
- Remove the protection on the inlet opening of the oil level dipstick guide.
- Refit the high pressure pump protection.
- Torque tighten the high pressure pump protection bolts (21 N.m).
- Refit:
- the diesel splash plate cover,
- dipstick guide ,
- the oil dipstick guide nuts,
- the dipstick.
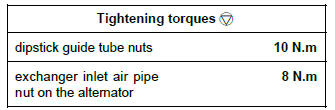
- Torque tighten the dipstick guide tube nuts (10 N.m).
- Refit the inlet duct.
- Connect the inlet air sensor connector.
K9K, and 750 or 766 or 768
- Loosen the intercooler inlet air pipe nut on the alternator.
- Fit the air pipe on the turbocharger outlet and the air pipe on the intercooler inlet.
- Click the turbocharger outlet air pipe on the turbocharger and on the exchanger inlet air pipe.
- Tighten the turbocharger outlet air pipe bolt on the rocker cover.
- Torque tighten the exchanger inlet air pipe nut on the alternator (8 N.m).
- Prime the fuel circuit with the manual priming pump until the disconnected pipes are filled with fuel (automatic degassing).
- Check that there are no fuel leaks.
- Connect the battery (see Battery: Removal - Refitting) (80A, Battery).
- Check the high pressure circuit (see 13B, Diesel injection, High pressure pipe: Check, 13B-99).
- Refit the engine cover.
- Using the diagnostic tool, check for stored faults; deal with these and clear them as necessary.
V - REPLACING THE HIGH PRESSURE PUMP
- If replacing the high pressure pump, reprime the diesel circuit using the Diagnostic tool.
Note: For VDiag numbers before Vdiag 48, it is essential to reprogram the injection computer. If the computer is not reprogrammed, do not apply the procedure described below but prime the circuit using the manual priming pump.
Note: Never start the engine until the pump has been reprimed.
Also comply with the operation instructions provided to prevent the high pressure pump from being damaged internally, due to its running empty and with no diesel lubrication.
- Connect the Diagnostic tool to the vehicle.
- Connect to the diesel injection computer.
- Run command AC212 "NEW PUMP HOUSING FILLING".
- Follow the instructions on the Diagnostic tool until the command is completed.
- Start the engine.
Note: The starting phase can last up to 20 seconds.
- If the engine does not start or if the start-up sequence
is interrupted:
- switch off the ignition,
- wait 30s,
- restart the engine.
- Using the Diagnostic tool, clear any faults stored in the injection computer.
READ NEXT:
 Flow actuator: Removal - Refitting
K9K, and 750 or 752 or 766 or 768
IMPORTANT
Before carrying out any work on the injection system,
check using the Diagnostic tool :
that the injector rail is not under pressure,
that the fuel temp
Venturi: Removal - Refitting
K9K, and 750 or 752 or 766 or 768
IMPORTANT
Before carrying out any work on the injection circuit,
check using the Diagnostic tool
that the injector rail is not under pressure,
that the fuel tempe
Diesel return pipe: Removal - Refitting
K9K, and 764 or 772
IMPORTANT
Consult the safety instructions and cleanliness
advice and the operation recommendations before
carrying out any repairs (see Diesel injection:
Repair precautions).
IMPO
SEE MORE:
M4R
IMPORTANT
To avoid all risk of damage to the systems, apply the safety and
cleanliness instructions and operation recommendations before carrying out any
repair (see Engine: Precautions for the repair).
WARNING
It is strictly forbidden to apply any pressure to the
engine oil sump. Damage to the s
Accessories
Electrical and electronic accessoriesBefore installing
this type of accessory (particularly for transmitters/receivers:
frequency bandwidth, power level, position
of the aerial, etc.), make sure it is compatible with your vehicle. You
can get advice from an authorised dealer.
