Renault Clio: Brake servo non-return valve: Removal - Refitting
LEFT-HAND DRIVE
REMOVAL
I - REMOVAL PREPARATION OPERATION
K4J or K4M or K9K
- Remove the engine cover.
II - OPERATION FOR REMOVAL OF PART CONCERNED
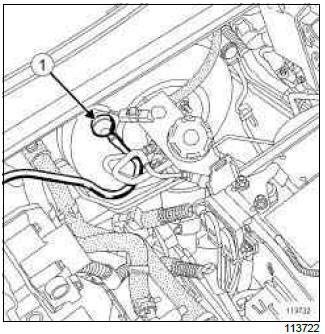
- Disconnect the non-return valve (1) at the servo.
- Pull and turn the non-return valve to release it from the rubber sealing washer.
K9K
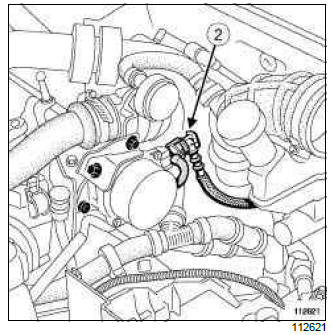
- Disconnect the non-return valve (2) at the vacuum pump.
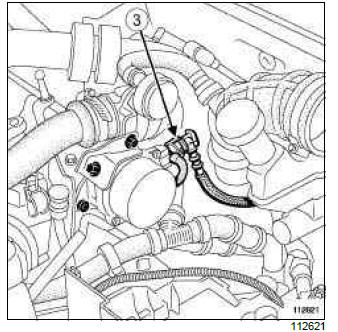
K4J or K4M
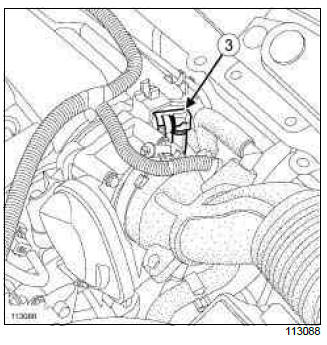
Note: Do not damage the vacuum tube on the plenum chamber. If it is damaged, the plenum chamber will have to be replaced.
- Disconnect the non-return valve (3) at the plenum chamber.
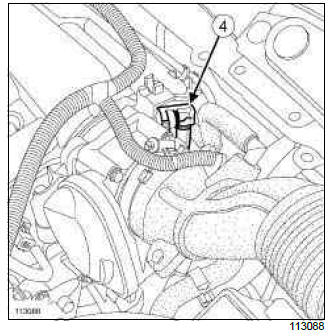
D4F
Note: Do not damage the vacuum tube on the plenum chamber. If it is damaged, the plenum chamber will have to be replaced.
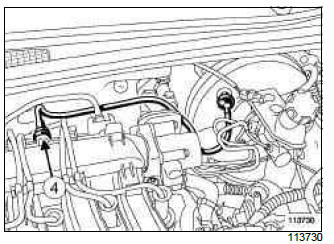
- Disconnect the non-return valve (4) at the inlet manifold.
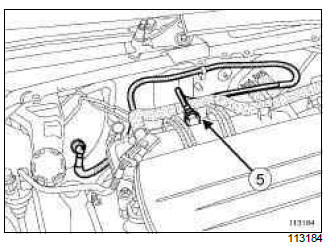
F4R
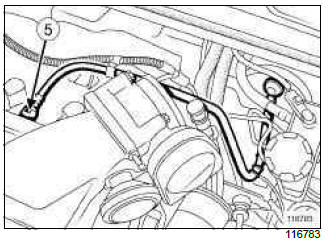
Note: Do not damage the vacuum tube on the plenum chamber. If it is damaged, the plenum chamber will have to be replaced.
- Disconnect the non-return valve (5) at the plenum chamber.
- Remove the non-return valve.
REFITTING
I - REFITTING PREPARATIONS OPERATION
- Check the condition of the sealing washer and the non-return valve.
- Replace any faulty parts.
II - REFITTING OPERATION FOR PART CONCERNED
- Refit the non-return valve.
K9K
- Connect the non-return valve at the vacuum pump,
D4F or F4R or K4J or K4M
- Connect the non-return valve at the inlet manifold.
- Connect the non-return valve on the servo,
III - FINAL OPERATION.
K4J or K4M or K9K
- Refit the engine cover.
RIGHT-HAND DRIVE
REMOVAL
I - REMOVAL PREPARATION OPERATION
K4J or K4M or K9K
- Remove the engine cover.
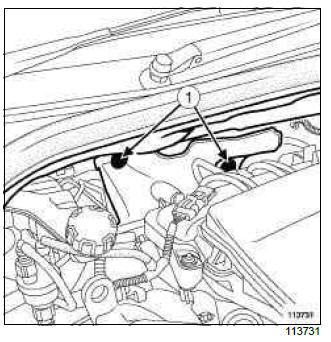
- Remove the soundproofing retaining clips (1).
- lift away the upper section of the soundproofing.
II - OPERATION FOR REMOVAL OF PART CONCERNED
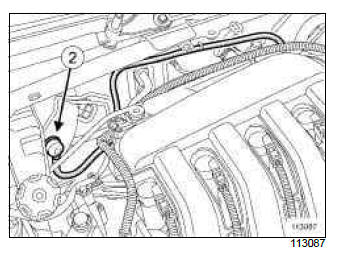
- Disconnect the non-return valve (2) at the servo,
- Pull and turn the non-return valve to release it from the rubber sealing washer.
K9K
- Disconnect the non-return valve (3) at the vacuum pump,
K4J or K4M
Note: Do not damage the vacuum tube on the plenum chamber. If it is damaged, the plenum chamber will have to be replaced.
- Disconnect the non-return valve (4) at the plenum chamber.
D4F
Note: Do not damage the vacuum tube on the plenum chamber. If it is damaged, the plenum chamber will have to be replaced.
- Disconnect the non-return valve (5) at the inlet manifold.
- Remove the non-return valve.
REFITTING
I - REFITTING PREPARATION OPERATION
- Check the condition of the rubber sealing washer and the non-return valve.
- Replace any faulty parts.
II - REFITTING OPERATION FOR PART CONCERNED
- Refit the non-return valve.
K9K
- Connect the non-return valve at the vacuum pump,
D4F or K4J or K4M
- Connect the non-return valve at the inlet manifold.
- Connect the non-return valve at the servo,
III - FINAL OPERATION
- Refit the upper section of the soundproofing.
- Refit the soundproofing retaining clips
K4J or K4M or K9K
- Refit the engine cover.
READ NEXT:
 K4J or K4M or K9K or M4R, and Left-hand Drive
REMOVAL
I - REMOVAL PREPARATION OPERATION
Position the vehicle on a two-post lift (see Vehicle:
Towing and lifting) (MR 392, 02A, Lifting equipment).
Remove:
the battery (see Battery: Remova
K9K, and Right-hand Drive
REMOVAL
I - REMOVAL PREPARATION OPERATION
Position the vehicle on a two-post lift (see Vehicle:
Towing and lifting) (MR 392, 02A, Lifting equipment).
Disconnect the battery (see Battery: Removal
SEE MORE:
Fitting a radio
Radio location 1
Unclip the blanking cover. The aerial, +
and – supply and speaker wire connections
are located behind it.
Door speakers 2
To install any equipment, please consult
an authorised dealer.
In all cases, it is very important to
follow the manufacturer
Heating resistor relays: Removal - Refitting
LEFT-HAND DRIVE
REMOVAL
I - REMOVAL PREPARATION OPERATION
Partially remove seal (1).
Remove the side panel (2).
Remove the bolt (3) from the base of the dashboard.
Unclip the trim piece (4) from the driver's side dashboard
lower cover.
Remove the bolts (5) from the driver's side das
