Renault Clio: Airbag computer: Removal - Refitting
IMPORTANT
To avoid any accidents, make sure you are aware of all risks associated with this operation.
REMOVAL
I - REMOVAL PREPARATION OPERATION
IMPORTANT
It is essential to lock the airbag computer using the Diagnostic tool before starting the removal.
When this function is activated, all the trigger lines are blocked and the airbag warning light on the instrument panel lights up continuously (ignition on).
- Lock the airbag computer (see MR 394 Fault finding, 88C, Airbags and pretensioners, Fault finding - Replacement of components).
- Disconnect the battery (see 80A, Battery, Battery: Removal - Refitting, 80A-1).
- Remove the centre console (see MR 393 Bodywork, 57A, Interior equipment, Centre console: Removal - Refitting).
Note: The seats and carpets do not have to be removed to remove the computer.
II - OPERATION FOR REMOVAL OF PART CONCERNED
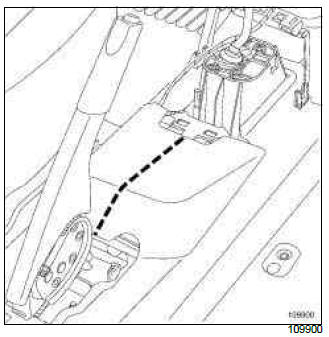
- Cut the carpet between the gear lever and the parking brake as shown in the illustration above.
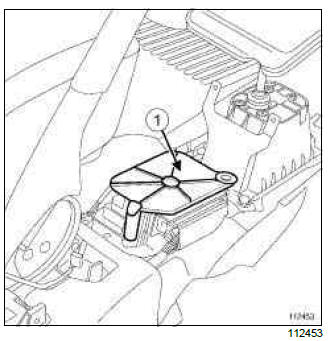
- Remove the protective housing from the computer (1).

- Unclip the connector latch (2).
- Disconnect the connector.
- Remove:
- the mounting nuts (3) from the computer,
- the computer.
REFITTING
I - REFITTING OPERATION FOR PART CONCERNED
- Position the computer.
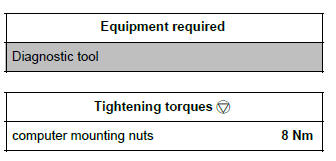
- Torque tighten the computer mounting nuts (8 Nm).
- Connect the connector.
- Replace the computer's protective housing with a new one.
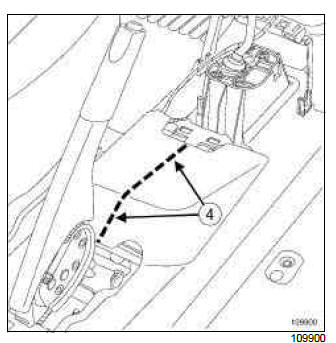
- Attach the carpet at (4) with the clips (part number: 77 01 047 751).
II - FINAL OPERATION.
- Refit the centre console (see MR 393 Bodywork, 57A, Interior equipment, Centre console: Removal - Refitting).
- Connect the battery (see 80A, Battery, Battery: Removal - Refitting, 80A-1).
- If replacing the airbag computer, carry out the necessary operations using the Diagnostic tool (see MR 394 Fault finding, 88C, Airbags and seat belt pretensioners, Fault finding - Replacement of components).
IMPORTANT
Check the airbag computer using the Diagnostic tool. Any failure to follow these instructions may lead to system malfunctions, or even result in the incorrect triggering of the airbags.
- If all is correct, unlock the airbag computer (see MR 394 Fault finding, 88C, Airbags and pretensioners, Fault finding - Replacement of components).
READ NEXT:
 Inhibitor switch: Removal - Refitting
IMPORTANT
Consult the safety and cleanliness advice and operation
recommendations before carrying out any
repair (see 88C, Air bag and Pretensioners, Airbag
and pretensioners: Precautions for the
rep
Front lap belt pretensioner: Removal - Refitting
B85 or K85
IMPORTANT
Consult the safety and cleanliness advice and operation
recommendations before carrying out any
repair (see 88C, Air bag and Pretensioners, Airbag
and pretensioners: Precautions
Front pyrotechnic inertia reel: Removal - Refitting
IMPORTANT
Consult the safety and cleanliness advice and operation
recommendations before carrying out any
repair (see 88C, Air bag and Pretensioners, Airbag
and pretensioners: Precautions for the
rep
SEE MORE:
Driving
The Renault Clio IV (2014-2019) offers a satisfying driving experience with its nimble handling and responsive performance. Its compact size and maneuverability make it well-suited for urban driving and tight parking spaces. The precise steering and suspension tuning provide a balanced and confident
Your comfort
The Renault Clio IV (2014-2019) is designed with your comfort in mind. It features a well-crafted interior with quality materials and thoughtful ergonomics. The seats offer excellent support and adjustability, providing a comfortable driving experience. The cabin is designed to minimize noise and vi
