Renault Clio: Multimedia network interface unit: Removal - Refitting
NAVIGATION AID 1 LEVEL

REMOVAL
I - REMOVAL PREPARATION OPERATION
- When replacing the multimedia network interface unit, carry out the necessary operations using the Diagnostic tool (see Fault finding - Replacement of components) (86C, Multimedia network interface unit).
- Switch off the ignition.
WARNING
To prevent damaging the navigation system, wait 1 minute after switching off the + after ignition feed.
WARNING
Do not press on the screen as this may damage it.
II - OPERATION FOR REMOVAL OF PART CONCERNED

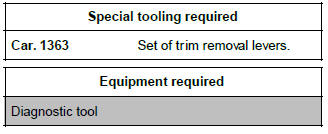
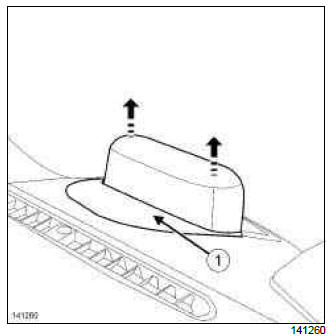
- Unclip the navigation screen upper trim (1) using the tool (Car. 1363).

- Mark the routing of the wiring and the aerials.
WARNING
To ensure correct operation:
- do not pinch the aerial cables,
- do not bend the aerial cables,
- do not force the aerial cables when refitting.
- Mark the position of the aerials on the unit.
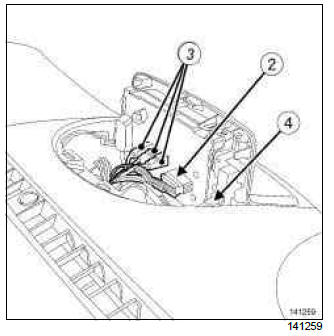
- Disconnect:
- the connector (2) of the navigation screen,
- the aerials (3) on the navigation screen,
- the connector (4) of the seat belt reminder warning light.

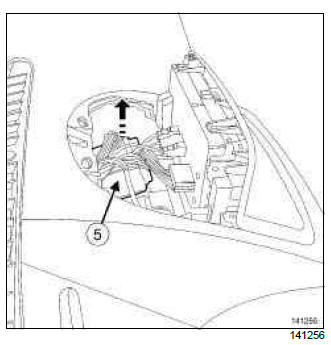
- Unclip the multimedia network interface unit (5) from the navigation screen support.
- Remove the multimedia network interface unit.
- Disconnect the multimedia network interface unit connector.
REFITTING
I - REFITTING OPERATION FOR PART CONCERNED
- Connect the multimedia network interface unit connector
- Fit the multimedia network interface unit.
- Clip on the multimedia network interface unit.
- Connect:
- the connector of the navigation screen,
- the aerials on the navigation screen in the position marked during removal,
- the connector of the seat belt reminder warning light.
- Refit the wiring in the position marked during removal.
WARNING
To ensure correct operation:
- do not pinch the aerial cables,
- do not bend the aerial cables,
- do not force the aerial cables when refitting.
- Clip on the navigation screen upper trim.
II - FINAL OPERATION
- Switch on the ignition
- Check the operation of the seat belt warning light.
- Check the operation of navigation system, if the satellites can be accessed.
- When replacing the multimedia network interface unit, carry out the necessary operations using the Diagnostic tool (see Fault finding - Replacement of components) (86C, Multimedia network interface unit).
Navigation screen: Removal - Refitting
NAVIGATION AID 1
The navigation screen is located in the offset radio display.
It is not sold separately.
REMOVAL
OPERATION FOR REMOVAL OF PART CONCERNED
- Remove the radio display (see 86A, Radio, Display: Removal - Refitting, 86A-18).
REFITTING
REFITTING OPERATION FOR PART CONCERNED
- Refit the radio display (see 86A, Radio, Display: Removal - Refitting, 86A-18).
Navigation aerial: Removal - Refitting
NAVIGATION AID 1
The navigation aerial is the same as the radio aerial.
REMOVAL
OPERATION FOR REMOVAL OF PART CONCERNED
- Remove the radio aerial (see 86A, Radio, Radio aerial: Removal - Refitting, 86A-11).
REFITTING
REFITTING OPERATION FOR PART CONCERNED
- Refit the radio aerial (see 86A, Radio, Radio aerial: Removal - Refitting, 86A-11).

