Renault Clio: Rear brake cylinder: Removal - Refitting
DRUM BRAKE
REMOVAL
I - REMOVAL PREPARATION OPERATION
- Put the vehicle on a two-post lift (see Vehicle: Towing and lifting).
- Release the parking brake.
- Remove:
- the rear wheels (see 35A, Wheels and tyres, Wheel: Removal - Refitting, 35A-1),
- the brake drum (see 33A, Rear axle components, Rear brake drum: Removal - Refitting, 33A-19).
II - OPERATION FOR REMOVAL OF PART CONCERNED
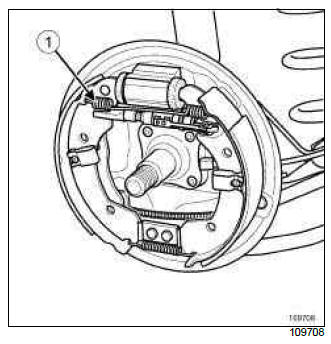
- Remove the upper return spring (1) using brake shoe pliers.
- Separate the shoes.
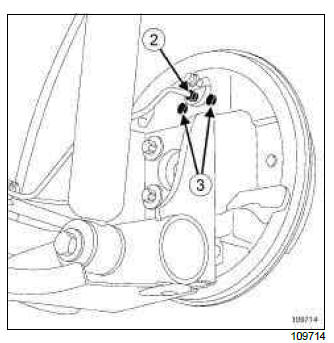
- Unscrew the rigid pipe union (2) from the brake cylinder (be prepared for brake fluid running out).
- Fit a cap on the brake pipe union.
- Remove:
- the cylinder mounting bolts (3) on the backplate,
- the brake cylinder.
REFITTING
I - REMOVAL PREPARATION OPERATION
- Remove any dust from the drums and flanges using a brake cleaner.
- Check the condition of the brake cylinder boots and pistons (replace any faulty parts).
II - OPERATION FOR REFITTING PART CONCERNED
- Refit:
- the brake cylinder,
- the cylinder mounting bolts on the backplate,
- the rigid pipe union on the brake cylinder,
- the upper return spring using brake shoe pliers.
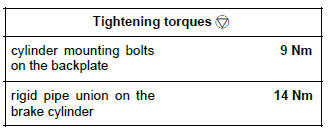
- Tighten to torque:
- the cylinder mounting bolts on the backplate (9 Nm),
- the rigid pipe union on the brake cylinder (14 Nm).
III - FINAL OPERATION
- Refit:
- the brake drum (see 33A, Rear axle components, Rear brake drum: Removal - Refitting, 33A-19),
- the rear wheels (see 35A, Wheels and tyres, Wheel: Removal - Refitting, 35A-1).
- Bleed the brake circuit (see 30A, General information, Braking circuit: Bleed, 30A-4).
- Adjust the brake shoes by pressing the brake pedal repeatedly.
Rear brake drum: Removal - Refitting

- When replacing a brake drum, it is essential to replace the drum on the opposite side as well.
- Always replace the brake pads if the brake drums are being replaced.
IMPORTANT
The two brake drums must be of the same diameter.
If one drum is reground, the other also must be reground. The maximum diameter is etched on the drum.
REMOVAL
I - REMOVAL PREPARATION OPERATION
- Position the vehicle on a two-post lift (see Vehicle: Towing and lifting).
- Release the parking brake.
- Remove the rear wheels (see 35A, Wheels and tyres, Wheel: Removal - Refitting, 35A-1).
II - OPERATION FOR REMOVAL OF PART CONCERNED
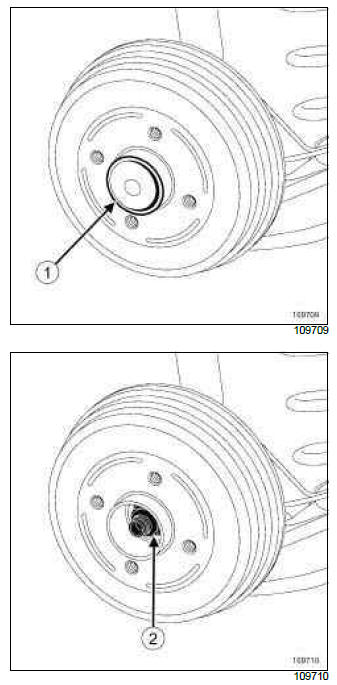
- Remove:
- the drum caps (1),
- the drum nuts (2),
- the brake drums.
REFITTING
I - REMOVAL PREPARATION OPERATION
- Check the internal diameter of the drum.
- Replace any faulty parts.
- Clean:
- the brake linings,
- the brake drums.
- the stub axle.
II - REFITTING OPERATION FOR PART CONCERNED
Adjust the parking brake if the lever stops between the first and second position of the parking brake lever's travel (see 37A, Mechanical component controls, Parking brake lever: Adjustment, 37A-90).
- Refit:
- the brake drums.
- the drum nuts,
- the drum caps,
- Torque tighten the drum nut (175 N.m).
III - FINAL OPERATION
- Refit the rear wheels (see 35A, Wheels and tyres, Wheel: Removal - Refitting, 35A-1).
- Adjust the brake pads by depressing the brake pedal repeatedly.
Rear brake drum: Description

I - PREPARATION OPERATION FOR CHECK
Position the vehicle on a two-post lift (see Vehicle: Towing and lifting) (02A, Lifting equipment).
Remove:
- the rear wheel (see 35A, Wheels and tyres, Wheel: Removal - Refitting, 35A-1),
- the rear brake drum (see 33A, Rear axle components, Rear brake drum: Removal - Refitting, 33A-19).
II - CHECKING OPERATION FOR PART CONCERNED
Note: To check the internal diameter of the drum, use a sliding calliper type tool for drums.
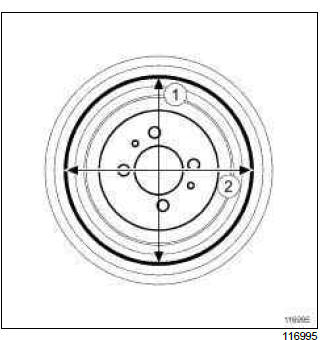
Position the sliding calliper to measure the internal diameters of the brake drum.
Measure the interior diameters of the brake drum on the perpendicular axes (1) and (2).
Compare the values with those recommended by the manufacturer (see 30A, General information, Brake: Specifications, 30A-9).
III - FINAL OPERATION
Replace the rear drums if necessary (see 33A, Rear axle components, Rear brake drum: Removal - Refitting, 33A-19).
Refit the rear wheel (see 35A, Wheels and tyres, Wheel: Removal - Refitting, 35A-1).

