Renault Clio: Card reader: Removal - Refitting
Renault Clio III (2005-2013) Service Manual / Electrical Equipment / Engine Immobiliser / Card reader: Removal - Refitting
VEHICLE WITH CARD
REMOVAL
I - REMOVAL PREPARATION OPERATION
- Remove the centre console (see Centre console: Removal - Refitting) (MR 393, 57A, Interior equipment).
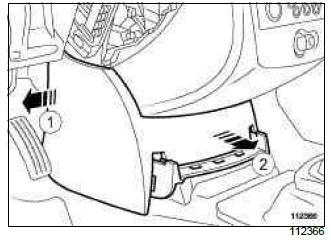
- Unclip the trim at (1) and (2).
RADIO NO. 01 or RADIO NO. 02 or RADIO NO.03 or RADIO NO. 04 or RADIO NO. 05 or RADIO NO.06
- Remove the radio (see 86A, Radio, Radio: Removal - Refitting, 86A-8).
NAVIGATION AID 1
- Remove the radio navigation system (see 83C, On-board telematics system, Radio navigation: Removal - Refitting, 83C-3).
WITHOUT NAVIGATION AID, and VEHICLE WITHOUT RADIO
- Unclip the glovebox using the (Car. 1363).
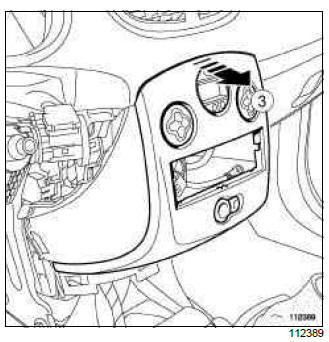
- Unclip the centre front panel at (3).
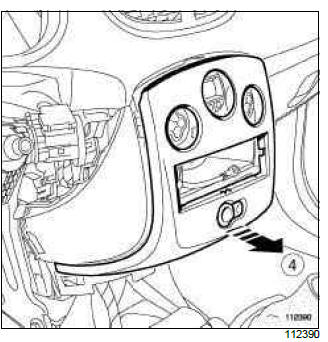
- Unclip the centre front panel at (4).
- Disconnect the connectors.
II - REMOVAL OPERATION FOR THE PART CONCERNED
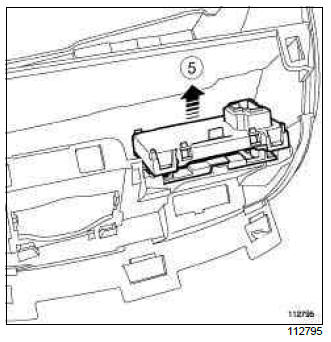
- Lift up the card reader at the rear section (5).
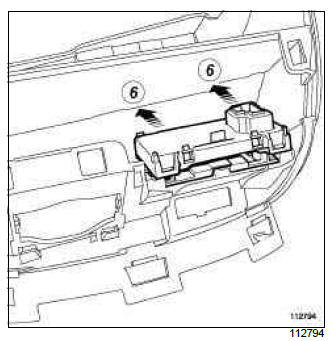
- Remove the card reader at (6).
REFITTING
I - REFITTING OPERATING FOR THE PART CONCERNED
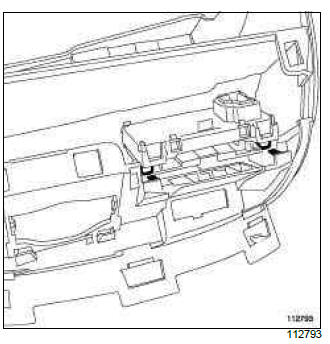
- Insert the card reader along the guides.
- Clip on the card reader.
II - FINAL OPERATION.
- Connect the centre front panel connectors.
- Clip in the centre front panel beginning with the lower section.
RADIO NO. 01 or RADIO NO. 02 or RADIO NO. 03 or RADIO NO. 04 or RADIO NO. 05 or RADIO NO.06
- Refit the radio (see 86A, Radio, Radio: Removal - Refitting, 86A-8).
NAVIGATION AID 1
- Refit the radio navigation system (see 83C, On-board telematics system, Radio navigation: Removal - Refitting, 83C-3).
WITHOUT NAVIGATION AID, and VEHICLE WITHOUT RADIO
- Clip the glovebox in position.
- Clip the trim under the centre front panel.
- Refit the centre console (see Centre console: Removal - Refitting) (MR 393, 57A, Interior equipment).
Horn
Audible warning: Removal - Refitting
REMOVAL
I - REMOVAL PREPARATION OPERATION
- Remove the front bumper (see Front bumper: Removal - Refitting) (MR 393, 55A, Exterior protection).
II - OPERATION FOR REMOVAL OF PART CONCERNED
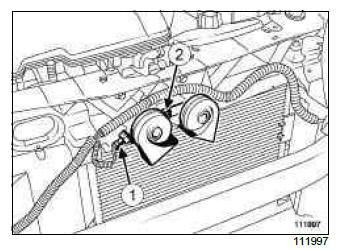
- Disconnect the connector (1).
- Remove:
- the bolt (2),
- the horn.
REFITTING
I - REFITTING OPERATION FOR PART CONCERNED
- Refit the horn.
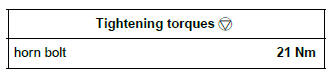
- Torque tighten the horn bolt (21 Nm) (2).
- Connect the connector (1).
II - FINAL OPERATION.
- Refit the front bumper (see Front bumper: Removal - Refitting) (MR 393, 55A, Exterior protection).
READ NEXT:
 Instrument Panel
Clock: Before/after repair procedure
SETTING THE CLOCK
WITHOUT NAVIGATION AID, and RADIO NO. 01
or RADIO NO. 02 or RADIO NO. 03 or RADIO NO.
04 or RADIO NO. 05 or RADIO NO. 06 or RADIO
NO. 07 or RADIO
Navigation: List and location of components
NAVIGATION AID 1 LEVEL or NAVIGATION AID 1
I - LIST OF COMPONENTS
The "navigation" equipment consists of:
a navigation aerial (see 86A, Radio, Radio aerial:
Removal - Refitting, 86A-11)
NAVIGATION
SEE MORE:
Turbocharging: Precautions for the repair
D4F or K9K
I - TURBOCHARGER: GENERAL INSTRUCTIONS
For the turbocharging pressure regulator check (see
Fault finding - Tests) (Technical Note 3419A, 12B,
Turbocharging).
WARNING
The turbocharger pressure regulator rod must not
be adjusted.
II - TURBOCHARGER CIRCUIT DIAGRAM
Air filter unit
Air fl
Turbocharger: Removal - Refitting
K9K, and 750 or 752 or 764 or 766 or 768
REMOVAL
I - REMOVAL PREPARATION OPERATION
Position the vehicle on a two-post lift (see Vehicle:
Towing and lifting) (MR 392, 02A, Lifting equipment).
Remove:
the engine cover,
the battery (see Battery: Removal - Refitting)
(MR 392, 80A, Battery),
© 2016-2026 Copyright Renault Clio Owners Club - 0.0039
