Renault Clio: Instrument Panel
Clock: Before/after repair procedure
SETTING THE CLOCK
WITHOUT NAVIGATION AID, and RADIO NO. 01 or RADIO NO. 02 or RADIO NO. 03 or RADIO NO. 04 or RADIO NO. 05 or RADIO NO. 06 or RADIO NO. 07 or RADIO NO. 08
- Switch on the ignition.
- Switch the radio on.
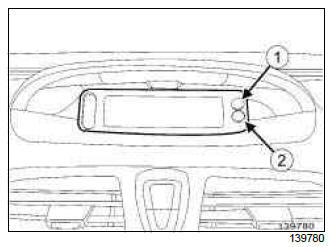
- Adjusting the hour: press button (1) to obtain the correct value.
- Adjusting the minutes: press button (2) to obtain the correct value.
Note: Pressing and holding enables the values to be scrolled through more quickly.
WITHOUT NAVIGATION AID, and RADIO NO. 07 or RADIO NO. 08
- Switch on the ignition.
- Switch the radio on.
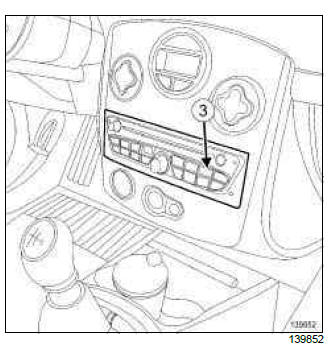
- Press the " SETTINGS " button (3).
- Using the central button, select " System settings " in the central display.
- Confirm the operation by pressing the OK button or the right-hand arrow.
- Using the central button, select " Clock " in the central display.
- Confirm the operation by pressing the OK button or the right-hand arrow.
- Two groups of values appear on the display.
- Setting the hour: turn the central button towards the right or left to obtain the correct value.
Note: The hour can also be set by pressing on the + or - buttons on the steering column switch.
- To move on to setting the minutes, press the " RIGHT " button on the radio or the " RIGHT " button on the steering column switch.
- Adjusting the minutes: turn the central button towards the right or left to obtain the correct value.
Note: The minutes can also be set by pressing the + or - buttons on the steering column switch.
- To go back to setting the hour, press the " LEFT " button on the radio or the " LEFT " button on the steering column switch.
NAVIGATION AID 1 LEVEL or NAVIGATION AID 1
- The time is set through the navigation system.
As soon as the system detects the satellites, the time is automatically displayed.
Instrument panel: Removal - Refitting
REMOVAL
I - REMOVAL PREPARATION OPERATION
- If replacing the instrument panel, carry out the necessary operations using the Diagnostic tool (see Fault finding - Replacement of components) (MR 394, 83A, Instrument panel).
II - OPERATION FOR REMOVAL OF PART CONCERNED
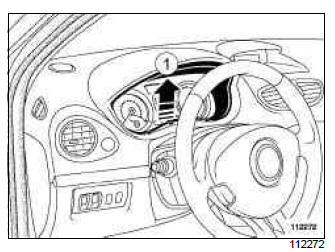
- Unclip the lower section of trim (1).
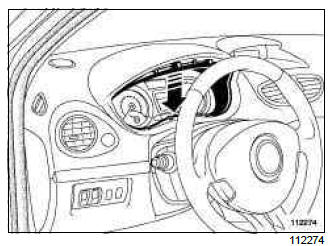
- Unclip the upper trim.
- Remove the trim.
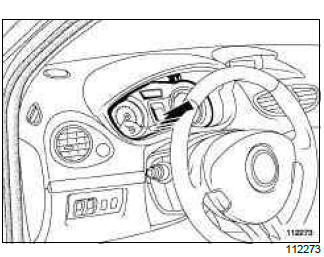
- Unclip instrument panel at.
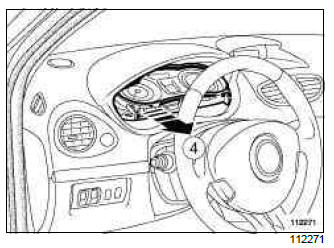
- Remove the instrument panel (4).
- Disconnect the connectors.
REFITTING
I - REFITTING OPERATION FOR PART CONCERNED
- Connect the connectors to the instrument panel.
- Clip on:
- the upper section of the instrument panel,
- the lower section of the instrument panel,
- the instrument panel frame trim.
II - FINAL OPERATION
- If replacing the instrument panel, carry out the necessary operations using the Diagnostic tool (see Fault finding - Replacement of components) (MR 394, 83A, Instrument panel).
Instrument panel: Before/after repair procedure
Note: The oil change interval must only be reinitialised after a service in accordance with the maintenance booklet.
REINITIALISING THE DISPLAY AFTER A SERVICE IN ACCORDANCE WITH THE MAINTENANCE PROGRAMME
- Switch on the ignition.
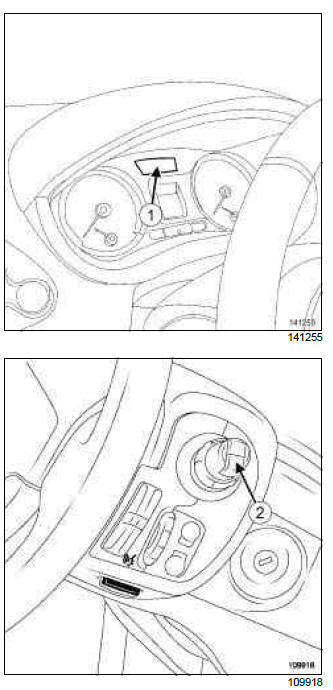
- Select the " OIL CHANGE INTERVAL " information on the display (1) by pressing the " Trip computer scroll " button (2).
- Keep the button (2) pressed for 10 seconds :
- the value on the display flashes 4 times,
- the value is replaced by the reinitialised oil change interval value,
- this new value flashes 4 times.
- Release the " Trip computer scroll " button (2).
The value illuminates continuously and is stored.
- Switch off the ignition.
Vehicle speed management unit: Removal - Refitting
WITHOUT ANTI-LOCK BRAKING SYSTEM
REMOVAL
I - REMOVAL PREPARATION OPERATION
- Remove the centre console (see Centre console: Removal - Refitting) (MR 393, 57A, Interior equipment).
II - OPERATION FOR REMOVAL OF PART CONCERNED

- Cut the carpet under the centre console at (1).
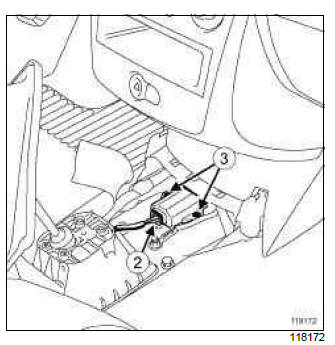
- Disconnect the vehicle speed management unit connector (2).
- Remove:
- the bolts (3) from the vehicle speed management unit,
- the vehicle speed management unit.
REFITTING
I - REFITTING OPERATION FOR PART CONCERNED
- Refit:
- the vehicle speed management unit,
- the vehicle speed management unit bolts.
- Torque tighten the vehicle speed management unit bolts (12 Nm).
- Connect the vehicle speed management unit connector.
- Attach the carpet using clips (part no. 77 01 047 751).
II - FINAL OPERATION.
- Refit the centre console (see Centre console: Removal - Refitting) (MR 393, 57A, Interior equipment).
READ NEXT:
 Navigation: List and location of components
NAVIGATION AID 1 LEVEL or NAVIGATION AID 1
I - LIST OF COMPONENTS
The "navigation" equipment consists of:
a navigation aerial (see 86A, Radio, Radio aerial:
Removal - Refitting, 86A-11)
NAVIGATION
Navigation computer: Removal - Refitting
NAVIGATION AID 1 LEVEL
REMOVAL
I - REMOVAL PREPARATION OPERATION
If the "computer - navigation screen" is being replaced,
carry out the necessary operations using the
Diagnostic tool (see Fault f
SEE MORE:
Driving
The Renault Clio IV (2014-2019) offers a satisfying driving experience with its nimble handling and responsive performance. Its compact size and maneuverability make it well-suited for urban driving and tight parking spaces. The precise steering and suspension tuning provide a balanced and confident
Your comfort
The Renault Clio IV (2014-2019) is designed with your comfort in mind. It features a well-crafted interior with quality materials and thoughtful ergonomics. The seats offer excellent support and adjustability, providing a comfortable driving experience. The cabin is designed to minimize noise and vi
