Renault Clio: Clutch pedal switch: Removal - Refitting
Renault Clio III (2005-2013) Service Manual / Chassis / Mechanical Component Controls / Clutch pedal switch: Removal - Refitting
JH3 or JR5 or TL4, and CRUISE CONTROL - JH3 or JR5 or TL4, and VEHICLE WITH CARD
REMOVAL
I - REMOVAL PREPARATION OPERATION
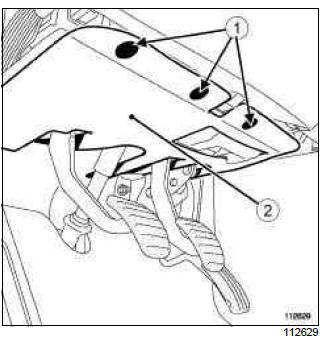
- Remove:
- the driver side dashboard lower trim clips (1),
- the driver side dashboard lower trim (2).
II - OPERATION FOR REMOVAL OF PART CONCERNED
CRUISE CONTROL
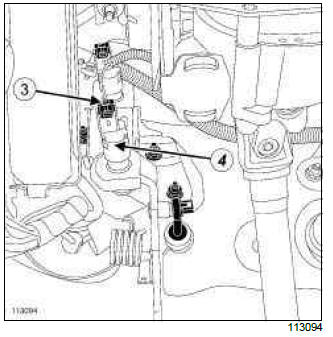
- Disconnect the clutch switch connector (3).
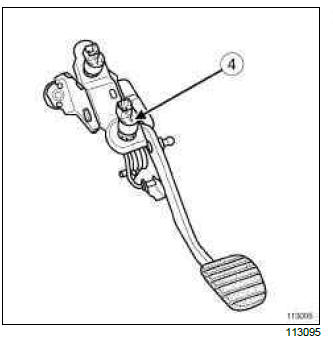
- Turn the clutch switch (4) one quarter of a turn anticlockwise.
- Remove the clutch switch (4).
VEHICLE WITH CARD
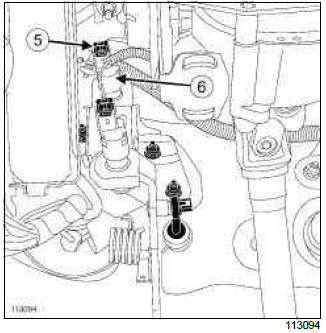
- Disconnect the clutch switch connector (5).
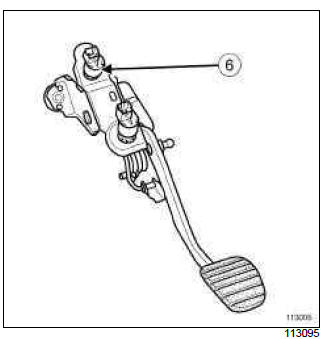
- Turn the clutch switch (6) one quarter of a turn anticlockwise.
- Remove the clutch switch (6).
REFITTING
I - REFITTING PREPARATION OPERATION
WARNING
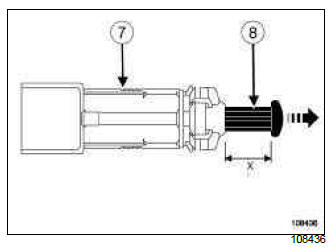
To avoid damaging the clutch switch (7) :
- handle the switch with care,
- only activate the piston during the adjustment phase,
- do not perform more than 3 adjustments to dimension (X),
- do not separate the piston from the switch.
Replace the switch:
- if the piston is separated from the switch
- if more than 3 consecutive adjustments to dimension (X) have been performed.
- Measure dimension (X) of the piston (8). If dimension (X) is less than 21 mm, carefully pull on the end of the piston to adjust the dimension (X) between 21 mm minimum and 23 mm maximum.
II - REFITTING OPERATION FOR PART CONCERNED
CRUISE CONTROL
- Depress the clutch pedal by hand.
- Position the clutch pedal on the pedal assembly.
- Lock the clutch switch by turning it a quarter of a turn clockwise.
- At the same time, carefully return the clutch pedal.
Note: The clutch pedal switch has an automatic adjustment feature, adapting to the pedal position.
The automatic adjustment makes a clicking noise when in operation.
- Connect clutch switch connector.
VEHICLE WITH CARD
- Position the clutch pedal on the pedal assembly.
- Lock the clutch switch by turning it a quarter of a turn clockwise.
- Carefully depress the clutch pedal.
Note: The clutch pedal switch has an automatic adjustment feature, adapting to the pedal position.
The automatic adjustment makes a clicking noise when in operation.
- Connect clutch switch connector.
III - FINAL OPERATION.
- Refit the driver side dashboard lower trim.
READ NEXT:
 Clutch circuit: Bleed
JH3 or JR5 or TL4
Bleed in the event of:
dead travel,
pedal at mid-travel,
pedal to the floor,
poor gear changing.
I - PRECAUTIONS DURING REPAIR
Risks relating to contamination.
The hydraulic c
Clutch master cylinder: Removal - Refitting
LEFT-HAND DRIVE
REMOVAL
I - REMOVAL PREPARATION OPERATION
K4J or K4M or K9K
Remove:
the battery (see Battery: Removal - Refitting),
the air filter box (see Air filter unit: Removal - Refitting).
Clutch circuit: Removal - Refitting
JH3 or JR5
Note:
Each time an operation is carried out on the
hydraulic clutch system, bleed the circuit:
between the reservoir and the bleed hole,
between the bleed hole and the clutch release
be
SEE MORE:
Driving
The Renault Clio IV (2014-2019) offers a satisfying driving experience with its nimble handling and responsive performance. Its compact size and maneuverability make it well-suited for urban driving and tight parking spaces. The precise steering and suspension tuning provide a balanced and confident
Your comfort
The Renault Clio IV (2014-2019) is designed with your comfort in mind. It features a well-crafted interior with quality materials and thoughtful ergonomics. The seats offer excellent support and adjustability, providing a comfortable driving experience. The cabin is designed to minimize noise and vi
© 2016-2026 Copyright Renault Clio Owners Club - 0.0052
