Renault Clio: Expansion valve: Removal - Refitting
AIR CONDITIONING or CLIMATE CONTROL
IMPORTANT
To avoid all risk of damage to the systems, apply the safety and cleanliness instructions and operation recommendations before carrying out any repair:
- (see 62A, Air conditioning, Air conditioning: Precautions for the repair, 62A-1),
- (see Vehicle: Precautions for the repair) (01D, Mechanical introduction).
REMOVAL
I - REMOVAL PREPARATION OPERATION
- Drain the refrigerant circuit using the refrigerant charging station (see 62A, Air conditioning, Refrigerant circuit: Draining - Filling, 62A-10).
- Disconnect the battery (see Battery: Removal - Refitting) (80A, Battery).
- Remove:
- the engine cover,
- the windscreen wiper arms (see Windscreen wiper arm: Removal - Refitting) (85A, Wiping - Washing),
- the scuttle panel grille (see Scuttle panel grille: Removal - Refitting) (56A, Exterior equipment),
- the scoop under the scuttle panel grille (see Scoop under the scuttle panel grille: Removal - Refitting) (56A, Exterior equipment).
- Remove the mountings from the bulkhead soundproofing.
- Lift away the bulkhead soundproofing.
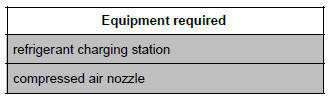
- Remove the bolts (1) from the expansion valve connecting pipes.
- Remove the connecting pipes from the expansion valve.
WARNING
In order to avoid any refrigerant leaks, do not damage (deform, twist, etc.) the pipe.
- Plug the openings of the connecting pipes and expansion valve.
WARNING
To prevent moisture from entering the system, place plugs on the cold loop components which are open to the air.
Note: Use blanking plugs for the fuel circuits with part no. 77 01 208 229 or 77 01 476 857 to plug any openings exposed to the open air. They must be clean. Do not use any which have already been used to plug a fuel circuit.
II - OPERATION FOR REMOVAL OF PART CONCERNED
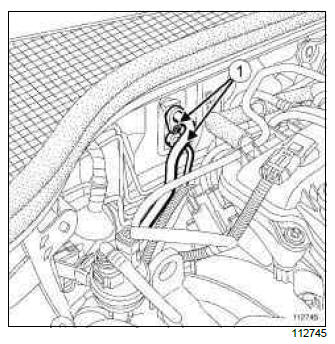
- Remove:
- the bolts (2) from the expansion valve,
- the expansion valve.
WARNING
Do not lose the bolt when removing it: if the bolt falls into the engine compartment, it will generate a noise which will be heard by the customer. The engine will need to be removed in order to recover the bolt.
REFITTING
I - REFITTING PREPARATION OPERATION
WARNING
Do not remove the blanking plugs from each component until the last moment.
Also, do not remove the components from their packaging until they are to be fitted to the vehicle.
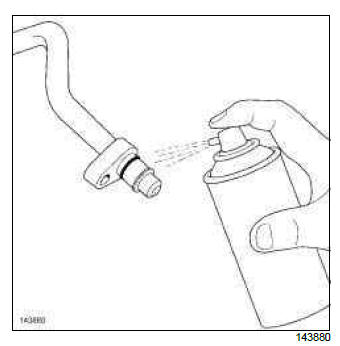
- Clean the surface and seal of the pipe using ENGINE CLEANER (see Vehicle: Parts and consumables for the repair) (04B, Consumables - Products).
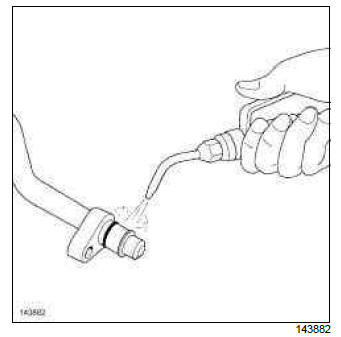
- Use a compressed air nozzle to blow on the surface and the seal of the connecting pipe.
- Lubricate the surface of the connecting pipe and the seal with air conditioning oil (see 62A, Air conditioning, Air conditioning: Parts and consumables for the repair, 62A-2).
- Remove the blanking plugs.
II - REFITTING OPERATION FOR PART CONCERNED
- Refit:
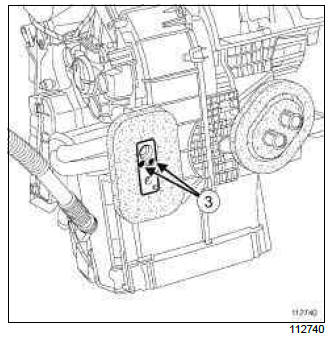
- the expansion valve,
- the expansion valve bolts (3) on the distribution unit.
Note: Gradually retighten the expansion valve mounting bolts so that the expansion valve is uniformly positioned on the air conditioning pipes.
- Tighten the expansion valve bolts.
III - FINAL OPERATION
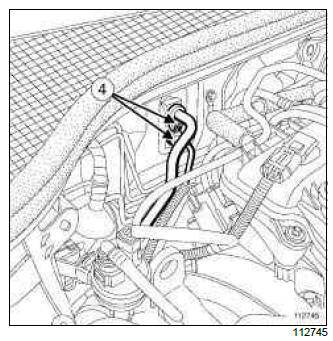
- Fit the expansion valve connecting pipes.
- Refit the expansion valve connecting pipe bolts (4).
- Tighten the connecting pipe bolts.
- Fit the bulkhead soundproofing.
- Connect the battery (see Battery: Removal - Refitting) (80A, Battery).
- Fill up the refrigerant circuit using the refrigerant charging station (see 62A, Air conditioning, Refrigerant circuit: Draining - Filling, 62A-10).
Note: A summary table gives the quantities of refrigerant in the system according to the engine type (see 62A, Air conditioning, Air conditioning: Parts and consumables for the repair, 62A-2).
- Check that the air conditioning system is operating correctly (see 62A, Air conditioning, Air conditioning: Check, 62A-6).
- Check for leaks (see 62A, Air conditioning, Refrigerant circuit: Check, 62A-9).
- Refit:
- the bulkhead soundproofing mountings,
- the scoop under the scuttle panel grille (see Scoop under the scuttle panel grille: Removal - Refitting) (56A, Exterior equipment),
- the scuttle panel grille (see Scuttle panel grille: Removal - Refitting) (56A, Exterior equipment),
- the windscreen wiper arms (see Windscreen wiper arm: Removal - Refitting) (85A, Wiping - Washing),
- the engine cover.
READ NEXT:
 Evaporator: Removal - Refitting
AIR CONDITIONING or CLIMATE CONTROL
Note:
The evaporator is supplied already assembled in
the distribution unit. (1)
REMOVAL
OPERATION FOR REMOVAL OF PART
CONCERNED
Remove the distribution unit (se
Expansion valve - intermediate pipe connecting pipe at the expansion valve outlet: Removal -
Refitting
F4R or K9K or M4R, and AIR CONDITIONING or CLIMATE CONTROL
IMPORTANT
To avoid all risk of damage to the systems, apply
the safety and cleanliness instructions and operation
recommendations before car
Dehydrator reservoir - expansion valve connecting pipe: Removal - Refitting
AIR CONDITIONING or CLIMATE CONTROL
IMPORTANT
To avoid all risk of damage to the systems, apply
the safety and cleanliness instructions and operation
recommendations before carrying out any
repair:
SEE MORE:
Driving
The Renault Clio IV (2014-2019) offers a satisfying driving experience with its nimble handling and responsive performance. Its compact size and maneuverability make it well-suited for urban driving and tight parking spaces. The precise steering and suspension tuning provide a balanced and confident
Your comfort
The Renault Clio IV (2014-2019) is designed with your comfort in mind. It features a well-crafted interior with quality materials and thoughtful ergonomics. The seats offer excellent support and adjustability, providing a comfortable driving experience. The cabin is designed to minimize noise and vi
