Renault Clio: Flow control solenoid valve: Removal - Refitting
DP0

Do not drain or remove the automatic gearbox in order to remove the flow control solenoid valve
REMOVAL
I - REMOVAL PREPARATION OPERATION
- Place the vehicle on a two-post lift (see 02A, Lifting equipment, Vehicle: Towing and lifting).
- Disconnect the battery (see 80A, Battery, Battery: Removal - Refitting).
- Remove:
- the front left-hand wheel (see 35A, Wheels and tyres, Wheel: Removal - Refitting).
- the front left-hand wheel arch liner (see MR 393, Bodywork, 55A, Exterior Protection, Wheel arch liner: Removal - Refitting).
- the battery tray (see 80A, Battery, Battery tray: Removal - Refitting).
- the air filter unit (see 12A, Fuel mixture, Air filter unit), Removal - Refitting).

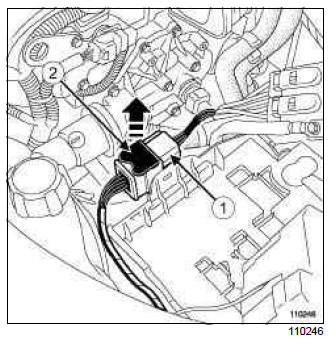
- Disconnect the modular connector (1) by pulling the connector sliding latch (2).
II - OPERATION FOR REMOVAL OF PART CONCERNED

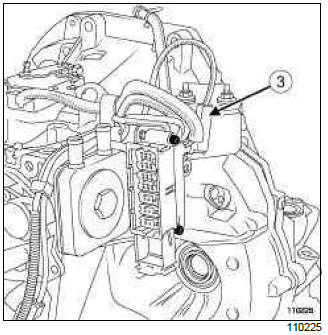
- Disconnect the flow control solenoid valve connector (3).
- Unclip the flow control solenoid valve connector (3) from the gearbox connector support.
- Release the flow control solenoid valve wiring harness from the automatic transmission wiring duct.

- Remove:
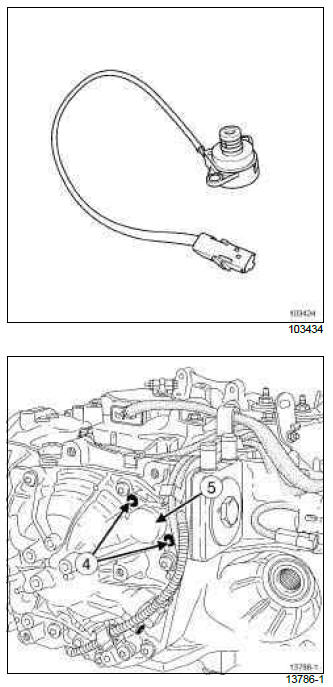
- the solenoid valve mounting bolts (4),
- the heat exchanger flow control solenoid valve (5).
REFITTING
I - REFITTING OPERATION FOR PART CONCERNED
- Refit the heat exchanger flow control solenoid valve.
- Tighten to torque the heat exchanger flow control solenoid valve mounting bolt (10 Nm).
- Clip the flow control solenoid valve connector to the gearbox connector support.
- Connect the flow control solenoid valve connector.
II - FINAL OPERATION
- Connect the modular connector by pushing the sliding latch.
- Refit:
- the air filter unit (see 12A, Fuel mixture, Air filter unit), Removal - Refitting).
- the battery tray (see 80A, Battery, Battery tray: Removal - Refitting).
- the front left-hand wheel arch liner (see MR 393, Bodywork, 55A, Exterior Protection, Wheel arch liner: Removal - Refitting).
- the front left-hand wheel (see 35A, Wheels and tyres, Wheel: Removal - Refitting).
- Connect the battery (see 80A, Battery, Battery: Removal - Refitting).
- Check the gearbox oil level (see 23A, Gearbox oil: Draining - Filling).
Hydraulic distributor solenoid valves: Removal - Refitting
DP0
WARNING
Work as cleanly as possible to prevent foreign bodies from entering the system.
REMOVAL
I - REMOVAL PREPARATION OPERATION
- Remove the hydraulic distributor (see 23A, Automatic gearbox, Hydraulic distributor: Removal - Refitting, 23A-34).
II - OPERATION FOR REMOVAL OF PART CONCERNED

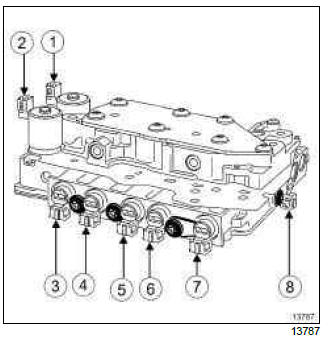
- Modulating solenoid valve
- " Lock up " solenoid valve (lockup converter)
- Sequence solenoid valve 4
- Sequence solenoid valve 3
- Sequence solenoid valve 1
- Sequence solenoid valve 2
- Sequence solenoid valve 6
- Sequence solenoid valve 5
- Remove the hydraulic distributor solenoid valves.
REFITTING
I - REFITTING OPERATION FOR PART CONCERNED
- Refit the hydraulic distributor solenoid valves.
II - FINAL OPERATION
- Refit the hydraulic distributor (see 23A, Automatic gearbox, Hydraulic distributor: Removal - Refitting, 23A-34).
READ NEXT:
 Automatic gearbox connector: Removal - Refitting
DP0
REMOVAL
I - REMOVAL PREPARATION OPERATION
Position the vehicle on a two-post lift (see Vehicle:
Towing and lifting) (MR 392, 02A, Lifting equipment).
Shift the selector lever to Neutral.
Dis
 Automatic gearbox converter: Removal - Refitting
DP0
REMOVAL
I - REMOVAL PREPARATION OPERATION
Remove the front left-hand wheel arch liner (see
Front wheel arch liner: Removal - Refitting) (MR
393, 55A, Exterior protection).
Remove the resonato
SEE MORE:
 Manual air conditioning
The controls
Adjusting the air temperature.
Adjusting the ventilation speed.
Air conditioning.
Distribution of air in the passenger
compartment.
De-icing/demisting of the rear screen
and, depending on the vehicle, the
door mirrors.
Air recirculation.
Switching air conditio
 Dehydrator reservoir: Removal - Refitting
AIR CONDITIONING or CLIMATE CONTROL
IMPORTANT
To avoid all risk of damage to the systems, apply
the safety and cleanliness instructions and operation
recommendations before carrying out any
repair:
(see 62A, Air conditioning, Air conditioning:
Precautions for the repair, 62A-1),
(se
© 2016-2026 Copyright Renault Clio Owners Club

