Renault Clio: Automatic gearbox connector: Removal - Refitting
Renault Clio III (2005-2013) Service Manual / Transmission / Automatic Gearbox / Automatic gearbox connector: Removal - Refitting
DP0
REMOVAL
I - REMOVAL PREPARATION OPERATION
- Position the vehicle on a two-post lift (see Vehicle: Towing and lifting) (MR 392, 02A, Lifting equipment).
- Shift the selector lever to Neutral.
- Disconnect the battery (see ) (MR 392, 80A, Battery).
- Remove:
- the front left-hand wheel (see Wheel: Removal - Refitting) (MR 392, 35A, Wheels and tyres),
- the front left-hand wheel arch liner (see Front wheel arch liner: Removal - Refitting) (MR 393, 55A, Exterior protection,
- the engine undertray,
- the battery tray (see ) (MR 392, 80A, Battery),
- the air filter unit (see Air filter unit: Removal - Refitting) (MR 392, 12A, Fuel mixture).
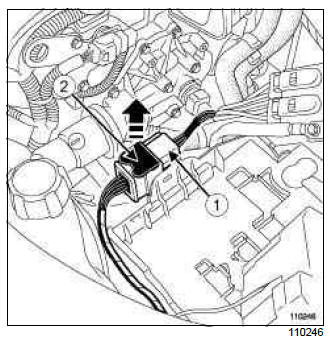
- Disconnect the modular connector (1) by pulling the sliding latch (2).
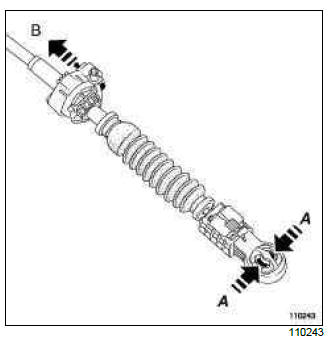
- Remove:
- the multifunction switch control cable by pressing at (A),
- the control cable sleeve stop from the gearbox support by pulling the catch at (B).
II - OPERATION FOR REMOVAL OF PART CONCERNED
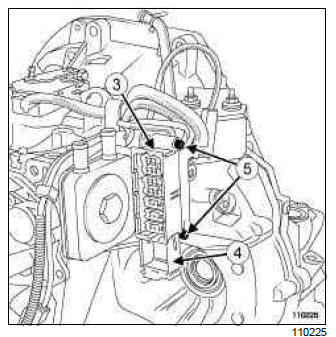
- Disconnect the gearbox connector (3) by pulling the sliding latch (4).
- Remove the gearbox connector mounting bolts (5).
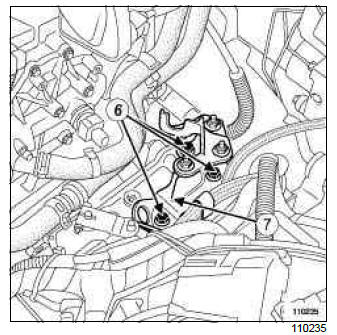
- Remove:
- the gearbox connector support mounting bolts (6),
- the gearbox connector support (7).
- the coloured connector concerned on the gearbox connector.
- Follow the five wiring harnesses connected to the gearbox connector.
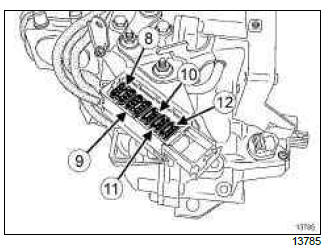
- Green connector (multifunction switch)
- Yellow connector (electronic interface)
- Green connector (line pressure)
- Yellow connector (turbo speed)
- Blue connector (exchanger flow control solenoid valve)
- Remove the five harnesses (these connectors can be removed separately from the gearbox connector when replacing certain components).
REFITTING
I - REFITTING OPERATION FOR PART CONCERNED
- Connect the five harnesses to the gearbox connector.
- Refit the gearbox mounting.
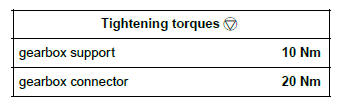
- Torque tighten:
- the gearbox support (10 Nm),
- the gearbox connector (20 Nm).
- Connect the gearbox connector by pushing in the slide.
- Fasten the multifunction switch control cable.
II - FINAL OPERATION
- Refit:
- the air filter unit (see Air filter unit: Removal - Refitting) (MR 392, 12A, Fuel mixture),
- the battery tray (see ) (MR 392, 80A, Battery).
- Connect:
- the modular connector reinserting the sliding latch,
- the battery (see ) (MR 392, 80A, Battery).
- Refit:
- the front left-hand wheel arch liner (see Front wheel arch liner: Removal - Refitting) (MR 393, 55A, Exterior protection,
- the engine undertray,
- the front left-hand wheel (see Wheel: Removal - Refitting) (MR 392, 35A, Wheels and tyres).
READ NEXT:
 Automatic gearbox converter: Removal - Refitting
DP0
REMOVAL
I - REMOVAL PREPARATION OPERATION
Remove the front left-hand wheel arch liner (see
Front wheel arch liner: Removal - Refitting) (MR
393, 55A, Exterior protection).
Remove the resonato
Driveshaft: Precautions for the repair
DP0 or JH3 or JR5 or TL4
WARNING
A gearbox oil leak at the driveshaft may destroy it.
WARNING
Always replace seals whenever the driveshaft is
removed.
WARNING
Grease the base of the bearing using BR 2
SEE MORE:
Driving
The Renault Clio IV (2014-2019) offers a satisfying driving experience with its nimble handling and responsive performance. Its compact size and maneuverability make it well-suited for urban driving and tight parking spaces. The precise steering and suspension tuning provide a balanced and confident
Your comfort
The Renault Clio IV (2014-2019) is designed with your comfort in mind. It features a well-crafted interior with quality materials and thoughtful ergonomics. The seats offer excellent support and adjustability, providing a comfortable driving experience. The cabin is designed to minimize noise and vi
© 2016-2026 Copyright Renault Clio Owners Club - 0.0036
