Renault Clio: Front driveshaft lower arm ball joint: Check
CHECK
CHECKING THE FRONT DRIVESHAFT LOWER ARM BALL JOINT
- Position the vehicle on a two-post lift (see Vehicle: Towing and lifting) (MR 392, 02A, Lifting equipment).
1 - Checking the condition of the front driveshaft lower arm ball joint gaiter
- Check:
- the gaiter crimping on the front driveshaft lower arm ball joint,
- that the front driveshaft lower arm ball joint gaiter is not torn.
If the front driveshaft lower arm ball joint gaiter is in poor condition and not crimped, replace the front driveshaft lower arm ball joint (see Front driveshaft lower arm ball joint: Removal - Refitting).
2 - Checking the fitting of the front driveshaft lower arm ball joint
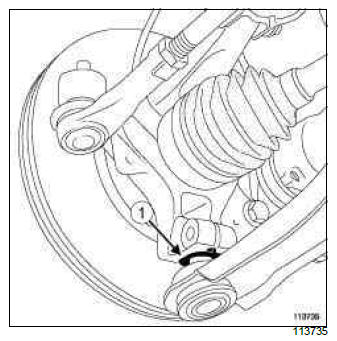
- Check:
- that the "lower arm ball joint-lower arm bolt-hub carrier" assembly is correctly positioned,
- the correct positioning of the ring (1) on the front driveshaft lower arm ball joint,
- the tightening torque (see 30A, General information, Front axle system: Tightening torque, 30A-14).
If the front driveshaft lower arm ball joint is not fitted correctly, replace the front driveshaft lower arm ball joint (see Front driveshaft lower arm ball joint: Removal - Refitting).
3 - Checking the front driveshaft lower arm ball joint clearance

- Check that there is no play in the front driveshaft
lower arm ball joint:
- from a position underneath the vehicle,
- using both hands, hold the front driveshaft lower arm as close as possible to the wheel,
- push downwards several times.
If there is play in the front driveshaft lower arm ball joint, replace the front driveshaft lower arm ball joint (see Front driveshaft lower arm ball joint: Removal - Refitting).
READ NEXT:
 Front axle subframe: Removal - Refitting
EQUIPMENT LEVEL E3 LEISURE or EQUIPMENT LEVEL EA1 or EQUIPMENT LEVEL EA2
or EQUIPMENT
LEVEL EA3 or EQUIPMENT LEVEL EA4 or EQUIPMENT LEVEL EA5 or EQUIPMENT LEVEL EAG
WARNING
Do not use the lower arm
Front anti-roll bar: Removal - Refitting
EQUIPMENT LEVEL E3 LEISURE or EQUIPMENT
LEVEL EA1 or EQUIPMENT LEVEL EA2 or
EQUIPMENT LEVEL EA3 or EQUIPMENT LEVEL
EA4 or EQUIPMENT LEVEL EA5 or EQUIPMENT
LEVEL EAG
Diameter of the anti-roll bar: 2
SEE MORE:
D4F, and 740 or 742 or 764
REMOVAL
I - REMOVAL PREPARATION OPERATION
Disconnect the battery (see Battery: Removal - Refitting)
(MR 392, 80A, Battery).
Remove:
the air filter box (see 12A, Fuel mixture, Air filter
unit: Removal - Refitting, 12A-17),
the intake distributor (see 12A, Fuel mixture, Inlet
distributor:
K4J
REMOVAL
I - REMOVAL PREPARATION OPERATION
Position the vehicle on a two-post lift (see Vehicle:
Towing and lifting) (MR 392, 02A, Lifting equipment).
Remove:
the battery (see Battery: Removal - Refitting)
(MR 392, 80A, Battery),
the battery tray (see ) (MR 392, 80A, Battery),
the scuttl
