Renault Clio: Front seat runner: Removal - Refitting
WITHOUT SPORT SEATS, and DOCUMENTATION PHASE 2
IMPORTANT
Before beginning work on any component of the safety system, it is essential to lock the airbag computer using the Diagnostic tool (see Airbag and pretensioners: Precautions for the repair) (88C, Airbag and pretensioners). When this function is activated, all the trigger lines are inhibited and the airbag warning light on the instrument panel is continuously lit (with the ignition on).
IMPORTANT
Never handle the pyrotechnic systems (pretensioners or airbags) near to a source of heat or naked flame - they may be triggered.
REMOVAL
I - REMOVAL PREPARATION OPERATION
- Disconnect the battery (see Battery: Removal - Refitting) (80A, Battery).
- Remove the front seat (see 75A, Front seat frames and mechanisms, Complete front seat: Removal - Refitting, 75A-33).
FRONT SEAT TYPE 02 or FRONT SEAT TYPE 03 or FRONT SEAT TYPE 05
- Remove the front seat height adjustment control (see 75A, Front seat frames and mechanisms, Front seat height adjuster control: Removal - Refitting, 75A-19).
- Remove the front seat height adjustment control (see 75A, Front seat frames and mechanisms, Front seat height adjuster control: Removal - Refitting, 75A-19).
FRONT SEAT WITH HEATING
- Unclip the connector for the front seat heated pad.
B85

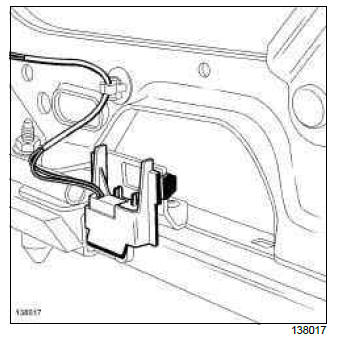
- Unclip the front seat connector (1).
- Unclip the connector support by pinching at (2) and pulling at (3).
- Remove:
- the connector support,
- the seat runner switch (see Seat runner switch: Removal - Refitting),
- the front lap belt pretensioner (see Front lap belt pretensioner: Removal - Refitting) (88C, Airbags and pretensioners).
C85

- Unclip:
- the front seat wiring at (4) and (5),
- the clip (6),
- the connector support at (7).
- Remove the connector support.
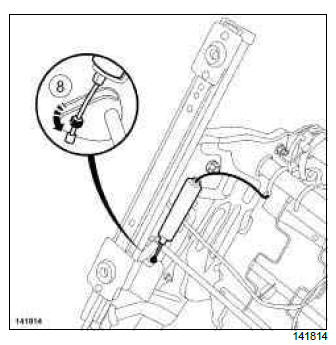
- Remove the unlocking cable for the runners by pivoting it at (8).
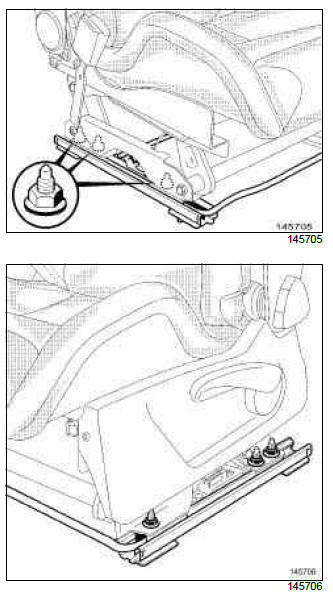
II - OPERATION FOR REMOVAL OF PART CONCERNED
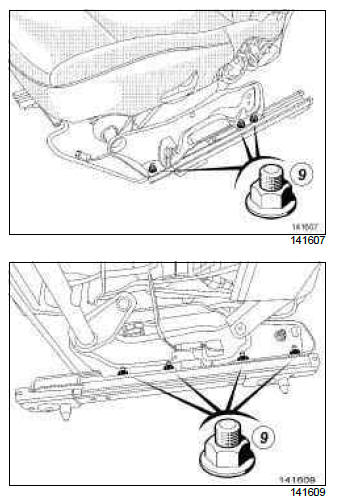
- Remove:
- the nuts of the front seat " runner - seat base " frame (9),
- the front seat runners.
REFITTING
I - REFITTING PREPARATION OPERATION
- parts always to be replaced: Front seat runner mounting on front seat frame.
II - REFITTING OPERATION FOR PART CONCERNED
- Refit the front seat runners.
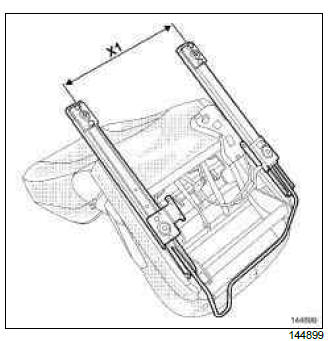
- Position the runners in order to ensure a centre-to-centre distance between the two rear mountings of X1 = 418 mm.
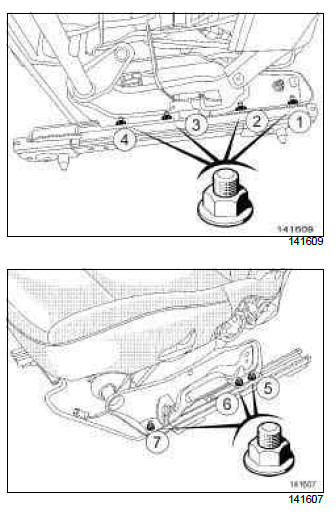
- Torque tighten in order (1), (2), (3), (4), (5), (6), (7) the new nuts of the front seat runner - seat base frame (21 N.m).
III - FINAL OPERATION
- Refit the connector support.
FRONT SEAT WITH HEATING
- Clip on the heated pad connector.
C85
- Clip on the front seat wiring.
- Refit the unlocking cable for the runners.
B85
- Clip on the front seat connector.
- Refit:
- the seat runner switch (see Seat runner switch: Removal - Refitting),
- the front lap belt pretensioner (see Front lap belt pretensioner: Removal - Refitting) (88C, Airbags and pretensioners).
- Refit the front seat base casing (see 77A, Front seat trim, Front seat lower casing: Removal - Refitting, 77A-30).
FRONT SEAT TYPE 02 or FRONT SEAT TYPE 03 or FRONT SEAT TYPE 05
- Refit the front seat height adjustment control (see 75A, Front seat frames and mechanisms, Front seat height adjuster control: Removal - Refitting, 75A-19).
- Refit the front seat (see 75A, Front seat frames and mechanisms, Complete front seat: Removal - Refitting, 75A-33).
- Connect the battery (see Battery: Removal - Refitting) (80A, Battery).
- Carry out a function test.
- Unlock the airbag computer using the Diagnostic tool (see Airbag and pretensioners: Precautions for the repair) (88C, Airbags and pretensioners).
SPORT FRONT SEATS
REMOVAL
I - REMOVAL PREPARATION OPERATION
- Disconnect the battery (see ) (80A, Battery).
- Remove the front seat (see 75A, Front seat frames and mechanisms, Complete front seat: Removal - Refitting, 75A-33).
- Unclip the front seat runner switch.
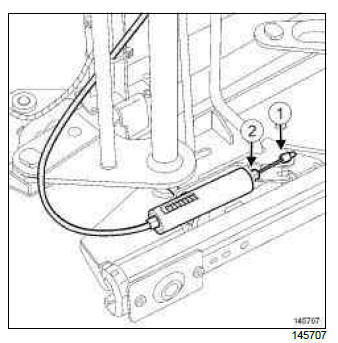
- Remove the stop of the unlocking cable for the front seat runners (1).
- Unclip the unlocking cable for the front seat runners (2).
II - REMOVAL OF THE PART CONCERNED
- Remove:
- the nuts of the front seat " base - runners " frame,
- the front seat runners.
REFITTING
I - REFITTING PREPARATION OPERATION
- parts always to be replaced: Front seat runner mounting on front seat frame.
II - REFITTING OPERATION
- Refit the front seat runners.
- Fit all the nuts without tightening them.
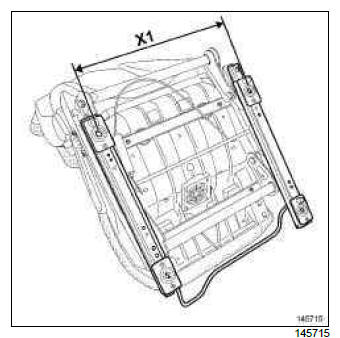
- Position the front seat runners to ensure a centre-to-centre distance of X1 = 418 mm between the two front and rear mountings.
- Torque tighten the new nuts of the front seat " base - runners " frame (21 N.m) starting with the inner rail (tunnel side).
III - FINAL OPERATION
- Proceed in the reverse order to removal.
- Carry out a function test.
READ NEXT:
 Front seat height adjuster control: Removal - Refitting
FRONT SEAT TYPE 02 or FRONT SEAT TYPE 03 or FRONT SEAT TYPE 05, and
WITHOUT SPORT SEATS, and
DOCUMENTATION PHASE 1 or DOCUMENTATION PHASE 2
REMOVAL
OPERATION FOR REMOVAL OF PART
CONCERNED
Unclip
Front seat height adjustment: Removal - Refitting
FRONT SEAT TYPE 02 or FRONT SEAT TYPE 03 or FRONT SEAT TYPE 05, and
WITHOUT SPORT SEATS, and
DOCUMENTATION PHASE 2
IMPORTANT
Before beginning work on any component of the
safety system, it is essent
Rear seat access mechanisms: Removal - Refitting
C85, and WITHOUT SPORT SEATS, and DOCUMENTATION PHASE 2
IMPORTANT
Before beginning work on any component of the
safety system, it is essential to lock the airbag computer
using the Diagnostic tool (s
SEE MORE:
Driving
The Renault Clio IV (2014-2019) offers a satisfying driving experience with its nimble handling and responsive performance. Its compact size and maneuverability make it well-suited for urban driving and tight parking spaces. The precise steering and suspension tuning provide a balanced and confident
Your comfort
The Renault Clio IV (2014-2019) is designed with your comfort in mind. It features a well-crafted interior with quality materials and thoughtful ergonomics. The seats offer excellent support and adjustability, providing a comfortable driving experience. The cabin is designed to minimize noise and vi
