Renault Clio: Passenger compartment fan assembly control unit: Removal - Refitting
REMOVAL
I - REMOVAL PREPARATION OPERATION
- Disconnect the battery (see Battery: Removal - Refitting) (80A, Battery).
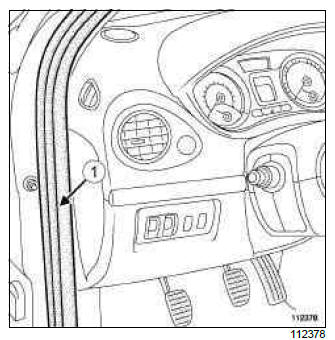
- Partially remove the seal (1).
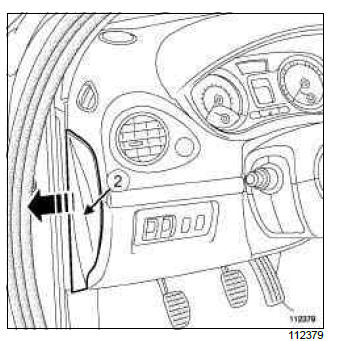
- Remove the side panel (2).
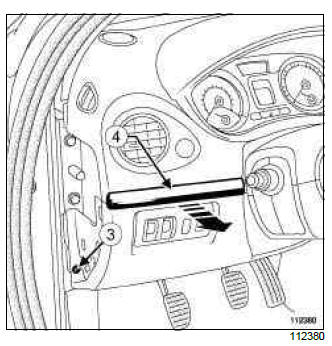
- Remove the bolt (3) from the base of the dashboard.
- Unclip the trim piece (4) from the driver's side dashboard lower cover
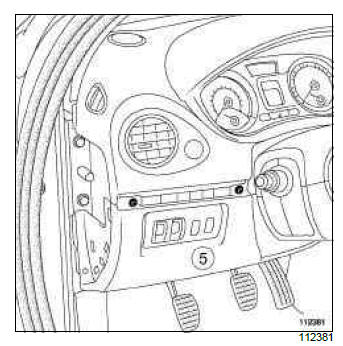
- Remove the bolts from the driver's side dashboard lower cover.
- Take out the driver's side dashboard lower cover (5).
- Disconnect the connectors from the driver's side dashboard lower cover (depending on the equipment level).
CLIMATE CONTROL
Note:
For vehicles equipped with climate control, there are two types of fitting for the passenger compartment fan assembly control unit:
- the first type of fitting has two connectors on the passenger compartment fan assembly control unit,
- the second type of fitting has only one connector on the passenger compartment fan assembly control unit.
Second type of fitting
- Remove the bolts from the lower half cover.
- Unclip the half covers.
- Pull the lower half cowling out from the steering column adjustment handle.
- Disconnect:
- the connectors of the steering column switch assembly,
- the starter switch connector,
- Unclip the connector wiring from the steering column switch assembly.
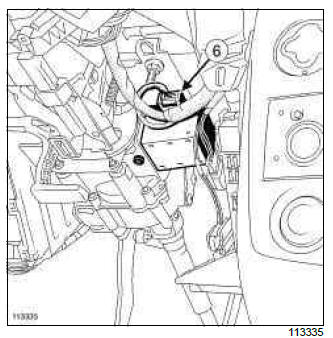
- Disconnect the connector (6) from the electric steering column lock.
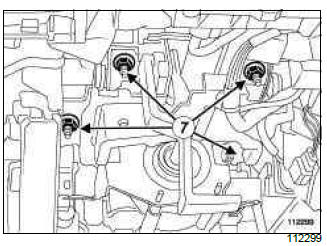
- Remove the steering column bolts (7).
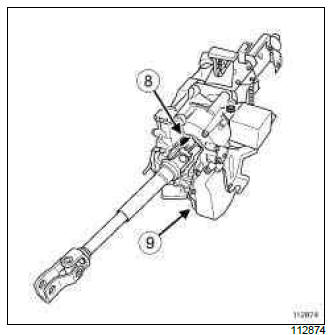
Note: The column cannot be set down directly on the floor since the wiring of the steering column connectors is not long enough.
- Fit a block of approximately 20 cm on the floor under the bolt of the intermediate shaft (8) in order to disconnect the steering column connections (9).
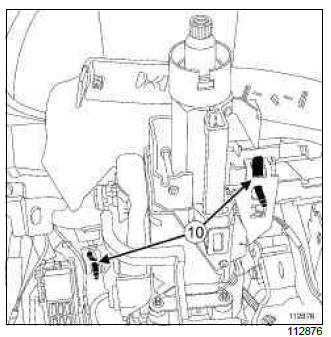
- Remove the steering column from the pre-supports (10) to set it down on the block.
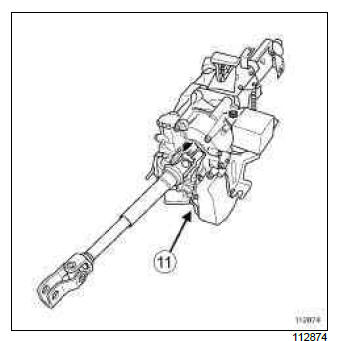
- Disconnect the three connectors (11) while holding the steering column on the block.
- Remove the steering column in the footwell.
II - OPERATION FOR REMOVAL OF PART CONCERNED
AIR CONDITIONING or STANDARD HEATING
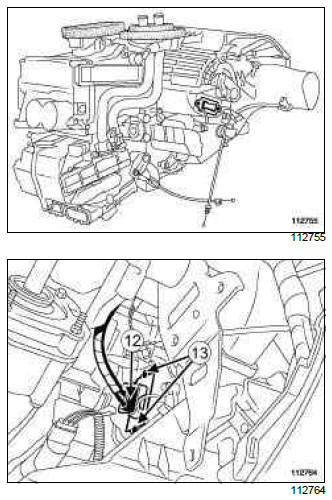
- Disconnect the connector (12) from the fan assembly control unit.
- Remove:
- the fan assembly control unit bolts (13),
- the fan assembly control unit.
- Replace the control unit of the passenger compartment fan assembly (see Technical Note 6015A, Repairing electrical wiring).
CLIMATE CONTROL
1 - First type of fitting
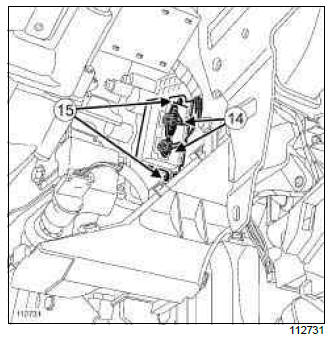
- Disconnect the connectors (14) from the fan assembly control unit.
- Remove:
- the fan assembly control unit bolts (15),
- the fan assembly control unit.
2 - Second type of fitting
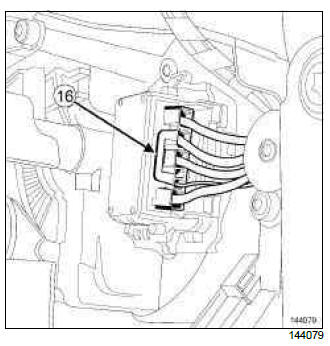
- Disconnect the connector (16) from the fan assembly control unit.
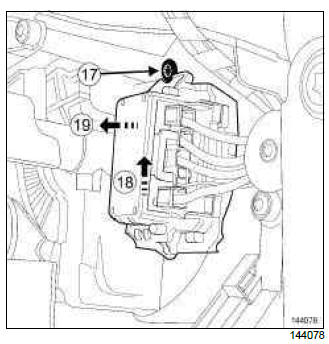
- Remove:
- the bolt (17) from the fan assembly control unit,
- the fan assembly control unit in the direction of the arrows (18) and (19).
REFITTING
I - REFITTING OPERATION FOR PART CONCERNED
AIR CONDITIONING or STANDARD HEATING
- Refit:
- the fan assembly control unit,
- the bolts of the fan assembly control unit.
- Connect the fan assembly control unit connector.
CLIMATE CONTROL
1 - First type of fitting
- Connect the fan assembly control unit connector.
- Refit:
- the fan assembly control unit,
- the fan assembly control unit bolts.
2 - Second type of fitting
- Connect the fan assembly control unit connector.
- Refit:
- the fan assembly control unit,
- the fan assembly control unit bolt.
II - FINAL OPERATION
CLIMATE CONTROL
Second type of fitting
- Fit the steering column on a block of approximately 20 cm on the floor under the intermediate shaft bolt.
- Connect the three steering column connectors, holding the steering column on the block.
- Position the steering column in its pre-supports.
- Refit the steering column bolts.
- Connect the electric steering column lock connector.
- Connect:
- the connectors of the steering column switch assembly,
- the starter switch connector,
- Clip on the connector wiring for the steering column switch assembly.
- Fit the lower half cover.
- Clip on the half covers.
- Refit the bolts to the lower half cover.
- Connect the connectors to the driver's side dashboard lower cover.
- Position the driver's side dashboard lower cover.
- Refit:
- the bolts from the driver's side dashboard lower cover,
- the bolts to the base of the dashboard.
- Clip on the driver's side dashboard lower cover trim piece.
- Refit:
- the side panel,
- the seal.
- Connect the battery (see Battery: Removal - Refitting) (80A, Battery).
RIGHT-HAND DRIVE
REMOVAL
I - REMOVAL PREPARATION OPERATION
- Remove the glovebox (see Glovebox: Removal - Refitting) (57A, Interior equipment).
II - OPERATION FOR REMOVAL OF PART CONCERNED
AIR CONDITIONING or STANDARD HEATING
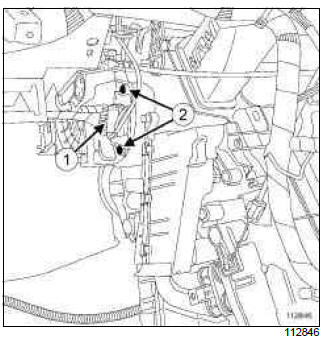
- Disconnect the connector (1) from the fan assembly control unit.
- Remove:
- the fan assembly control unit bolts (2),
- the fan assembly control unit.
- Replace the control unit of the passenger compartment fan assembly (see Technical Note 6015A, Repairing electrical wiring).
Note: When repairing the wiring, ensure the wiring is cut 10 cm from the fan assembly control unit.
CLIMATE CONTROL
Note:
For vehicles equipped with climate control, there are two types of fitting for the passenger compartment fan assembly control unit:
- the first type of fitting has two connectors on the passenger compartment fan assembly control unit,
- the second type of fitting has only one connector on the passenger compartment fan assembly control unit.
1 - First type of fitting
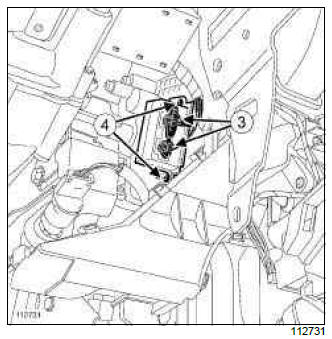
- Disconnect the connectors (3) from the fan assembly control unit.
- Remove:
- the fan assembly control unit bolts (4),
- the fan assembly control unit.
2 - Second type of fitting
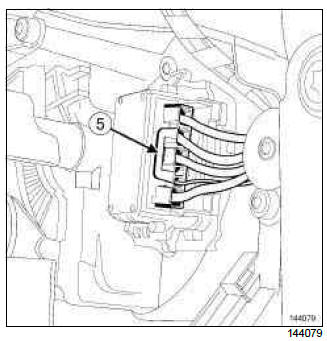
- Disconnect the connector (5) from the fan assembly control unit.
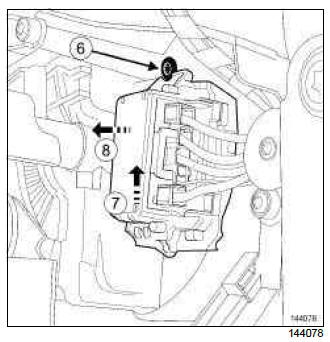
- Remove:
- the bolt (6) from the fan assembly control unit,
- the fan assembly control unit in the direction of the arrows (7) and (8).
REFITTING
I - REFITTING OPERATION FOR PART CONCERNED
AIR CONDITIONING or STANDARD HEATING
- Refit:
- the fan assembly control unit,
- the fan assembly control unit bolts.
- Connect the fan assembly control unit connector.
CLIMATE CONTROL
1 - First type of fitting
- Connect the fan assembly control unit connectors.
- Refit:
- the fan assembly control unit,
- the fan assembly control unit bolts.
2 - Second type of fitting
- Connect the fan assembly control unit connector.
- Refit:
- the fan assembly control unit,
- the fan assembly control unit bolt.
II - FINAL OPERATION
- Refit the glovebox (see Glovebox: Removal - Refitting) (57A, Interior equipment).

