Renault Clio: Rear Seat Frames And Mechanisms
Single unit rear bench seatback: Removal - Refitting
REMOVAL
I - REMOVAL PREPARATION OPERATION
- Remove the single unit rear bench seat base (see 76A, Rear seat frames and mechanisms, Single unit rear bench seat base: Removal - Refitting, 76A-6).
II - OPERATION FOR REMOVAL OF PART CONCERNED
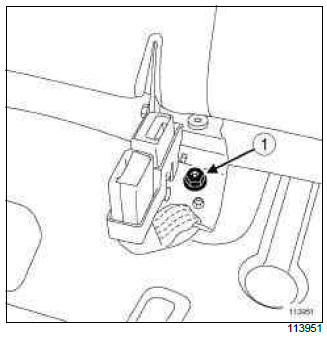
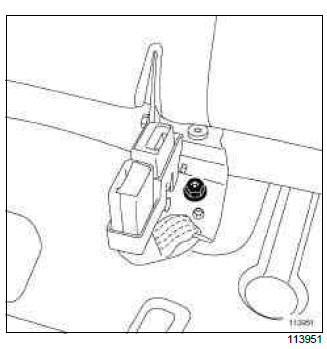
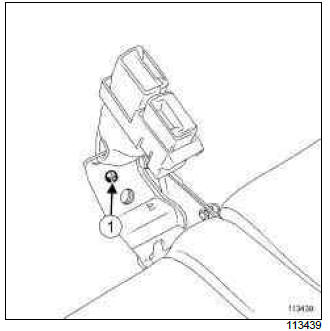
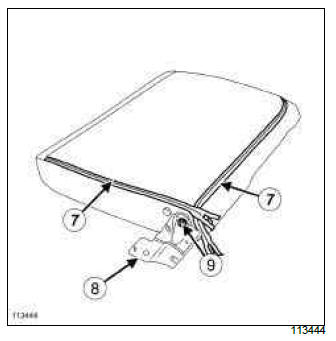
- Remove the bolt (1) from the central support of the single unit rear bench seatback.
- Pull down the single unit rear bench seatback.
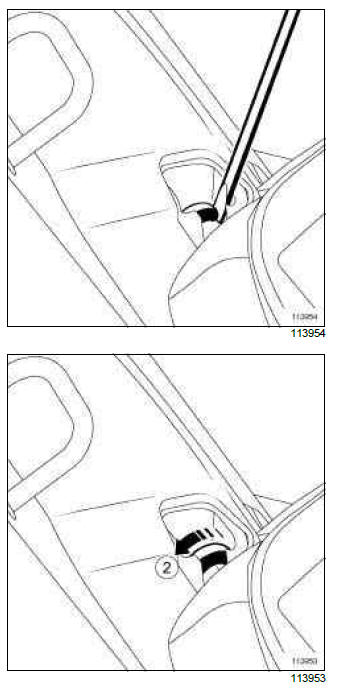
- Unlock the side locks (2) using a flat-blade screwdriver.

- Loosen the bolt (3) from the central support of the single unit rear bench seatback.
- Remove the single unit rear bench seatback.
- This operation requires two people.
REFITTING
I - REFITTING OPERATION FOR PART CONCERNED
- Refit the single unit rear bench seatback.
- This operation requires two people.
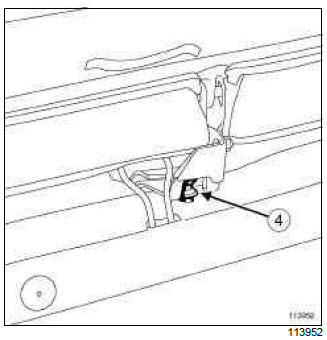
- Fit bolt (4).
- Lock the side locks using a flat-blade screwdriver.
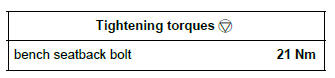
- Torque tighten the rear bolt of the seatback central support (21 Nm).
- Refit and torque tighten the front bolt of the seatback central support (21 Nm).
II - FINAL OPERATION
- Refit the single unit rear bench seat base (see 76A, Rear seat frames and mechanisms, Single unit rear bench seat base: Removal - Refitting, 76A-6).
1/3 and 2/3 rear bench seatback: Removal - Refitting
REMOVAL
I - REMOVAL PREPARATION OPERATION
- Lift up the rear bench seat bases (see 76A, Rear seat frames and mechanisms, 1/3 and 2/3 rear bench seat base: Removal - Refitting, 76A- 7).
II - OPERATION FOR REMOVAL OF PART CONCERNED
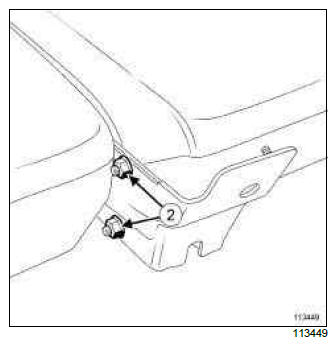
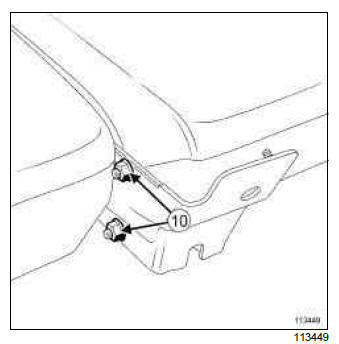
- Remove the bolt (1).
- Tilt the bench seatbacks.
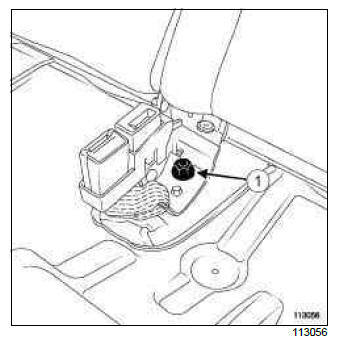
- Unlock the side mountings (2) using a flat-blade screwdriver.
- Remove the rear bench seatback (this operation requires two people).
REFITTING
I - REFITTING OPERATION FOR PART CONCERNED
- Refit the rear bench seatback, making sure that it is inserted under the bolt (3).
- Lock the side mountings (2).
- Refit the bolt (1).
- Torque tighten the bench seatback bolt (21 Nm).
II - FINAL OPERATION
- Refit the rear bench seat bases (see 76A, Rear seat frames and mechanisms, 1/3 and 2/3 rear bench seat base: Removal - Refitting, 76A-7).
Single unit rear bench seat base: Removal - Refitting
REMOVAL
OPERATION FOR REMOVAL OF PART CONCERNED
- Tilt the single unit rear bench seat base.
- Unclip the seat base frame linkages (1) from the single unit rear bench seat.
- Remove the single unit rear bench seat base.
REFITTING
REFITTING OPERATION FOR PART CONCERNED
- Clip on the single unit rear bench seat base frame linkages.
- Pull down the single unit rear bench seat seat base.
1/3 and 2/3 rear bench seat base: Removal - Refitting
REMOVAL
OPERATION FOR REMOVAL OF PART CONCERNED

- Lift up the rear bench seat base (1) et (2).
- Unclip the two retaining parts on the rear bench seat base (3).
- Remove the rear bench seat base.
REFITTING
REFITTING OPERATION FOR PART CONCERNED
- Clip the two retaining parts on to the rear bench seat base.
- Refit the rear bench seat base.
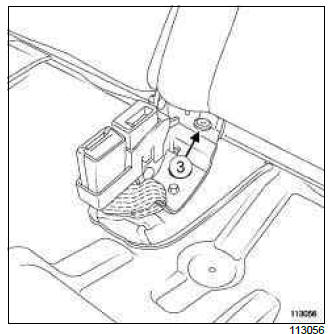
Rear bench seat mechanism: Removal - Refitting
REMOVAL
I - REMOVAL PREPARATION OPERATION
- Remove the complete rear bench seat.
- Remove:
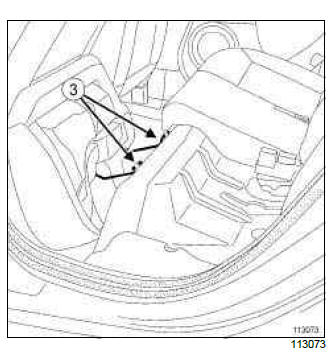
- the nut (1),
- the seat belt buckle support.
- Remove nuts (2).
- Separate the bench seatbacks.
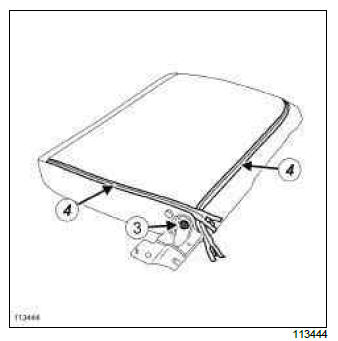
- Remove nut (3) and remove the centre retaining bracket (depending on the side removed).
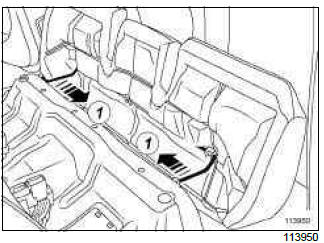
- Open the zip fasteners (4).
II - OPERATION FOR REMOVAL OF PART CONCERNED
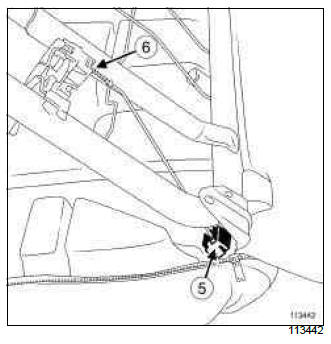
- Unclip:
- the unlocking mechanism (5),
- the unlocking system (6).
REFITTING
I - REFITTING OPERATION FOR PART CONCERNED
- Refit:
- the unlocking system,
- the unlocking mechanism.
- Carry out a function test.
II - FINAL OPERATION
- Close the zip fasteners (7).
- Refit the centre retaining bracket (8) (depending on the side removed).
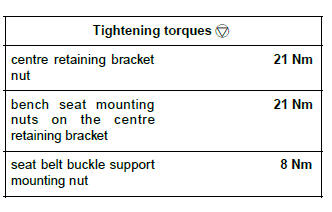
- Tighten to torque the centre retaining bracket nut (21 Nm), (9).
- Assemble the bench seatbacks.
- Tighten to torque the bench seat mounting nuts on the centre retaining bracket (21 Nm), (10).
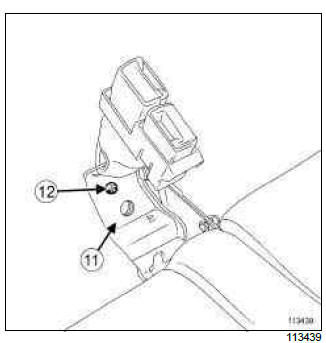
- Refit the seat belt buckle support (11).
- Tighten to torque the seat belt buckle support mounting nut (8 Nm), (12).
- Refit the complete rear bench seat.
READ NEXT:
 Front seat base trim: Removal - Refitting
WITHOUT SPORT SEATS, and DOCUMENTATION PHASE 1
IMPORTANT
Before carrying out any work on a safety or proximity
system component, lock the airbag computer
using the Diagnostic tool. When this
function
Front seatback trim: Removal - Refitting
WITHOUT SPORT SEATS, and DOCUMENTATION PHASE 1
IMPORTANT
Before carrying out any work on a safety or proximity
system component, lock the airbag computer
using the Diagnostic tool. When this
function
SEE MORE:
Opening and closing the doors
Opening the doors from the outside
Front doors
With the doors unlocked, pull handle 1.
Special feature of the RENAULT
“hands-free” card
With the doors locked, press button 2
on handle 1 of one of the two front
doors and pull towards you.
Rear doors
With the doors unlocked, pull hand
Locking, unlocking the opening elements
Locking/Unlocking the doors
from the outside
This is done using the RENAULT Card;
see the “RENAULT Card” information in
Section 1.
In certain cases, the RENAULT card
may not work:
if the RENAULT card battery is weak,
flat, etc.
if equipment operating on the same
frequency as the ca
