Renault Clio: Starter: Removal - Refitting
D4F, and 740 or 742 or 764

REMOVAL
I - REMOVAL PREPARATION OPERATION
- Disconnect the battery (see Battery: Removal - Refitting) (MR 392, 80A, Battery).
- Remove the air filter unit (see 12A, Fuel mixture, Air filter unit: Removal - Refitting, 12A-17).
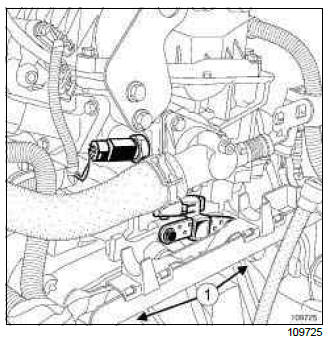
- Remove the engine's electrical wiring channel mounting bolts (1) and move it out of the way to gain access to the starter mounting bolt.
II - OPERATION FOR REMOVAL OF PART CONCERNED
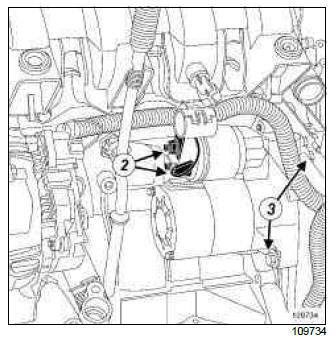
- Disconnect the starter motor connectors (2).
- Remove:
- the mounting bolts (3) from the starter,
- the starter motor from above the vehicle.
REFITTING
I - REFITTING PREPARATION OPERATION
- Check that the starter centring dowel is in place.
II - REFITTING OPERATION FOR PART CONCERNED
- Refit the starter.
- Tighten to torque the starter mounting bolts (44 N.m).
- Connect the starter motor connectors.
III - FINAL OPERATION.
- Refit the engine wiring harness duct mounting bolts.
- Refit the air filter box (see 12A, Fuel mixture, Air filter unit: Removal - Refitting, 12A-17).
- Connect the battery (see Battery: Removal - Refitting) (MR 392, 80A, Battery).
K4J, and 780 - K4M, and 800 or 801

REMOVAL
I - REMOVAL PREPARATION OPERATION
- Position the vehicle on a two-post lift (see Vehicle: Towing and lifting) (MR 392, 02A, Lifting equipment).
- Disconnect the battery (see Battery: Removal - Refitting) (MR 392, 80A, Battery).
- Remove the engine protector.
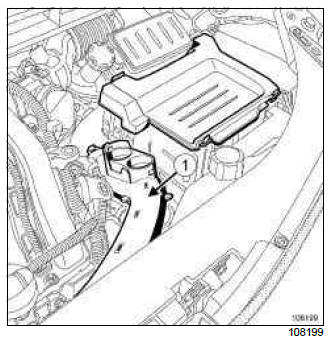
- Remove the air inlet duct (1).
- Disconnect:
- the starter motor connectors,
- the oil level sensor.
II - REMOVAL OF PART CONCERNED
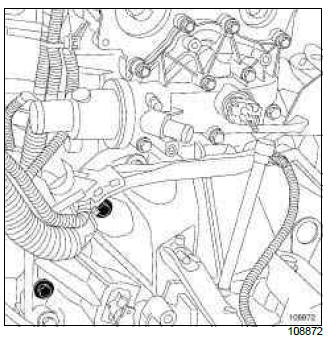
- Remove:
- the starter mounting bolts from below,
- the starter motor from underneath.
REFITTING
I - REFITTING PREPARATION OPERATION
- Check that the centring dowel is in place.
II - REFITTING PART CONCERNED
- Refit:
- the starter,
- the starter mounting bolts.
- Tighten to torque the starter mounting bolts (44 Nm).
III - FINAL OPERATION.
- Connect:
- the oil level sensor,
- the starter connectors.
- Refit the air inlet duct.
- Connect the battery (see Battery: Removal - Refitting) (MR 392, 80A, Battery).
K9K, and 764 or 766 or 768

REMOVAL
I - REMOVAL PREPARATION OPERATION
- Put the vehicle on a two-post lift (see Vehicle: Towing and lifting).
- Remove the air inlet duct.
- Disconnect the battery (see Battery: Removal - Refitting).
- Remove the engine undertray.
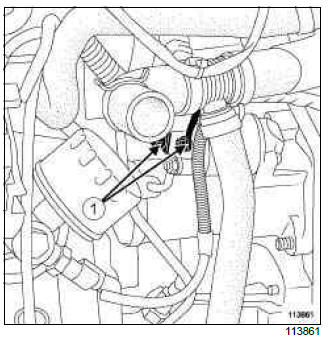
- Disconnect the starter motor connectors (1).
II - OPERATION FOR REMOVAL OF PART CONCERNED
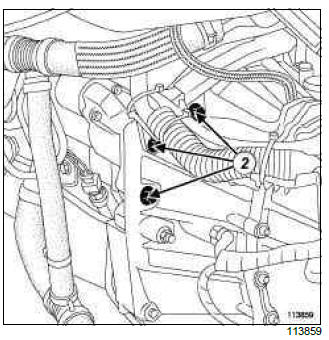
- Remove:
- the starter motor mounting bolts (2).
- the starter motor from below.
REFITTING
I - REFITTING PREPARATION OPERATION
- Check that the centring dowel is in place.
II - OPERATION FOR REFITTING PART CONCERNED
- Refit:
- the starter,
- the starter motor mounting bolts.
- Tighten to torque the starter motor mounting bolts (44 Nm).
III - FINAL OPERATION
- Connect the starter motor connectors.
- Connect the battery (see Battery: Removal - Refitting).
- Refit:
- the air inlet duct,
- the engine undertray.
M4R
REMOVAL
I - REMOVAL PREPARATION OPERATION
- Position the vehicle on a two-post lift (see Vehicle: Towing and lifting) (MR 392, 02A, Lifting equipment).
- Disconnect the battery (see ) (MR 392, 80A, Battery).
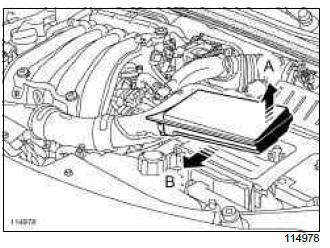
- Lift the air resonator (A) to remove it from the battery cover.
- Pull the air resonator towards the front of the vehicle (B) to remove it.
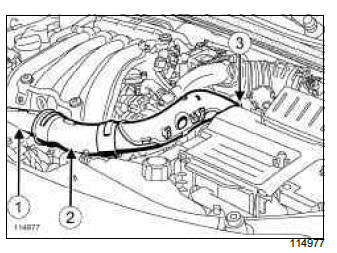
- Detach the air intake sleeve:
- from the front end panel at (1),
- from the air resonator on the front end panel at (2),
- from the air filter unit at (3).
- Remove the air intake sleeve.
- Remove:
- the engine undertray,
- the front bumper (see Front bumper: Removal - Refitting) (MR 393, 55A, Exterior protection),
- the frontal impact cross member (see Front impact cross member: Removal - Refitting) (MR 393, 41A, Front lower structure),
- the front end panel air resonator (see 12A, Fuel mixture, Air resonator: Removal - Refitting, 12A-10).
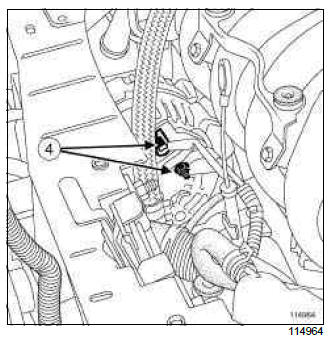
- Disconnect the alternator connectors (4).
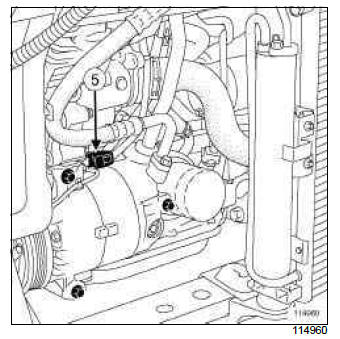
- Disconnect the connector (5) from the air conditioning compressor.
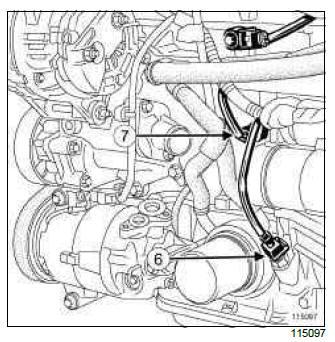
- Disconnect:
- the oil level sensor connector (6),
- the oil pressure sensor (7).
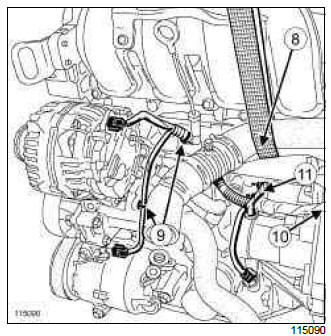
- Strap the hoses (8) to the front end panel in order to access the starter.
- Unclip the wiring harness at (9).
- Cut the wiring harness retaining clip on the neck at (10).
- Disconnect the starter connector (11).
- Move the wiring harness to one side.
II - OPERATION FOR REMOVAL OF PART CONCERNED
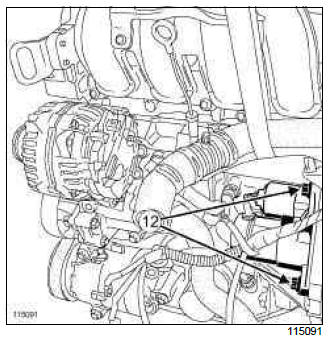
- Remove:
- the mounting bolts (12) from the starter,
- the starter through the space left by the air resonator in the front end panel.
REFITTING
I - REFITTING OPERATION FOR PART CONCERNED
- Refit the starter.
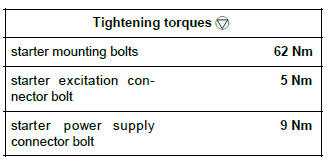
- Torque tighten the starter mounting bolts (62 Nm).
II - FINAL OPERATION.
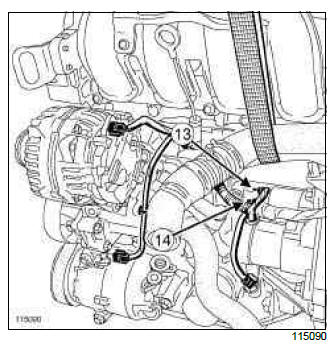
- Connect:
- the starter motor connectors,
- the oil pressure sensor connector,
- the oil level sensor connector,
- the alternator connectors.
- the air conditioning compressor connector.
- Torque tighten:
- the starter excitation connector bolt (5 Nm) at (13),
- the starter power supply connector bolt (9 Nm) at (14).
- Clip on the wiring harness.
- Refit a wiring harness retaining clip to the neck.
- Remove the retaining belt from the hoses.
- Refit:
- the front end panel air resonator (see 12A, Fuel mixture, Air resonator: Removal - Refitting, 12A-10),
- the frontal impact cross member (see Front impact cross member: Removal - Refitting) (MR 393, 41A, Front lower structure),
- the front bumper (see Front bumper: Removal - Refitting) (MR 393, 55A, Exterior protection),
- the engine undertray.
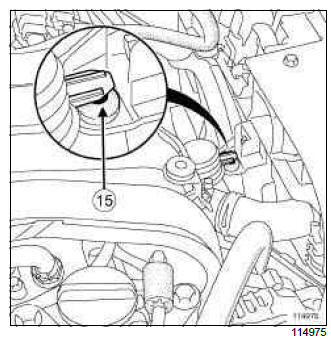
- Before refitting the air intake sleeve, check that the air resonator's upper mounting in the front end panel is correctly clipped at (15).
- Refit the air intake sleeve.
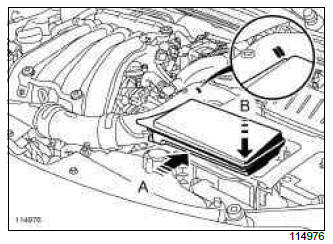
- Push the air resonator towards the rear of the vehicle (A) until the corner of the air resonator is between the two lines marked on the air intake sleeve.
- Push the air resonator (B) to fit it onto the battery cover.
- Connect the battery (see ) (MR 392, 80A, Battery).
F4R
REMOVAL
I - REMOVAL PREPARATION OPERATION
- Position the vehicle on a two-post lift (see Vehicle: Towing and lifting) (02A, Lifting equipment).
- Remove:
- the battery (see Battery: Removal - Refitting) (80A, Battery),
- the air filter unit (see 12A, Fuel mixture, Air filter unit: Removal - Refitting, 12A-17),
- the battery tray (see Battery tray: Removal - Refitting) (80A, Battery),
- the front right-hand wheel (see Wheel: Removal - Refitting) (35A, Wheels and tyres),
- the engine undertray,
- the lower cross member.
II - OPERATION FOR REMOVAL OF PART CONCERNED
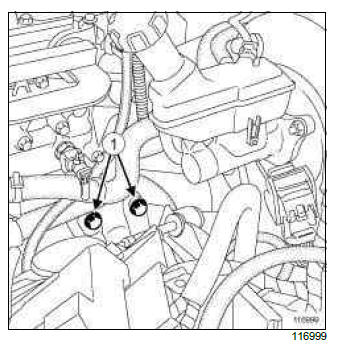
- Remove the upper bolts (1) from the starter.
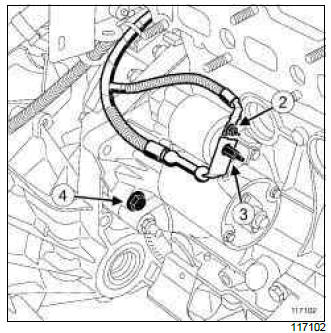
- Remove:
- the excitation wiring terminal (2) on the starter,
- the power wiring terminal (3) on the starter.
F4R, and 830
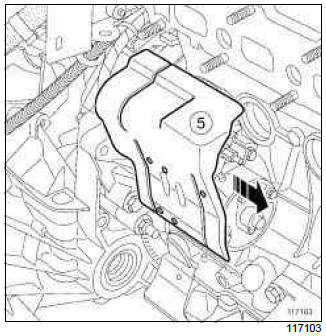
- Remove the starter heat shield (5) by sliding it along the starter on the timing end.
F4R, and 832
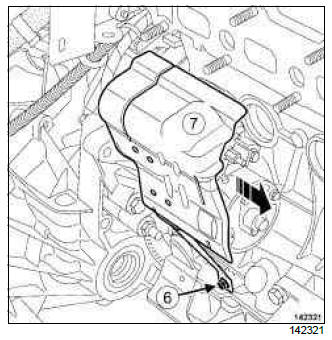
- Remove:
- the starter heat shield bolt (6),
- the starter heat shield (7) by sliding it along the starter on the timing end.
- Remove the starter lower bolt (4).
- Remove the starter motor.
REFITTING
I - REFITTING PREPARATION OPERATION
- Check the presence and condition of the centring device on the starter.
II - OPERATION FOR REMOVAL OF PART CONCERNED
- Fit the starter.
- Refit the starter lower bolt.
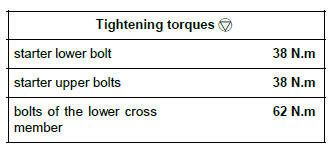
- Torque tighten the starter lower bolt (38 N.m).
- Refit the starter heat shield by sliding it along the starter on the timing end.
F4R, and 832
- Refit the starter heat shield bolt.
- Refit:
- the excitation wiring terminal on the starter,
- the power wiring terminal on the starter.
- Refit the upper bolts on the starter.
- Torque tighten the starter upper bolts (38 N.m).
III - FINAL OPERATION
- Refit the lower cross member.
- Torque tighten the bolts of the lower cross member (62 N.m).
- Refit:
- the engine undertray,
- the front right-hand wheel (see Wheel: Removal - Refitting) (35A, Wheels and tyres),
- the air filter unit (see 12A, Fuel mixture, Air filter unit: Removal - Refitting, 12A-17),
- the battery tray (see Battery tray: Removal - Refitting) (80A, Battery),
- the battery (see Battery: Removal - Refitting) (80A, Battery).
K9K, and 772
REMOVAL
I - REMOVAL PREPARATION OPERATION
- Position the vehicle on a two-post lift (see Vehicle: Towing and lifting) (MR 392, 02A, Lifting equipment).
- Disconnect the battery (see Battery: Removal - Refitting) (MR 392, 80A, Battery).
- Remove the front engine cover.
- Remove:
- the air duct at the air filter box inlet,
- the nut from the air inlet pipes on the alternator.
- Loosen the air inlet duct clip between the intercooler and the air box unit on the air inlet box.
- Move the air inlet duct between the intercooler and the air inlet box to one side.
- Detach the relay box from the battery tray.
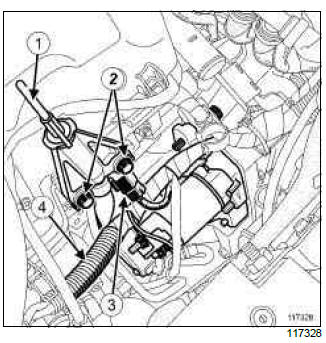
- Remove:
- the dipstick (1),
- the dipstick duct bolts (2).
- Disconnect the injector rail pressure sensor connector (3).
- Detach the emission control cover wiring harness (4).
II - OPERATION FOR REMOVAL OF PART CONCERNED
- Remove:
- the starter excitation lead,
- the starter power lead,
- the starter upper bolt,
- the front left-hand wheel (see Wheel: Removal - Refitting) (MR 392, 35A, Wheels and tyres),
- the front section of the front left-hand wheel arch liner (see Front wheel arch liner: Removal - Refitting) (MR 393, 57A, Interior equipment),
- the engine undertray.
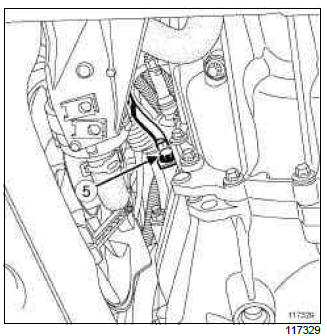
- Remove the bolt (5) from the earth wiring on the gearbox.
- Unclip the diesel runoff pipe from the sump.
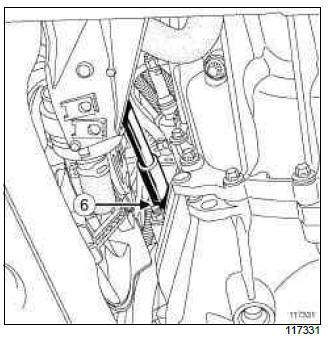
- Remove:
- the starter lower bolt (6),
- the starter from underneath, placing the starter solenoid on timing end.
REFITTING
I - REFITTING OPERATION FOR PART CONCERNED
- Refit:
- the starter,
- the starter lower mounting bolt.
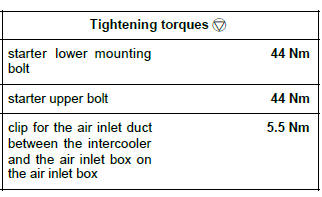
- Torque tighten the starter lower mounting bolt (44 Nm).
- Refit the earth wiring bolt on the gearbox.
- Clip the diesel runoff pipe onto the sump.
- Refit:
- the engine undertray,
- the front left-hand wheel arch liner (see Front wheel arch liner: Removal - Refitting) (MR 393, 57A, Interior equipment),
- the front left-hand wheel (see Wheel: Removal - Refitting) (MR 392, 35A, Wheels and tyres),
- the starter upper mounting bolt.
- Torque tighten the starter upper bolt (44 Nm).
- Refit:
- the starter power lead,
- the starter excitation lead.
II - FINAL OPERATION.
- Attach the emission control cover wiring harness.
- Connect the injector rail pressure sensor connector.
- Refit:
- the dipstick duct bolts,
- the dipstick.
- Attach the relay box onto the battery tray.
- Position the air inlet duct between the intercooler and the air inlet box.
- Torque tighten the clip for the air inlet duct between the intercooler and the air inlet box on the air inlet box (5.5 Nm).
- Refit:
- the air inlet pipe nut on the alternator,
- the air duct at the air filter unit inlet.
- Refit the engine cover.
- Connect the battery (see 80A, Battery, Battery: Removal - Refitting).
K9K, and 750 or 752
REMOVAL
I - REMOVAL PREPARATION OPERATION
- Remove:
- the air filter box air inlet pipe,
- the battery (see Battery: Removal - Refitting) (MR 392, 80A, Battery),
- the battery tray (see Battery: Removal - Refitting) (MR 392, 80A, Battery),
- the air filter box (see 12A, Fuel mixture, Air filter unit: Removal - Refitting, 12A-17).
II - OPERATION FOR REMOVAL OF PART CONCERNED
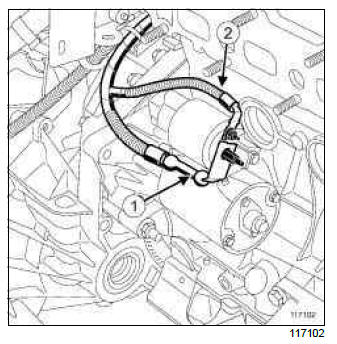
- Remove:
- the nut (1) from the starter feed wire,
- the nut (2) from the solenoid feed wire.
- Move the starter wiring harness to one side.
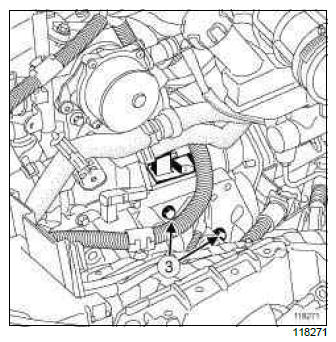
- Remove:
- the starter bolts (3),
- the starter from above.
REFITTING
I - REFITTING PREPARATION OPERATION
- Check that the centring dowel is in place
II - REFITTING OPERATION FOR PART CONCERNED
- Refit:
- the starter,
- the starter bolts.
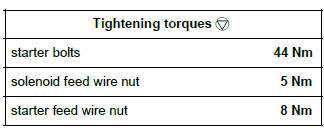
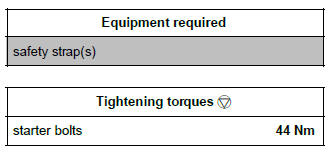
- Torque tighten the starter bolts (44 Nm).
- Fit the starter wiring harness.
- Refit:
- the solenoid feed wire nut,
- the starter feed wire nut.
- Torque tighten:
- the solenoid feed wire nut (5 Nm),
- the starter feed wire nut (8 Nm).
III - FINAL OPERATION.
- Refit:
- the air filter box (see 12A, Fuel mixture, Air filter unit: Removal - Refitting, 12A-17),
- the battery tray (see Battery: Removal - Refitting) (MR 392, 80A, Battery),
- the battery (see Battery: Removal - Refitting) (MR 392, 80A, Battery),
- the air filter unit air inlet pipe.
D4F, and 784 or 786
REMOVAL
I - REMOVAL PREPARATION OPERATION
- Position the vehicle on a two-post lift (see Vehicle: Towing and lifting) (MR 392, 02A, Lifting equipment).
- Disconnect the battery (see Battery: Removal - Refitting) (MR 392, 80A, Battery).
- Remove:
- the air filter box air inlet pipe,
- the front wheels (see Wheel: Removal - Refitting) (MR 392, 35A, Wheels and tyres),
- the engine undertray,
- the front section of the left and right-hand wheel arch liners (see Front wheel arch liner: Removal - Refitting) (MR 393, 55A, Exterior protection),
- the front bumper (see Front bumper: Removal - Refitting) (MR 393, 55A, Exterior protection).
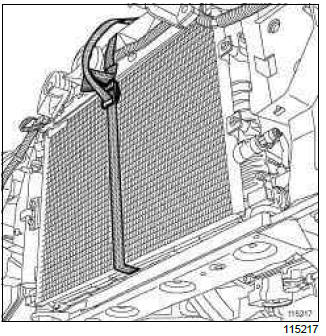
- Attach the cooling assembly using a safety strap(s).
- Remove the radiator mounting cross member (see Radiator mounting cross member: Removal - Refitting) (MR 393, 41A, Front lower structure).
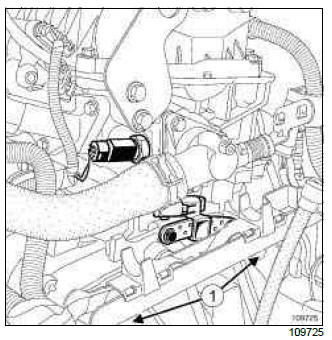
- Remove the engine wiring harness neck bolts (1).
- Move the wiring harness away from the engine.
II - OPERATION FOR REMOVAL OF PART CONCERNED
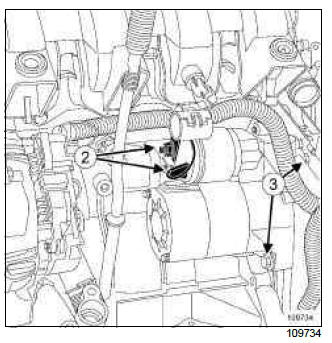
- Remove the starter wiring harness (2).
Note: Depending on fitting, the starter wiring harness is screwed on or clipped on for solenoid excitation.
- Remove:
- the starter bolts (3),
- the starter from underneath the vehicle.
REFITTING
I - REFITTING PREPARATION OPERATION
- Check that the centring dowel is in place.
II - REFITTING OPERATION FOR PART CONCERNED
- Refit:
- the starter,
- the starter bolts.
- Torque tighten the starter bolts (44 Nm).
- Refit the starter wiring harness.
III - FINAL OPERATION.
- Refit:
- the engine's electrical wiring channel bolts,
- the radiator mounting cross member (see Radiator mounting cross member: Removal - Refitting) (MR 393, 41A, Front lower structure).
- Separate the cooling assembly.
- Refit:
- the front bumper (see Front bumper: Removal - Refitting) (MR 393, 55A, Exterior protection),
- the front section of the left and right-hand wheel arch liners (see Front wheel arch liner: Removal - Refitting) (MR 393, 55A, Exterior protection),
- the engine undertray,
- the front wheels (see Wheel: Removal - Refitting) (MR 392, 35A, Wheels and tyres),
- the air filter box air inlet pipe.

