Renault Clio: Steering box: Removal - Refitting
Renault Clio III (2005-2013) Service Manual / Chassis / Steering Assembly / Steering box: Removal - Refitting
REMOVAL
I - REMOVAL PREPARATION OPERATION
- Position the vehicle on a two-post lift (see Vehicle: Towing and lifting) (02A, Lifting equipment).
- Remove:
- the front wheels (see 35A, Wheels and tyres,
Wheel: Removal - Refitting, 35A-1),
- the engine undertray bolts,
- the engine undertray,
- the front axle subframe (see 31A, Front axle components, Front axle subframe: Removal - Refitting, 31A-55).
II - OPERATION FOR REMOVAL OF PART CONCERNED
RIGHT-HAND DRIVE
- Remove:
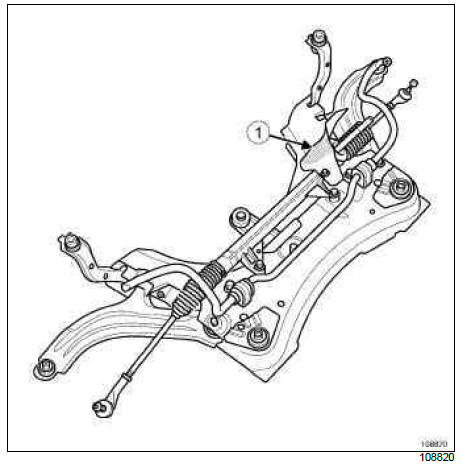
- the heat shield bolts from the steering box,
- the steering box heat shield (1),
- Tilt the anti-roll bar (2) backwards.
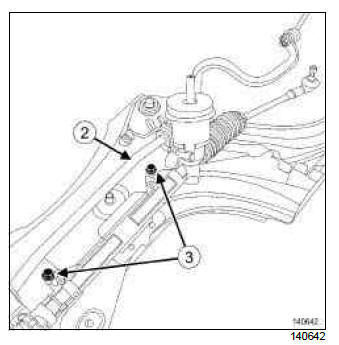
- Remove:
- the steering box bolts (3),
- the steering box of the front axle subframe.
REFITTING
I - REFITTING PREPARATION OPERATION
- parts always to be replaced: Steering box bolt (13,04,03,05).
II - REFITTING OPERATION FOR PART CONCERNED
- Refit the steering box on the front axle subframe.
- Tighten to torque the steering box bolts on the front axle subframe (105 N.m).
- Tilt the anti-roll bar forward.
RIGHT-HAND DRIVE
- Refit the heat shield on the steering rack.
III - FINAL OPERATION
- Refit:
- the front axle sub-frame (see 31A, Front axle components, Front axle subframe: Removal - Refitting, 31A-55),
- the engine undertray,
- the front wheels (see 35A, Wheels and tyres, Wheel: Removal - Refitting, 35A-1).
- Adjust the front axle (see 30A, General information, Front axle system: Adjustment, 30A- 23).
DISCHARGE LAMPS
- It is essential to initialise the xenon bulb system (see Fault finding - Replacement of components) (80B, Headlights).
READ NEXT:
 Track rod: Removal - Refitting
IMPORTANT
Consult the safety and cleanliness advice and operation
recommendations before carrying out any repair (see Steering: Precautions for
the repair).
REMOVAL
I - REMOVAL PREPARATION OPERATIO
Axial ball joint linkage: Removal - Refitting
REMOVAL
I - REMOVAL PREPARATION OPERATION
Position the vehicle on a two-post lift (see Vehicle: Towing and
lifting).
Remove the front wheel (see 35A, Wheels and tyres,
Wheel: Removal - Refittin
Steering column: List and location of components
VEHICLE WITH KEY
Intermediate shaft
Steering column adjustment
handle
Key-operated switch
VEHICLE WITH CARD
Intermediate shaft
Electric steering column lock
Steering column adjustment
han
SEE MORE:
Driving
The Renault Clio IV (2014-2019) offers a satisfying driving experience with its nimble handling and responsive performance. Its compact size and maneuverability make it well-suited for urban driving and tight parking spaces. The precise steering and suspension tuning provide a balanced and confident
Your comfort
The Renault Clio IV (2014-2019) is designed with your comfort in mind. It features a well-crafted interior with quality materials and thoughtful ergonomics. The seats offer excellent support and adjustability, providing a comfortable driving experience. The cabin is designed to minimize noise and vi
© 2016-2026 Copyright Renault Clio Owners Club - 0.0058
