Renault Clio: Alternator: Removal - Refitting
K4J, and STANDARD HEATING - K4M, and STANDARD HEATING
REMOVAL
I - REMOVAL PREPARATION OPERATION
- Position the vehicle on a two-post lift (see Vehicle: Towing and lifting).
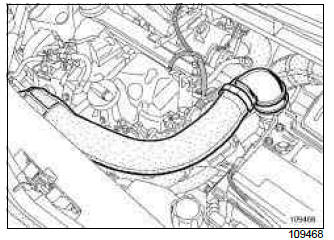
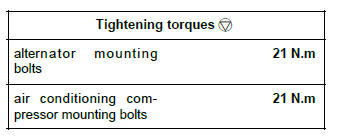
- Remove the air inlet duct.
- Disconnect the battery (see Battery: Removal - Refitting).
- Remove:
- the front right-hand wheel (see Wheel: Removal - Refitting),
- the front right-hand wheel arch liner (see Front wheel arch liner: Removal - Refitting),
- the front left-hand wheel arch liner partially (see Front wheel arch liner: Removal - Refitting),
- the bumper (see Front bumper: Removal - Refitting),
- the accessories belt (see 11A, Top and front of engine, Accessories belt: Removal - Refitting, 11A-5).
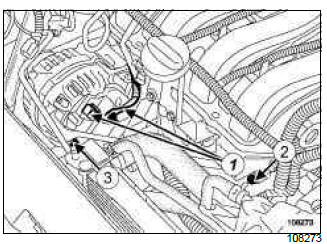
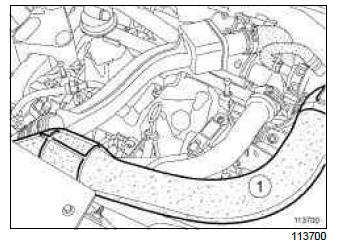
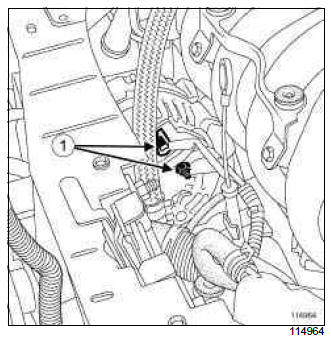
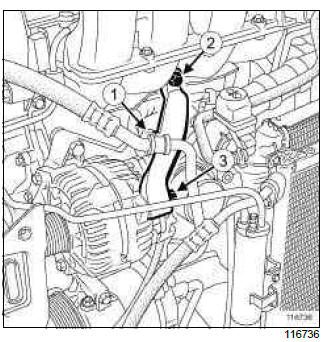
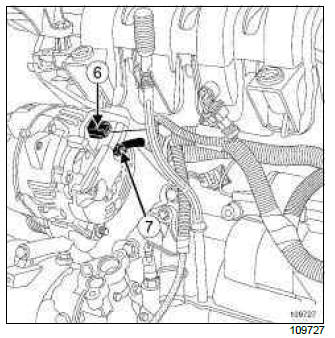
- Disconnect the electrical connections from the alternator (1).
- Undo the strut mounting bolt on the cylinder block (2).
- Remove the strut mounting bolt on the alternator (3).
- Separate the mounting strut from the alternator.
- Remove the front right-hand air deflector.
II - REMOVAL OF PART CONCERNED
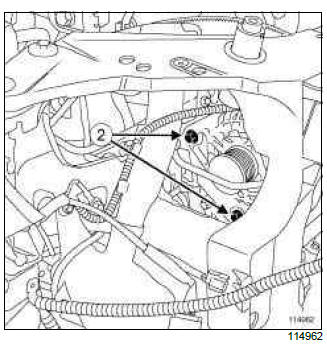
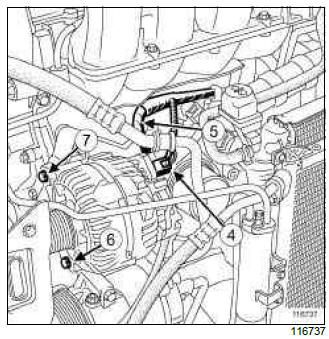
- Remove the upper mounting bolt from the alternator.
- Undo the lower alternator mounting bolt.
- Remove the alternator with its lower mounting bolt through the front of the vehicle.
REFITTING
I - REFITTING PREPARATION OPERATION
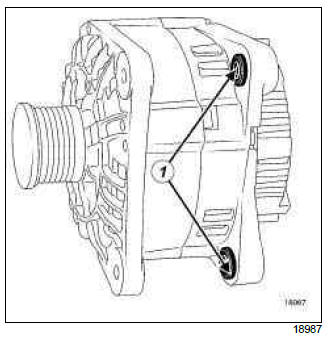
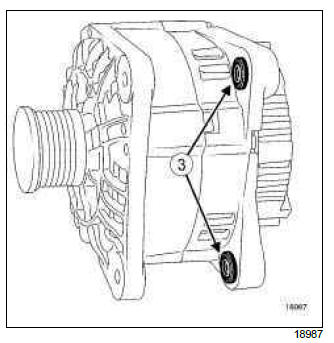
- Push in the rings (1) to make fitting easier.
II - REFITTING PART CONCERNED
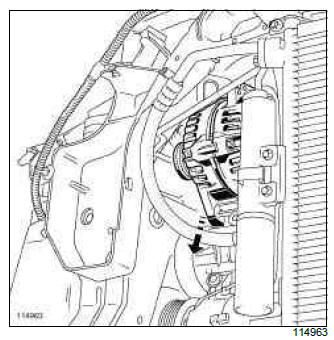
- Refit the alternator.
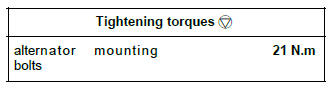
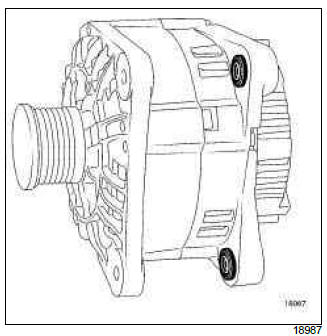
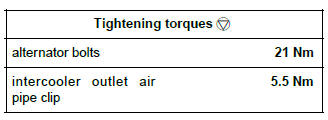
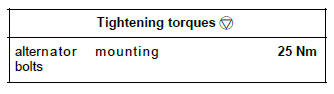
- Torque tighten the alternator mounting bolts (21 N.m).
III - FINAL OPERATION.
- Reconnect the alternator electrical connections.
- Refit:
- Refit the front right-hand air deflector,
- the new accessories belt (see 11A, Top and front of engine, Accessories belt: Removal - Refitting, 11A-5),
- the bumper (see Front bumper: Removal - Refitting),
- the front left-hand wheel arch liner (see Front wheel arch liner: Removal - Refitting),
- the front right-hand wheel arch liner (see Front wheel arch liner: Removal - Refitting),
- the front right-hand wheel (see Wheel: Removal - Refitting).
- Reconnect the battery (see Battery: Removal - Refitting).
- Refit the air inlet duct.
D4F, and 740 or 742 or 764, and STANDARD HEATING

REMOVAL
I - REMOVAL PREPARATION OPERATION
- Position the vehicle on a two-post lift (see Vehicle: Towing and lifting) (MR 392, 02A, Lifting equipment).
- Disconnect the battery (see Battery: Removal - Refitting) (MR 392, 80A, Battery).
- Remove:
- the front bumper (see Front bumper: Removal - Refitting) (MR 393, 55A, Exterior protection),
- the front right-hand deflector,
- the front right-hand wheel (see Wheel: Removal - Refitting) (MR 392, 35A, Wheels and tyres),
- the front right-hand wheel arch liner (see Front wheel arch liner: Removal - Refitting) (MR 393, 55A, Exterior protection),
- the accessories belt (see 11A, Top and front of engine, Accessories belt: Removal - Refitting, 11A-5).
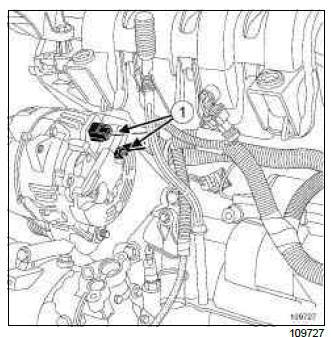
- Disconnect the alternator's electrical connections (1)
II - OPERATION FOR REMOVAL OF PART CONCERNED
- Remove:
- the alternator mounting bolts,
- the alternator.
REFITTING
I - REFITTING PREPARATION OPERATION
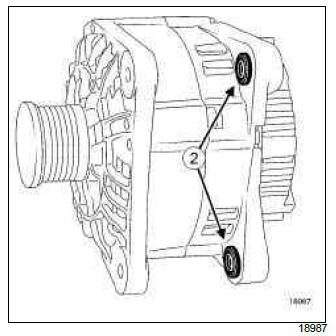
- Press in the rings (2) using pliers or a vice to make the fitting operation easier.
II - REFITTING OPERATION FOR PART CONCERNED
- Refit the alternator.
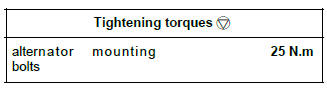
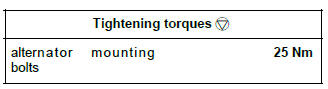
- Torque tighten the alternator mounting bolts (25 N.m).
III - FINAL OPERATION.
- Connect the alternator electrical connections.
- Refit:
- the front right-hand deflector,
- the front bumper (see Front bumper: Removal - Refitting) (MR 393, 55A, Exterior protection),
- the accessories belt (see 11A, Top and front of engine, Accessories belt: Removal - Refitting, 11A-5),
- the front right-hand wheel arch liner (see Front wheel arch liner: Removal - Refitting) (MR 393, 55A, Exterior protection),
- the front right-hand wheel (see Wheel: Removal - Refitting) (MR 392, 35A, Wheels and tyres).
- Connect the battery (see Battery: Removal - Refitting) (MR 392, 80A, Battery).
D4F, and 740 or 742 or 764, and AIR CONDITIONING
REMOVAL
I - REMOVAL PREPARATION OPERATION
- Position the vehicle on a two-post lift (see Vehicle: Towing and lifting) (MR 392, 02A, Lifting equipment).
- Disconnect the battery (see Battery: Removal - Refitting) (MR 392, 80A, Battery).
- Remove:
- the front bumper (see Front bumper: Removal - Refitting) (MR 393, 55A, Exterior protection),
- the front right-hand deflector,
- the front right-hand wheel (see Wheel: Removal - Refitting) (MR 392, 35A, Wheels and tyres),
- the front right-hand wheel arch liner (see Front wheel arch liner: Removal - Refitting) (MR 393, 55A, Exterior protection),
- the accessories belt (see 11A, Top and front of engine, Accessories belt: Removal - Refitting, 11A-5),
- the air conditioning compressor mounting bolts.
- Fit the air conditioning compressor on the radiator front cross member.
Note: Do not drain the air conditioning circuit.
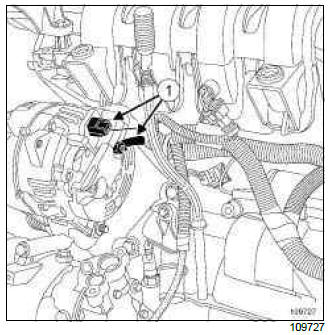
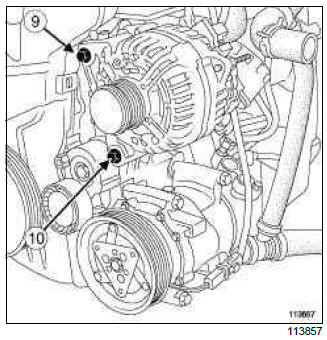
- Disconnect the alternator's electrical connections (1).
II - OPERATION FOR REMOVAL OF PART CONCERNED
- Remove:
- the alternator mounting bolts,
- the alternator.
REFITTING
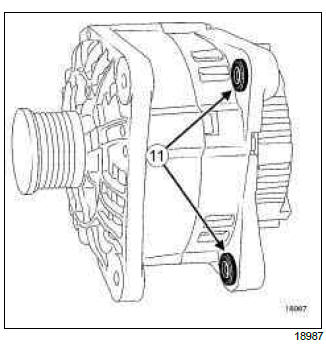
I - REFITTING PREPARATION OPERATION
- Press in the rings using pliers or a vice to make the fitting operation easier.
II - REFITTING OPERATION FOR PART CONCERNED
- Refit the alternator.
- Torque tighten the alternator mounting bolts (25 N.m).
III - FINAL OPERATION.
- Connect the alternator electrical connections.
- Refit:
- the air conditioning compressor (see Compressor: Removal - Refitting) (MR 392, 62A, Air conditioning),
- the accessories belt (see 11A, Top and front of engine, Accessories belt: Removal - Refitting, 11A-5),
- the front right-hand deflector,
- the front bumper (see Front bumper: Removal - Refitting) (MR 393, 55A, Exterior protection),
- the front right-hand wheel arch liner (see Front wheel arch liner: Removal - Refitting) (MR 393, 55A, Exterior protection),
- the front right-hand wheel (see Wheel: Removal - Refitting) (MR 392, 35A, Wheels and tyres).
- Connect the battery (see Battery: Removal - Refitting) (MR 392, 80A, Battery).
K4J or K4M, and AIR CONDITIONING or CLIMATE CONTROL
REMOVAL
I - REMOVAL PREPARATION OPERATION
- Position the vehicle on a two-post lift (see Vehicle: Towing and lifting).
- Remove the air inlet duct.
- Disconnect the battery (see Battery: Removal - Refitting).
- Remove:
- the front right-hand wheel (see Wheel: Removal - Refitting),
- the front right-hand wheel arch liner (see Front wheel arch liner: Removal - Refitting),
- the front left-hand wheel arch liner partially (see Front wheel arch liner: Removal - Refitting),
- the bumper (see Front bumper: Removal - Refitting),
- the accessories belt (see 11A, Top and front of engine, Accessories belt: Removal - Refitting, 11A-5).
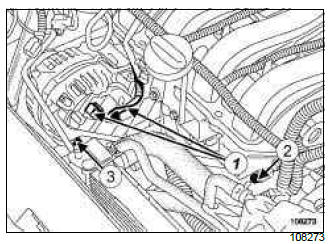
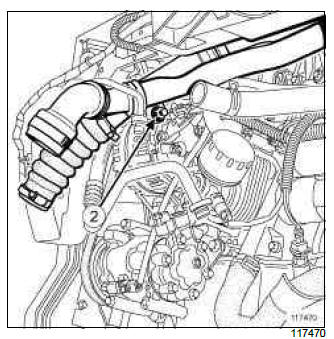
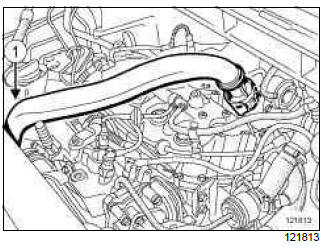
- Disconnect the electrical connections from the alternator (1).
- Undo the strut mounting bolt on the cylinder block (2).
- Remove the strut mounting bolt on the alternator (3).
- Separate the mounting strut from the alternator.
- Remove the front right-hand air deflector.
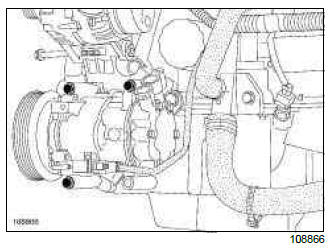
- Remove the air conditioning compressor mounting bolts.
- Fit the air conditioning compressor on the front radiator cross member.
Note: This operation does not require the air conditioning system to be drained.
II - REMOVAL OF PART CONCERNED
- Remove the upper mounting bolt from the alternator.
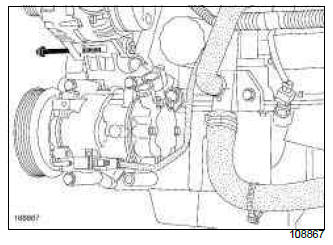
- Undo the lower alternator mounting bolt.
- Remove the alternator with its lower mounting bolt through the front of the vehicle.
REFITTING
I - REFITTING PREPARATION OPERATION
- Push in the rings (1) to make fitting easier.
II - REFITTING PART CONCERNED
- Refit the alternator.
- Torque tighten the alternator mounting bolts (21 N.m).
III - FINAL OPERATION.
- Reconnect the alternator electrical connections.
- Refit the air conditioning compressor.
- Torque tighten the air conditioning compressor mounting bolts (21 N.m).
- Refit:
- Refit the front right-hand air deflector,
- the new accessories belt (see 11A, Top and front of engine, Accessories belt: Removal - Refitting, 11A-5),
- the bumper (see Front bumper: Removal - Refitting),
- the front left-hand wheel arch liner (see Front wheel arch liner: Removal - Refitting),
- the front right-hand wheel arch liner (see Front wheel arch liner: Removal - Refitting),
- the front right-hand wheel (see Wheel: Removal - Refitting).
- Reconnect the battery (see Battery: Removal - Refitting).
- Refit the air inlet duct.
K9K
REMOVAL
I - REMOVAL PREPARATION OPERATION
- Position the vehicle on a two-post lift (see Vehicle: Towing and lifting) (MR 392, 02A, Lifting equipment).
- Remove the front engine cover.
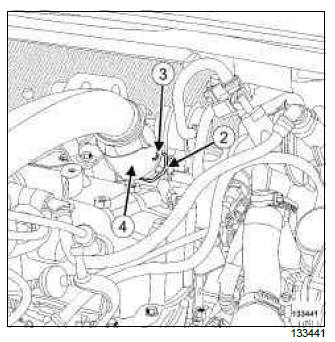
- Remove the air filter inlet air pipe (1).
- Disconnect the battery (see Battery: Removal - Refitting) (MR 392, 80A, Battery).
- Remove:
- the front wheels (see Wheel: Removal - Refitting) (MR 392, 35A, Wheels and tyres),
- the front section of the front wheel arch liners (see Front wheel arch liner: Removal - Refitting) (MR 393, 55A, Exterior protection),
- the bumper (see Front bumper: Removal - Refitting) (MR 393, 55A, Exterior protection),
- the headlights (see ) (MR 392, 80B, Headlights) or (see Xenon headlight: Removal - Refitting) (MR 392, 80C, Xenon bulbs),
- the frontal impact cross member (see Front impact cross member: Removal - Refitting) (MR 393, 41A, Front lower structure),
- the intercooler (see 12B, Turbocharging, Intercooler: Removal - Refitting, 12B-21),
- the front end panel (see Front end panel: Removal - Refitting) (MR 393, 42A, Upper front structure),
- the accessories belt (see 11A, Top and front of engine, Accessories belt: Removal - Refitting, 11A-5).
- Remove the bolt (2) from the intercooler inlet and outlet pipes.
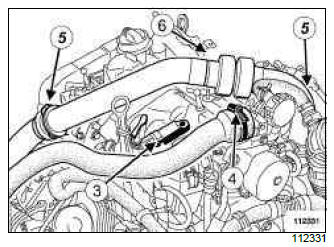
- Disconnect the connector (3) from the inlet air pressure sensor.
- Undo the clip (4) from the intercooler outlet air pipe.
- Remove:
- the intercooler outlet air pipe,
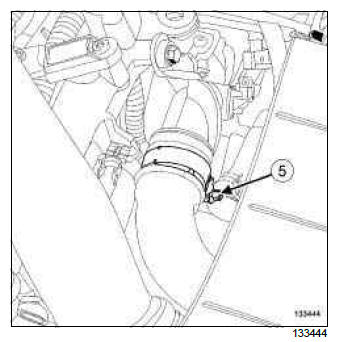
- the clips (5) from the intercooler inlet air pipe,
- the nut (6) from the intercooler inlet air pipe,
- the intercooler inlet air pipe.
II - OPERATION FOR REMOVAL OF PART CONCERNED
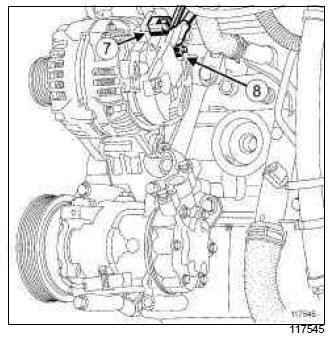
- Disconnect the alternator connector (7).
- Remove the nut (8) from the alternator positive terminal.
- Disconnect the alternator positive terminal wire.
- Remove the alternator upper bolt (9).
- Loosen the alternator lower bolt (10).
- Remove the alternator with its lower bolt.
REFITTING
I - REFITTING PREPARATION OPERATION
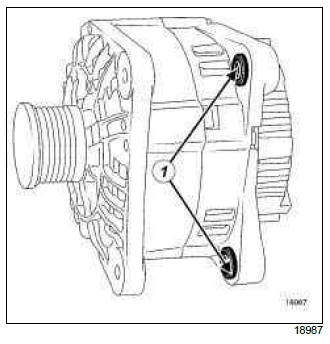
- Refit the rings (11) using pliers or a vice.
II - REFITTING OPERATION FOR PART CONCERNED
- Refit the alternator with its lower bolt.
- Screw in the alternator bolts, without tightening them.
- Torque tighten the alternator bolts (21 Nm).
- Connect the wire to the alternator positive terminal.
- Refit the alternator positive terminal nut.
- Connect the alternator connector.
III - FINAL OPERATION.
- Refit:
- the intercooler air inlet pipe,
- the nut to the intercooler inlet air pipe,
- the clips to the intercooler inlet air pipe,
- the intercooler outlet air pipe.
- Torque tighten the intercooler outlet air pipe clip (5.5 Nm).
- Connect the inlet air pressure sensor connector.
- Remove:
- the intercooler inlet and outlet pipe bolts,
- the accessories belt (see 11A, Top and front of engine, Accessories belt: Removal - Refitting, 11A-5),
- the front end panel (see Front end panel: Removal - Refitting) (MR 393, 42A, Upper front structure),
- the frontal impact cross member (see Front impact cross member: Removal - Refitting) (MR 393, 41A, Front lower structure),
- the intercooler (see 12B, Turbocharging, Intercooler: Removal - Refitting, 12B-21),
- the headlights (see ) (MR 392, 80B, Headlights) or (see Xenon headlight: Removal - Refitting) (MR 392, 80C, Xenon bulbs),
- the bumper (see Front bumper: Removal - Refitting) (MR 393, 55A, Exterior protection),
- the front section of the front wheel arch liners (see Front wheel arch liner: Removal - Refitting) (MR 393, 55A, Exterior protection),
- the front wheels (see Wheel: Removal - Refitting) (MR 392, 35A, Wheels and tyres).
- Connect the battery (see Battery: Removal - Refitting) (MR 392, 80A, Battery).
- Refit:
- the air filter inlet air pipe,
- the engine cover.
M4R
REMOVAL
I - REMOVAL PREPARATION OPERATION
- Position the vehicle on a lift (see Vehicle: Towing and lifting).
- Remove the engine cover.
- Disconnect the battery (see Battery: Removal - Refitting).
- Remove:
- the air resonator in the front end panel (see 12A, Fuel mixture, Air resonator: Removal - Refitting, 12A-10),
- the right-hand headlight ,
- the accessories belt (see 11A, Top and front of engine, Accessories belt: Removal - Refitting, 11A-5).
- Disconnect the alternator's electrical connections (1)
II - OPERATION FOR REMOVAL OF PART CONCERNED
- Remove the alternator mounting bolts (2).
- Remove the alternator using a screwdriver.
REFITTING
I - REFITTING PREPARATION OPERATION
- Push in the rings (3), using pliers or a vice to make the fitting operation easier.
II - REFITTING OPERATION FOR PART CONCERNED
- Refit the alternator.
- Tighten to torque the alternator mounting bolts (25 Nm).
III - FINAL OPERATION
- Connect the alternator electrical connections.
- Refit:
- the accessories belt (see 11A, Top and front of engine, Accessories belt: Removal - Refitting, 11A-5),
- the right-hand headlight ,
- the air resonator in the front end panel (see 12A, Fuel mixture, Air resonator: Removal - Refitting, 12A-10).
- Connect the battery (see Battery: Removal - Refitting).
- Refit the engine cover.
F4R
REMOVAL
I - REMOVAL PREPARATION OPERATION
- Position the vehicle on a two-post lift (see Vehicle: Towing and lifting) (MR 392, 02A, Lifting equipment).
- Disconnect the battery (see Battery: Removal - Refitting) (MR 392, 80A, Battery).
- Remove:
- the accessories belt (see 11A, Top and front of engine, Accessories belt: Removal - Refitting, 11A-5),
- the front bumper (see Front bumper: Removal - Refitting) (MR 393, 55A, Exterior protection),
II - OPERATION FOR REMOVAL OF PART CONCERNED
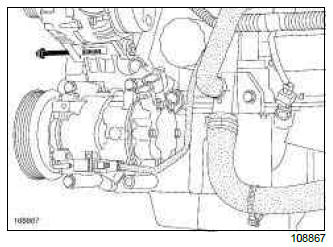
- Remove:
- the bolt (1) mounting the air conditioning pipe on the reinforcing bracket.
- the bolt (2) mounting the reinforcing bracket on the injector holder plate,
- the bolts (3) mounting the reinforcing bracket on the alternator,
- the reinforcing bracket.
- Disconnect the alternator connector (4).
- Remove:
- the wiring harness nut (5) on the alternator,
- the lower mounting bolt (6) from the alternator,
- the upper mounting bolt (7) from the alternator,
- the alternator.
REFITTING
I - REFITTING PREPARATION OPERATION
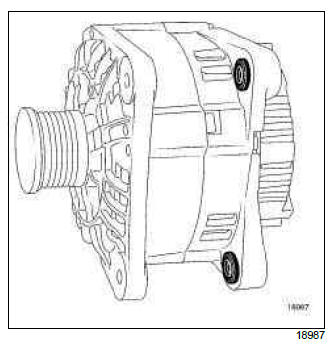
- Refit the rings using pliers or a vice to facilitate fitting.
II - REFITTING OPERATION FOR PART CONCERNED
- Refit:
- the alternator,
- the alternator upper mounting bolt,
- the alternator lower mounting bolt.
- Torque tighten the alternator mounting bolts (25 Nm).
- Refit the nut to the wiring harness (5) on the alternator.
- Connect the alternator connector (4).
- Refit:
- the reinforcing bracket,
- the bolt (3) mounting the reinforcing bracket on the alternator.
- the bolt (2) mounting the reinforcing bracket on the injector holder plate,
- the bolt (1) mounting the air conditioning pipe on the reinforcing bracket.
III - FINAL OPERATION.
- Refit:
- the front bumper (see Front bumper: Removal - Refitting) (MR 393, 55A, Exterior protection),
- the accessories belt (see 11A, Top and front of engine, Accessories belt: Removal - Refitting, 11A-5).
- Connect the battery (see Battery: Removal - Refitting) (MR 392, 80A, Battery).
D4F, and 784 or 786
REMOVAL
I - REMOVAL PREPARATION OPERATION
- Position the vehicle on a two-post lift (see Vehicle: Towing and lifting) (02A, Lifting equipment).
- Disconnect the battery (see ) (80A, Battery).
- Remove:
- the front wheel arch liners (see Front wheel arch liner: Removal - Refitting) (55A, Exterior protection),
- the front bumper (see Front bumper: Removal - Refitting) (55A, Exterior protection),
- the accessories belt (see 11A, Top and front of engine, Accessories belt: Removal - Refitting, 11A-5).
- Remove the bolt (1) from the turbocharger air outlet pipe on the inlet distributor.
- Separate the clip (2) of the turbocharger air outlet pipe.
Note: If the clip (3) is removed from the flexible heat shield (4), the latter must be replaced.
- Move aside the turbocharger air outlet pipe.
- Loosen the clip (5) on the intercooler intermediate pipe.
- Remove:
- the intercooler (see 12B, Turbocharging, Intercooler: Removal - Refitting, 12B-21),
- the front impact cross member (see Front impact cross member: Removal - Refitting) (41A, Front lower structure).
AIR CONDITIONING
- Disconnect the air conditioning compressor clutch connector.
- Detach the air conditioning pipe from the body between the compressor and expansion valve.
- Remove the air conditioning compressor bolts.
- Position the air conditioning compressor on the radiator mounting cross member.
II - OPERATION FOR REMOVAL OF PART CONCERNED
- Disconnect the alternator wiring connector (6).
- Remove:
- the alternator wiring nut (7),
- the alternator bolts,
- the alternator.
REFITTING
I - REFITTING PREPARATION OPERATION
- Clean the alternator pulley V-grooves to remove any deposits.
- Press in the rings (8) using pliers or a vice to make the fitting operation easier.
II - REFITTING OPERATION FOR PART CONCERNED
- Refit:
- the alternator,
- the alternator bolts.
- Torque tighten the alternator bolts (25 N.m).
- Refit the alternator wiring nut.
- Connect the alternator wiring connector.
III - FINAL OPERATION
AIR CONDITIONING
- Refit:
- the air conditioning compressor ,
- the air conditioning compressor bolts.
- Torque tighten the air conditioning compressor bolts (25 N.m).
- Attach the air conditioning pipe to the body between the compressor and expansion valve.
- Connect the air conditioning compressor clutch connector.
- Refit:
- the turbocharger air outlet pipe,
- the clip of the turbocharger air outlet pipe,
- the turbocharger air outlet pipe bolt on the inlet manifold,
- the front impact cross member (see Front impact cross member: Removal - Refitting) (41A, Front lower structure),
- the intercooler (see 12B, Turbocharging, Intercooler: Removal - Refitting, 12B-21),
- the accessories belt (see 11A, Top and front of engine, Accessories belt: Removal - Refitting, 11A-5),
- the front bumper (see Front bumper: Removal - Refitting) (55A, Exterior protection),
- the front wheel arch liners (see Front wheel arch liner: Removal - Refitting) (55A, Exterior protection).
- Connect the battery (see ) (80A, Battery).
READ NEXT:
 Starter: Removal - Refitting
D4F, and 740 or 742 or 764
REMOVAL
I - REMOVAL PREPARATION OPERATION
Disconnect the battery (see Battery: Removal - Refitting)
(MR 392, 80A, Battery).
Remove the air filter unit (see 12A, Fuel mi
Ignition: Specifications
D4F or F4R or K4J or K4M or M4R
Coils: Removal - Refitting
D4F, and 740 or 742 or 764
REMOVAL
I - REMOVAL PREPARATION OPERATION
Disconnect the battery (see Battery: Removal - Refitting)
(MR 392, 8
SEE MORE:
Driving
The Renault Clio IV (2014-2019) offers a satisfying driving experience with its nimble handling and responsive performance. Its compact size and maneuverability make it well-suited for urban driving and tight parking spaces. The precise steering and suspension tuning provide a balanced and confident
Your comfort
The Renault Clio IV (2014-2019) is designed with your comfort in mind. It features a well-crafted interior with quality materials and thoughtful ergonomics. The seats offer excellent support and adjustability, providing a comfortable driving experience. The cabin is designed to minimize noise and vi
