Renault Clio: Battery: Removal - Refitting
IMPORTANT
Consult the safety and cleanliness advice and operation recommendations before carrying out any repair (see 80A, Battery, Battery: Precautions for the repair, 80A-4).
REMOVAL
I - REMOVAL PREPARATION OPERATION
WARNING
Before disconnecting the battery:
- wait for the motor-driven fan assembly to stop,
- wait for the computer to finish saving (1 minute).
WARNING
The visual indicator cannot be considered reliable in After-Sales; do not use it to determine the state of the battery.
K4J or K4M or M4R
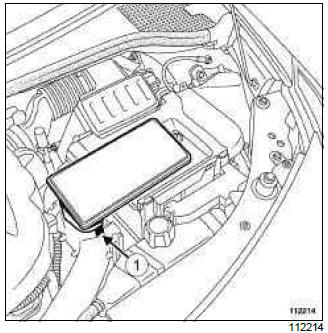
- Remove the air resonator by pressing the clip (1).

- Remove the air resonator by pressing the clip (1).
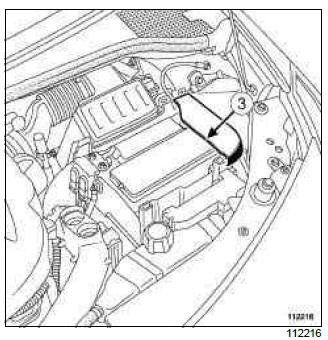
- Remove the small part of the battery cover (3).
II - OPERATION FOR REMOVAL OF PART CONCERNED
1 - DISCONNECTING
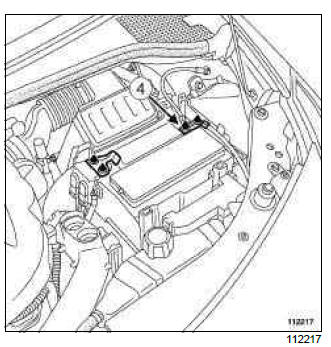
- Remove the negative battery terminal (4).
2 - REMOVAL
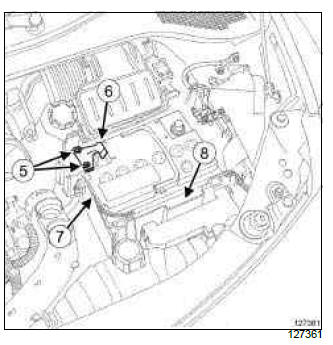
- Remove the nuts (5) from the protective fuse holder.
- Remove the charge terminal (6).
- Disconnect the protective fuse holder.
- Unclip the degassing pipe (7).
- Remove:
- the nut from the battery bracket,
- the battery bracket (8),
- the battery.
REFITTING
I - REFITTING PREPARATION OPERATION
- Check the battery (see Battery: Check) (80A, Battery).
- In the event of a replacement, remove the positive battery terminal.
II - REFITTING OPERATION FOR PART CONCERNED
1 - REPLACEMENT
- Undo the positive battery terminal.
- Push the positive battery terminal fully onto the battery terminal post.
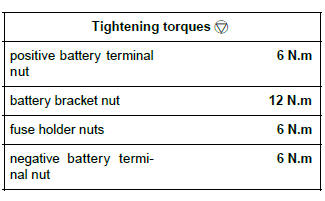
- Torque tighten the positive battery terminal nut (6 N.m).
WARNING
Poor contact may cause starting or charging faults, create sparks and cause the battery to explode.
2 - REFITTING
- Fit the battery into its housing, placing it as close as possible to the engine side.
- Refit the battery bracket.
- Tighten to torque the battery bracket nut (12 N.m).
- Connect the degassing pipe to the battery.
- Connect the protective fuse holder to the positive battery terminal.
- Position the charge terminal on the positive terminal studs.
- Fit the protective fuse holder against the battery heat shield while securing.
- Torque tighten the fuse holder nuts (6 N.m).
WARNING
Poor contact may cause starting or charging faults, create sparks and cause the battery to explode.
3 - CONNECTION
- Loosen the negative battery terminal.
- Push the negative battery terminal fully onto the battery terminal post.
- Torque tighten the negative battery terminal nut (6 N.m).
WARNING
Poor contact may cause starting or charging faults, create sparks and cause the battery to explode.
III - FINAL OPERATION
- Clip:
- the small part of the battery housing,
- the large part of the battery housing.
K4J or K4M or M4R
- Refit the air resonator.
- When refitting the battery or each time it is disconnected, carry out a certain number of operations, without using the diagnostic tool, so that the vehicle can operate correctly (see Battery: Initialisation) (80A, Battery).
READ NEXT:
 Battery: Precautions for the repair
I - SAFETY
1 - DANGER: RISK FROM ACID LINKED TO
HANDLING
Sulphuric acid is a highly aggressive and toxic substance
which corrodes most metals.
When handling batteries, it is very important to take th
Front lighting: List and location of components
DOCUMENTATION PHASE 1
I - LIST OF COMPONENTS
The front lighting consists of:
headlights (see 80B, Headlights, Headlight: Removal
- Refitting, 80B-7)
halogen bulbs (see 80B, Headlights, Headlight
SEE MORE:
Manual gear control: Adjustment
TL4
ADJUSTMENT
ADJUSTMENT OF SELECTION CABLE DURING A
REMOVAL OPERATION
1 - Passenger compartment
Shift the selector lever to third gear.
Fit a shim (1) (6 mm between the locking ring and
reverse gear interlock on the selector lever.
Use a strap (2) to immobilise the lever against the
shim
Master cylinder: Removal - Refitting
F4R or K4J or K4M or K9K or M4R, and LEFT-HAND DRIVE
WARNING
Prepare for brake fluid outflow, to prevent damage
to the mechanical parts and bodywork around the
braking system.
REMOVAL
I - REMOVAL PREPARATION OPERATION
Position the vehicle on a two-post lift (see Vehicle:
Towing and lifting) (MR
