Renault Clio: Brake pedal: Removal - Refitting
SCHOOL VEHICLE
REMOVAL
I - REMOVAL PREPARATION OPERATION
- Disconnect the battery (see Battery: Removal - Refitting) (MR 392, 80A, Battery).
II - OPERATION FOR REMOVAL OF PART CONCERNED
1 - student side
- Remove:
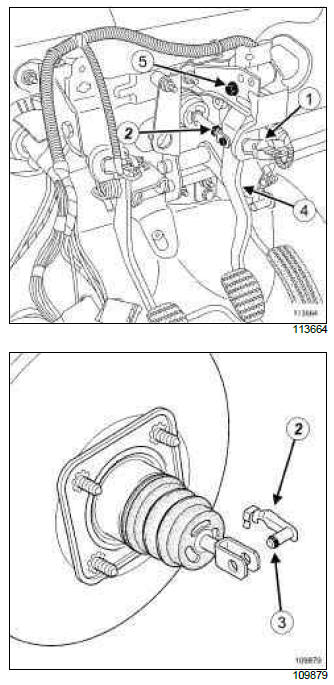
- the brake light switch (1) (see 37A, Mechanical component controls, Brake pedal switch: Removal - Refitting, 37A-79),
- the double safety connecting shaft (2) from between the brake servo pushrod and the brake pedal, and, after tilting the connecting shaft upwards, move the ring (3) using a flat-blade screwdriver.
- the circlip (4) from the brake pedal to the link bar connection control lever,
- the brake pedal stud (5),
- the brake pedal.
2 - Instructor side
- Remove:
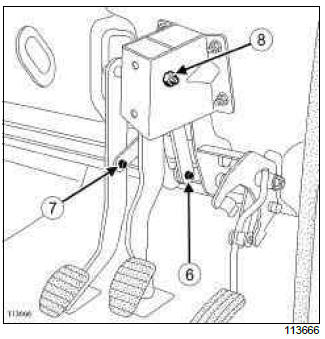
- the circlip (6) from the brake pedal connection control lever to the link bar,
- the circlip (7) from the clutch pedal to the link bar,
- the brake and clutch pedal shaft (8),
- the brake and clutch pedals,
- the circlip from the brake pedal to the connection control lever,
- the connection control lever.
REFITTING
I - REFITTING PREPARATIONS OPERATION
- Always replace the connecting circlips whenever they have been removed.
II - REFITTING OPERATION FOR PART CONCERNED
1 - student side
- Refit:
- the brake pedal,
- the brake pedal stud (5),
- the circlip (4) from the brake pedal to the link bar connection control lever,
- the double safety connecting shaft (2) between the brake servo pushrod and the brake pedal, from right to left, and from top to bottom,
- the brake light switch (1) (see 37A, Mechanical component controls, Brake pedal switch: Removal - Refitting, 37A-79).
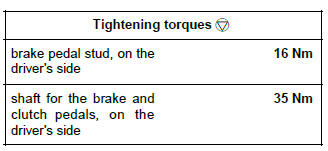
- Torque tighten the brake pedal stud, on the driver's side (16 Nm).
2 - instructor side
- Refit:
- the connection control lever,
- the circlip from the brake pedal to the connection control lever,
- the brake and clutch pedals,
- the shaft (8) for the brake and clutch pedals,
- the circlip (7) from the clutch pedal to the link bar connection control lever,
- the circlip (6) from the brake pedal connection control lever to the link bar.
- Torque tighten the shaft for the brake and clutch pedals, on the driver's side (35 Nm).
III - FINAL OPERATION.
- Connect the battery (see Battery: Removal - Refitting) (MR 392, 80A, Battery).
VERSION WITHOUT ADAPTATION SUPPLEMENT
REMOVAL
I - REMOVAL PREPARATION OPERATION
- Remove:
- the lower cover moulding,
- the side section to the lower cover.
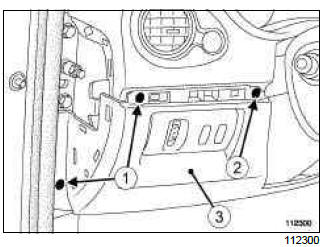
- Remove:
- the bolts (1),
- the clip (2),
- the lower cover (3), disconnecting the various connectors.
II - OPERATION FOR REMOVAL OF PART CONCERNED
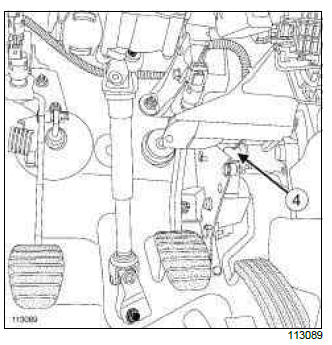
- Disconnect the accelerator pedal connector (4).
- Remove the brake pedal switch (see 37A, Mechanical component controls, Brake pedal switch: Removal - Refitting, 37A-79).
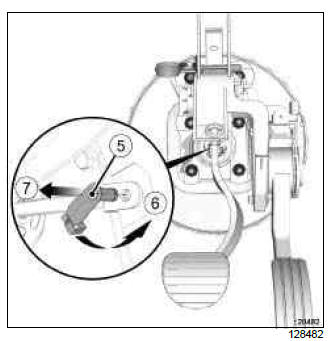
- Remove the dual safety connecting shaft (5)
between the brake pedal to the brake servo pushrod.
- unlock the shaft in accordance with (6),
- extract the shaft in accordance with (7).
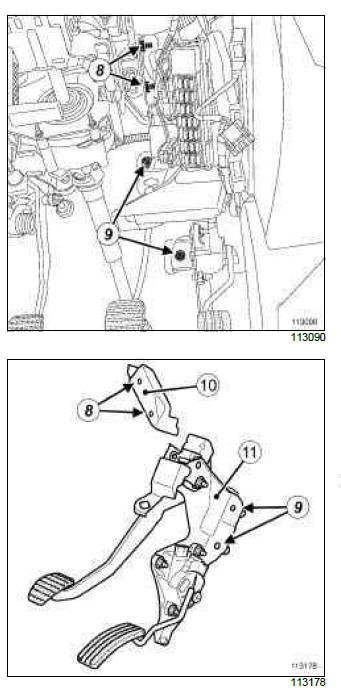
- Remove:
- the impacter nuts (8),
- the nuts (9) of the pedal yoke,
- the impacter (10),
- " the brake - accelerator pedal assembly ".
REFITTING
I - REFITTING PREPARATION OPERATION
- Always replace the parts always to be replaced: Connecting shaft between the brake pedal and the brake servo pushrod (30,03,02,07).
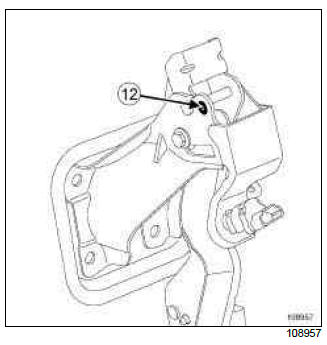
Note: Check that the brake pedal collapse rivet (12) is not faulty; if it is, replace the pedal.
II - REFITTING OPERATION FOR PART CONCERNED
- Refit:
- " the brake - accelerator pedal assembly ",
- the brake pedal impacter.
- Tighten to torque:
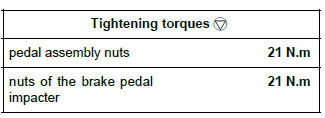
- the pedal assembly nuts (21 N.m),
- the nuts of the brake pedal impacter (21 N.m).
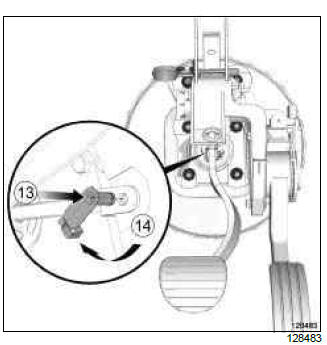
- Refit a new connecting shaft between the brake pedal
and the brake servo pushrod:
- insert the shaft in accordance with (13),
- lock the shaft in accordance with (14).
- Refit the brake light switch (see 37A, Mechanical component controls, Brake pedal switch: Removal - Refitting, 37A-79).
- Connect the accelerator pedal connector.
III - FINAL OPERATION
- Refit:
- the lower cover, connecting the various connectors.
- the clip,
- the bolts,
- the side section to the lower cover.
- the lower cover moulding,
READ NEXT:
 Brake pedal switch: Removal - Refitting
REMOVAL
I - REMOVAL PREPARATION OPERATION
Remove:
the retaining clips on the driver side dashboard
lower trim,
the driver side dashboard lower trim.
II - OPERATION FOR REMOVAL OF PART
CO
 Brake compensator: Removal - Refitting
WITHOUT ANTI-LOCK BRAKING SYSTEM
REMOVAL
I - REMOVAL PREPARATION OPERATION
Position the vehicle on a two-post lift (see Vehicle:
Towing and lifting) (MR 392, 02A, Lifting equipment).
Fit the tool
 Brake compensator: Check
WITHOUT ANTI-LOCK BRAKING SYSTEM
CHECK
Position the vehicle on a four-post lift equipped with
an intermediate lifting system (see Vehicle: Towing
and lifting) (MR 392, 02A, Lifting).
I - CHECKIN
SEE MORE:
 Engine coolant
With the engine switched off and on
level ground, the level when cold must
be between the MINI and MAXI marks
on reservoir 1.
Top this level up when cold before it
reaches the MINI mark.
When working in the engine
compartment, ensure that
the windscreen wiper stalk
is in
 Front headrests
To raise the headrest
Pull the headrest upwards to the desired
height. Check that it is correctly
locked.
To lower the headrest
Press button 1 and guide the headrest
down to the desired height. Check that
it is correctly locked.
To raise the headrest
Raise the headrest to its highest po
© 2016-2026 Copyright Renault Clio Owners Club

