Renault Clio: Centre floor front carpet: Removal - Refitting
Renault Clio III (2005-2013) Service Manual / Trim And Upholstery / Body Internal Trim / Centre floor front carpet: Removal - Refitting
REMOVAL
I - REMOVAL PREPARATION OPERATION
- Remove:
- the complete rear bench seat,
- the front seats (see 75A, Front seat frames and mechanisms, Complete front seat: Removal - Refitting, 75A-33),
- the centre console (see Centre console: Removal - Refitting),
- the front door sill trims (see 71A, Body internal trim, Front door sill lining: Removal - Refitting, 71A-10).
B85
- Unclip the rear door sill trims (see 71A, Body internal trim, Rear door sill lining: Removal - Refitting, 71A-12).
C85
- Remove the rear wing panel lining (see 71A, Body internal trim, Rear panel lining: Removal - Refitting, 71A-32).
II - OPERATION FOR REMOVAL OF PART CONCERNED
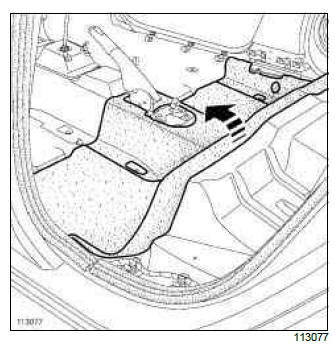
- Pull away the rear carpet.
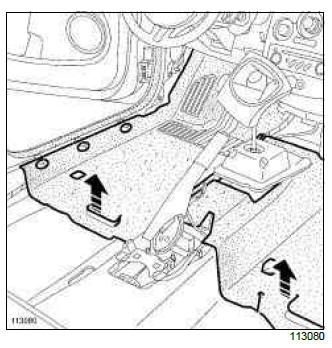
- Pull away the front carpet.
REFITTING
I - REFITTING OPERATION FOR PART CONCERNED
- Refit the front and rear carpets.
II - FINAL OPERATION
C85
- Refit the rear wing panel lining (see 71A, Body internal trim, Rear panel lining: Removal - Refitting, 71A-32).
B85
- Refit the rear door sill trims (see 71A, Body internal trim, Rear door sill lining: Removal - Refitting, 71A-12).
- Refit:
- the front door sill trims (see 71A, Body internal trim, Front door sill lining: Removal - Refitting, 71A-10).
- the centre console (see Centre console: Removal - Refitting),
- the complete rear bench seat,
- the front seats (see 75A, Front seat frames and mechanisms, Complete front seat: Removal - Refitting, 75A-33).
Centre floor rear carpet: Removal - Refitting
REMOVAL
I - REMOVAL PREPARATION OPERATION
- Remove:
- the complete rear bench seat,
- the front seats (see 75A, Front seat frames and mechanisms, Complete front seat: Removal - Refitting, 75A-33),
- the centre console (see Centre console: Removal - Refitting),
- the front door sill trims (see 71A, Body internal trim, Front door sill lining: Removal - Refitting, 71A-10).
B85
- Unclip the rear door sill trims (see 71A, Body internal trim, Rear door sill lining: Removal - Refitting, 71A-12).
C85
- Remove the rear wing panel lining (see 71A, Body internal trim, Rear panel lining: Removal - Refitting, 71A-32).
II - OPERATION FOR REMOVAL OF PART CONCERNED
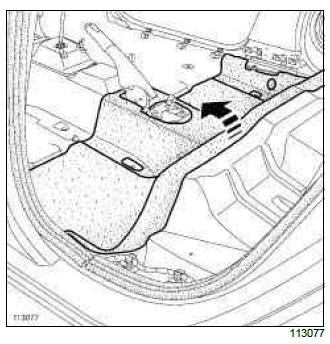
- Pull away the rear carpet.
REFITTING
I - REFITTING OPERATION FOR PART CONCERNED
- Refit the rear carpets.
II - FINAL OPERATION
C85
- Refit the rear wing panel lining (see 71A, Body internal trim, Rear panel lining: Removal - Refitting, 71A-32).
B85
- Refit the rear door sill trims (see 71A, Body internal trim, Rear door sill lining: Removal - Refitting, 71A-12).
- Refit:
- the front door sill trims (see 71A, Body internal trim, Front door sill lining: Removal - Refitting, 71A-10).
- the centre console (see Centre console: Removal - Refitting),
- the complete rear bench seat,
- the front seats (see 75A, Front seat frames and mechanisms, Complete front seat: Removal - Refitting, 75A-33).
Floor carpet: Removal - Refitting
REMOVAL
OPERATION FOR REMOVAL OF PART CONCERNED
- Remove:
- the rear centre floor carpet (see 71A, Body internal trim, Centre floor rear carpet: Removal - Refitting, 71A-3),
- the front centre floor carpet (see 71A, Body internal trim, Centre floor front carpet: Removal - Refitting, 71A-1),
REFITTING
REFITTING OPERATION FOR PART CONCERNED
- Refit:
- the rear centre floor carpet (see 71A, Body internal trim, Centre floor rear carpet: Removal - Refitting, 71A-3),
- the front centre floor carpet (see 71A, Body internal trim, Centre floor front carpet: Removal - Refitting, 71A-1),
READ NEXT:
 Headlining: Removal - Refitting
IMPORTANT
Consult the safety and cleanliness advice and operation
recommendations before carrying out any
repair (see Airbag and pretensioners: Precautions
for the repair) (88C, Airbags and pretensio
Front door sill lining: Removal - Refitting
B85 or C85
REMOVAL
I - REMOVAL PREPARATION OPERATION
Partially remove the seal (1).
Using a pair of unclipping pliers, unclip the bonnet release catch (2).
II - OPERATION FOR REMOVAL OF PART
C
Rear wheel arch trim: Removal - Refitting
B85 or C85
IMPORTANT
Consult the safety and cleanliness advice and
operation recommendations before carrying out
any repair (see Airbag and pretensioners: Precautions
for the repair) (88C, Airbags an
SEE MORE:
Opening and closing the doors
Opening the doors from the outside
Front doors
With the doors unlocked, pull handle 1.
Special feature of the RENAULT
“hands-free” card
With the doors locked, press button 2
on handle 1 of one of the two front
doors and pull towards you.
Rear doors
With the doors unlocked, pull hand
Locking, unlocking the opening elements
Locking/Unlocking the doors
from the outside
This is done using the RENAULT Card;
see the “RENAULT Card” information in
Section 1.
In certain cases, the RENAULT card
may not work:
if the RENAULT card battery is weak,
flat, etc.
if equipment operating on the same
frequency as the ca
© 2016-2026 Copyright Renault Clio Owners Club - 0.0043
