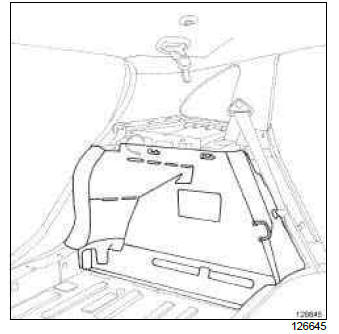
Renault Clio: Rear wheel arch trim: Removal - Refitting

B85 or C85
IMPORTANT
Consult the safety and cleanliness advice and operation recommendations before carrying out any repair (see Airbag and pretensioners: Precautions for the repair) (88C, Airbags and pretensioners).
IMPORTANT
To avoid any risk of triggering when working on or near a pyrotechnic component (airbags or pretensioners), lock the airbag computer using the diagnostic tool.
When this function is activated, all the trigger lines are inhibited and the airbag warning light on the instrument panel lights up continuously (ignition on).
IMPORTANT
Never handle the pyrotechnic systems (pretensioners or airbags) near to a source of heat or naked flame - they may be triggered.
REMOVAL
I - REMOVAL PREPARATION OPERATION
B85 or C85
- Lock the airbag computer using the Diagnostic tool (see Fault finding - Replacement of components) (88C, Airbags and pretensioners).
- Disconnect the battery (see Battery: Removal - Refitting) (80A, Battery).
- Remove:
- the rear bench seatback (see 76A, Rear seat frames and mechanisms, Single unit rear bench seatback: Removal - Refitting, 76A-1) or (see 76A, Rear seat frames and mechanisms, 1/3 and 2/3 rear bench seatback: Removal - Refitting, 76A-4),
- the rear end panel trim (see 71A, Body internal trim, Rear end panel lining: Removal - Refitting, 71A-37).
B85 or K85
- Remove the rear inner sill upper trim (see 71A, Body internal trim, Rear inner sill upper trim: Removal - Refitting, 71A-24).
C85
- Remove the rear wing panel trim (see 71A, Body internal trim, Rear panel lining: Removal - Refitting, 71A-32).
B85 or C85
- Remove the rear quarter panel trim (see 71A, Body internal trim, Quarter panel trim: Removal - Refitting, 71A-27).
K85
- Remove the rear parcel shelf side trim (see 71A, Body internal trim, Rear parcel shelf side trim: Removal - Refitting, 71A-34).
II - OPERATION FOR REMOVAL OF PART CONCERNED
K85

- Remove the rear wheel arch trim.
- Remove the rear wheel arch trim.
REFITTING
I - REFITTING OPERATION FOR PART CONCERNED
- Refit the rear wheel arch trim.
II - FINAL OPERATION.
K85
- Refit the rear parcel shelf side trim (see 71A, Body internal trim, Rear parcel shelf side trim: Removal - Refitting, 71A-34).
B85 or C85
- Refit the rear quarter panel trim (see 71A, Body internal trim, Quarter panel trim: Removal - Refitting, 71A-27).
C85
- Refit the rear wing panel trim (see 71A, Body internal trim, Rear panel lining: Removal - Refitting, 71A-32).
B85 or K85
- Refit the rear inner sill upper trim (see 71A, Body internal trim, Rear inner sill upper trim: Removal - Refitting, 71A-24).
- Refit:
- the rear bench seatback (see 76A, Rear seat frames and mechanisms, Single unit rear bench seatback: Removal - Refitting, 76A- 1) or (see 76A, Rear seat frames and mechanisms, 1/3 and 2/3 rear bench seatback: Removal - Refitting, 76A-4),
- the rear end panel trim (see 71A, Body internal trim, Rear end panel lining: Removal - Refitting, 71A-37).
B85 or C85
- Connect the battery (see Battery: Removal - Refitting) (80A, Battery).
- Unlock the airbag computer using the Diagnostic tool (see Fault finding - Replacement of components) (88C, Airbags and pretensioners).

