Renault Clio: Headlining: Removal - Refitting

IMPORTANT
Consult the safety and cleanliness advice and operation recommendations before carrying out any repair (see Airbag and pretensioners: Precautions for the repair) (88C, Airbags and pretensioners).
IMPORTANT
To avoid any risk of triggering when working on or near a pyrotechnic component (airbags or pretensioners), lock the airbag computer using the diagnostic tool.
When this function is activated, all the trigger lines are inhibited and the airbag warning light on the instrument panel lights up continuously (ignition on).
IMPORTANT
Never handle the pyrotechnic systems (pretensioners or airbags) near to a source of heat or naked flame - they may be triggered.
REMOVAL
I - REMOVAL PREPARATION OPERATION
- Lock the airbag computer using the Diagnostic tool (see Fault finding - Replacement of components) (88C, Airbags and pretensioners).
- Disconnect the battery (see Battery: Removal - Refitting) (80A, Battery).
Note: To remove the headlining, strip one side of the vehicle only.
- Remove:
- the windscreen pillar trims (see 71A, Body internal trim, Windscreen pillar trim: Removal - Refitting, 71A-15),
- the sun visors (see Sun visor: Removal - Refitting) (57A, Interior equipment),
- the interior rear-view mirror (see Interior rear-view mirror: Removal - Refitting) (57A, Interior equipment)
- the grab handles (see Grab handle: Removal - Refitting) (57A, Interior equipment).
PANORAMIC SUNROOF
- Remove the sunroof opening control (see Sunroof opening control: Removal - Refitting) (52A, Non-side opening element mechanisms).
B85 or K85
- Remove the B-pillar trim (see 71A, Body internal trim, B-pillar trim: Removal - Refitting, 71A- 21).
C85
- Remove:
- the rear wing panel trim (see 71A, Body internal trim, Rear panel lining: Removal - Refitting, 71A-32),
- the B-pillar upper trim (see 71A, Body internal trim, B-pillar upper trim: Removal - Refitting, 71A-18),
- the rear roof drip moulding trim (see 71A, Body internal trim, Side roof rail rear trim: Removal - Refitting, 71A-17).
K85
- Remove the rear parcel shelf side trim (see 71A, Body internal trim, Rear parcel shelf side trim: Removal - Refitting, 71A-34).
- Remove the rear quarter panel trim (see 71A, Body internal trim, Quarter panel trim: Removal - Refitting, 71A-27).
C85
- Remove the C-pillar upper trim (see 71A, Body internal trim, C-pillar upper trim: Removal - Refitting, 71A-26).
B85 or C85
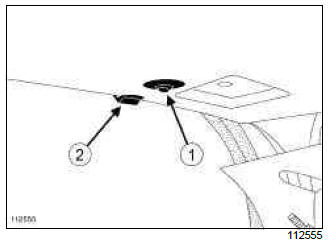
- Unclip:
- the magnetic clip (1),
- the clips (2).
K85
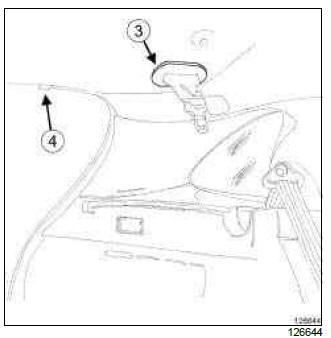
- Remove the rear centre seat belt loop (3).
- Unclip the clips (4).
PANORAMIC SUNROOF
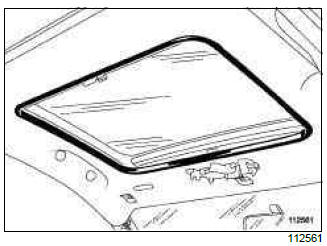
- Carefully remove the sunroof seals.
II - OPERATION FOR REMOVAL OF PART CONCERNED
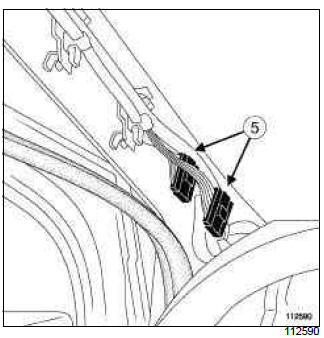
- Disconnect the connectors (5) (depending on equipment level).
- Unclip the wiring from the clips.
PANORAMIC SUNROOF
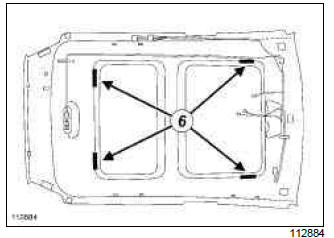
WARNING
The headlining on vehicles with a sunroof is held in place using Velcro strips (6). Take care not to damage these when removing the headlining.
Note: For vehicles equipped with a sunroof, the headlining must be handled with care. The side edges are weakened by the design of the sunroof.
- Remove the headlining through the rear of the vehicle (this operation requires two people).
REFITTING
I - REFITTING OPERATION FOR PART CONCERNED
- Refit the headlining (this operation requires two people).
Note: For vehicles equipped with a sunroof, the headlining must be handled with care. The side edges are weakened by the design of the sunroof.
II - FINAL OPERATION.
- Refit:
- the grab handles (see Grab handle: Removal - Refitting) (57A, Interior equipment).
- the sun visors (see Sun visor: Removal - Refitting) (57A, Interior equipment),
- the A-pillar wiring (5).
- Connect the connectors (depending on equipment level).
- Refit:
- the windscreen pillar trims (see 71A, Body internal trim, Windscreen pillar trim: Removal - Refitting, 71A-15),
- the interior rear-view mirror (see Interior rear-view mirror: Removal - Refitting) (57A, Interior equipment)
B85 or C85
- Refit:
- the magnetic clip (1),
- the clips (2).
K85
- Refit the rear centre seat belt loop (3).
- Attach the clips (4).
PANORAMIC SUNROOF
- Refit the sunroof seals.
C85
- Refit the C-pillar upper trim (see 71A, Body internal trim, C-pillar upper trim: Removal - Refitting, 71A-26).
- Refit the rear quarter panel trim (see 71A, Body internal trim, Quarter panel trim: Removal - Refitting, 71A-27).
K85
- Refit the rear parcel shelf side trim (see 71A, Body internal trim, Rear parcel shelf side trim: Removal - Refitting, 71A-34).
C85
- Refit:
- the rear roof drip moulding trim (see 71A, Body internal trim, Side roof rail rear trim: Removal - Refitting, 71A-17),
- the B-pillar upper trim (see 71A, Body internal trim, B-pillar upper trim: Removal - Refitting, 71A-18),
- the rear wing panel trim (see 71A, Body internal trim, Rear panel lining: Removal - Refitting, 71A-32).
B85 or K85
- Refit the B-pillar trim (see 71A, Body internal trim, B-pillar trim: Removal - Refitting, 71A-21).
PANORAMIC SUNROOF
- Refit the sunroof opening control (see Sunroof opening control: Removal - Refitting) (52A, Non-side opening element mechanisms).
- Connect the battery (see Battery: Removal - Refitting) (80A, Battery).
- Unlock the airbag computer using the Diagnostic tool (see Fault finding - Replacement of components) (88C, Airbags and pretensioners).

