Renault Clio: Clutch control: List and location of components
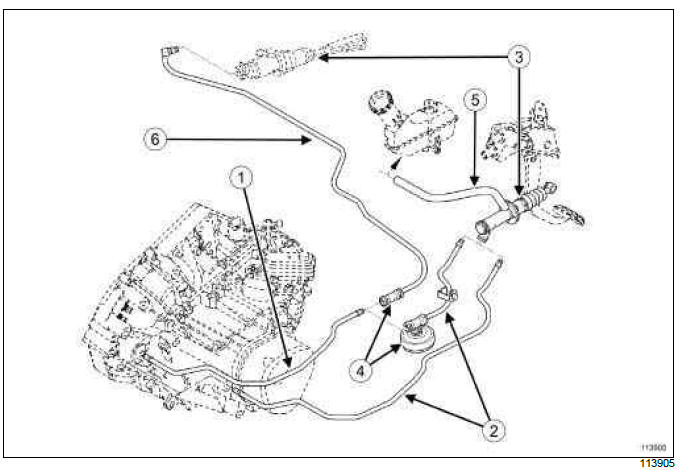
- Slave cylinder supply pipe (engine compartment)
- Left-hand drive slave cylinder supply pipe (engine compartment)
- Master cylinder (engine compartment / passenger compartment connection)
- Brake pipe connector
- Master cylinder supply pipe (engine compartment)
- Right-hand drive slave cylinder supply pipes (engine compartment)
Clutch pedal: Removal - Refitting
5-SPEED MANUAL GEARBOX or 6-SPEED MANUAL GEARBOX, and VERSION WITHOUT ADAPTATION SUPPLEMENT
REMOVAL
I - REMOVAL PREPARATION OPERATION
- Remove:
- the lower cover strip,
- the side section of the lower cover.
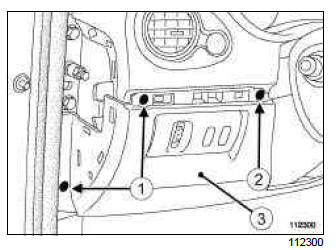
- Remove:
- the bolts (1),
- the clip (2).
- the lower cover (3), disconnecting the various connectors.
II - OPERATION FOR REMOVAL OF PART CONCERNED
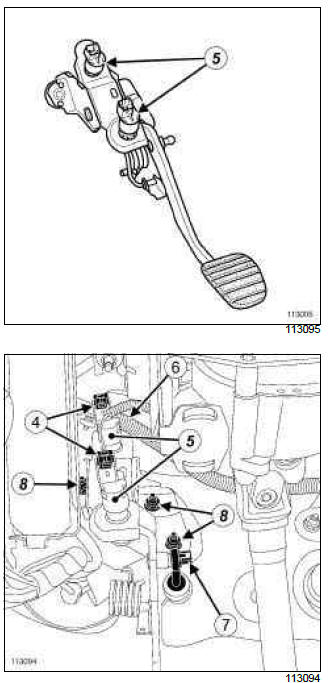
- Disconnect the connector(s) (4) from the clutch switch(es).
Note: If the vehicle is keyless, the clutch pedal is fitted with two switches.
- Remove the clutch switch(es) (5) by turning a quarter of a turn anti-clockwise.
- Unclip the wiring harness (6) from the clutch pedal.
- Remove the master cylinder ball joint (7) from the clutch pedal.
- Remove:
- the clutch pedal mounting nuts (8),
- the clutch pedal.
REFITTING
I - REFITTING OPERATION FOR PART CONCERNED
- Refit:
- the clutch pedal,
- the clutch pedal mounting nuts,
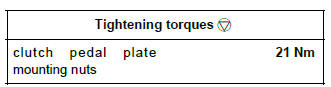
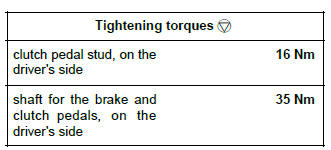
- Torque tighten the clutch pedal plate mounting nuts (21 Nm).
- Refit the clutch cylinder ball joint on the pedal.
- Clip the harness on the clutch pedal.
- Refit the clutch switch(es) (see Clutch pedal position sensor: Removal - Refitting).
II - FINAL OPERATION.
- Refit:
- the lower cover, connecting the various connectors.
- the clip,
- the bolts,
- the side section of the lower cover.
- the lower cover strip,
5-SPEED MANUAL GEARBOX or 6-SPEED MANUAL GEARBOX, and SCHOOL VEHICLE
REMOVAL
I - REMOVAL PREPARATION OPERATION
- Disconnect the battery (see Battery: Removal - Refitting) (MR 392, 80A, Battery).
II - OPERATION FOR REMOVAL OF PART CONCERNED
1 - student side
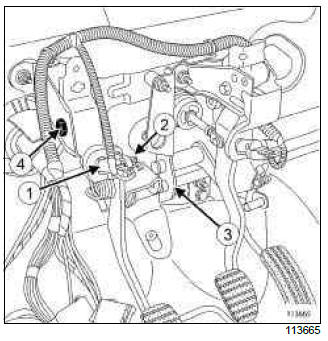
- Remove:
- the clutch switch (1) (see Clutch pedal position sensor: Removal - Refitting),
- the clutch master cylinder ball joint (2) from the clutch pedal,
- the circlip (3) from the clutch pedal to the link bar connection control lever,
- the clutch pedal bolt (4),
- the clutch pedal.
2 - Instructor side

- Remove:
- the circlip (5) from the brake pedal connection control lever to the link bar,
- the circlip (6) from the clutch pedal to the link bar connection control lever,
- the brake and clutch pedal shaft (7),
- the brake and clutch pedals.
REFITTING
I - REFITTING PREPARATIONS OPERATION
- Always replace the connecting circlips whenever they have been removed.
II - REFITTING OPERATION FOR PART CONCERNED
1 - student side
- Remove:
- the clutch pedal,
- the clutch pedal stud (4),
- the circlip (3) from the clutch pedal to the link bar connection control lever,
- the clutch master cylinder ball joint (2) from the clutch pedal,
- the clutch switch (1) (see Clutch pedal position sensor: Removal - Refitting).
- Torque tighten the clutch pedal stud, on the driver's side (16 Nm).
2 - instructor side
- Refit:
- the brake and clutch pedals,
- the shaft (7) for the brake and clutch pedals,
- the circlip (6) from the clutch pedal to the link bar connection control lever,
- the circlip (5) from the brake pedal connection control lever to the link bar.
- Torque tighten the shaft for the brake and clutch pedals, on the driver's side (35 Nm).
III - FINAL OPERATION.
- Connect the battery (see Battery: Removal - Refitting) (MR 392, 80A, Battery).
Clutch pedal spring: Removal - Refitting
REMOVAL
OPERATION FOR REMOVAL OF PART CONCERNED
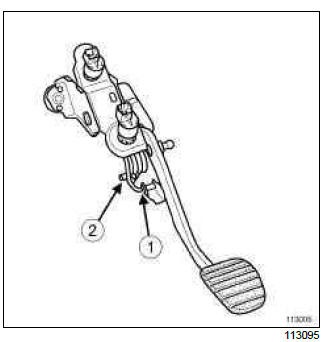
- Remove the clutch pedal spring at (1) using a flat-blade screwdriver.
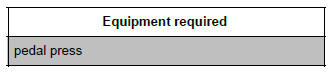
- Fit the pedal press on the clutch pedal.
- Remove the spring from its mounting at (2) using a flat-blade screwdriver.
REFITTING
REFITTING OPERATION FOR PART CONCERNED
- Refit the spring onto its mounting.
- Remove the pedal press.
- Refit the spring onto the clutch pedal.
READ NEXT:
 Clutch pedal switch: Removal - Refitting
JH3 or JR5 or TL4, and CRUISE CONTROL - JH3 or JR5 or TL4, and VEHICLE
WITH CARD
REMOVAL
I - REMOVAL PREPARATION OPERATION
Remove:
the driver side dashboard lower trim clips (1),
the driver si
Clutch circuit: Bleed
JH3 or JR5 or TL4
Bleed in the event of:
dead travel,
pedal at mid-travel,
pedal to the floor,
poor gear changing.
I - PRECAUTIONS DURING REPAIR
Risks relating to contamination.
The hydraulic c
Clutch master cylinder: Removal - Refitting
LEFT-HAND DRIVE
REMOVAL
I - REMOVAL PREPARATION OPERATION
K4J or K4M or K9K
Remove:
the battery (see Battery: Removal - Refitting),
the air filter box (see Air filter unit: Removal - Refitting).
SEE MORE:
Driving
The Renault Clio IV (2014-2019) offers a satisfying driving experience with its nimble handling and responsive performance. Its compact size and maneuverability make it well-suited for urban driving and tight parking spaces. The precise steering and suspension tuning provide a balanced and confident
Your comfort
The Renault Clio IV (2014-2019) is designed with your comfort in mind. It features a well-crafted interior with quality materials and thoughtful ergonomics. The seats offer excellent support and adjustability, providing a comfortable driving experience. The cabin is designed to minimize noise and vi
