Renault Clio: Electric Windows - Sunroof
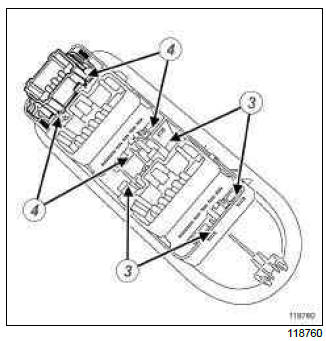
Electric window: List and location of components
ELECTRIC FRONT WINDOW or ONE-TOUCH ELECTRIC FRONT WINDOW or PASSENGER ELECTRIC ONETOUCH WINDOW CONTROL, and ELECTRIC REAR WINDOW
- UCH
- Driver's window lift switch board
- Passenger window lift switch board
- Rear window lift switch board
I - UCH
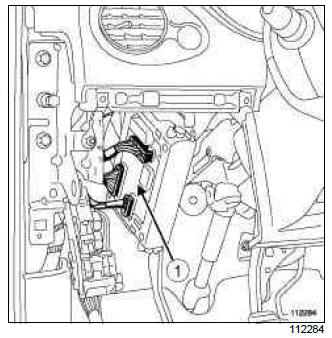
UCH (1)
II - DRIVER'S WINDOW LIFT SWITCH BOARD
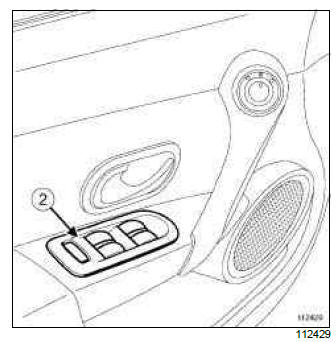
Driver's window lift switch board (2)
III - PASSENGER WINDOW LIFT SWITCH BOARD
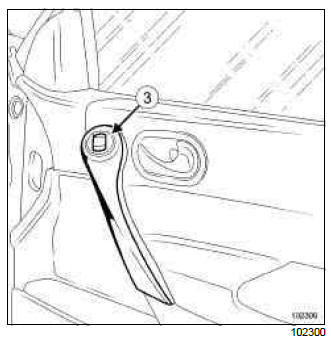
Passenger window lift switch board (3)
IV - REAR WINDOW LIFT SWITCH BOARD
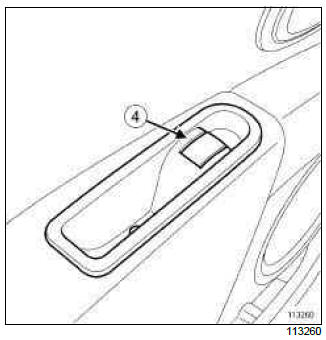
Rear window lift switch board (4)
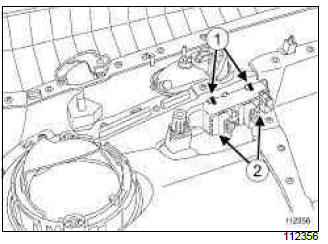
Front electric window switches on driver's door: Removal - Refitting
ELECTRIC FRONT WINDOW or ONE-TOUCH ELECTRIC FRONT WINDOW or PASSENGER ELECTRIC ONETOUCH WINDOW CONTROL
REMOVAL
I - REMOVAL PREPARATION OPERATION
- Remove the driver's front side door trim (see Front side door trim: Removal - Refitting) (72A, Side opening element trim).
II - OPERATION FOR REMOVAL OF PART CONCERNED

- Remove the board by moving clips (1) and (2).
- Unclip the front electric window switches by pressing on the clips (3).
- Unclip the rear electric window switches by pressing on the clips (4).
REFITTING
I - REFITTING OPERATION FOR PART CONCERNED
- Refit:
- the electric window switches onto the plate,
- the plate onto the front side door trim.
II - FINAL OPERATION.
- Refit the driver's front side door trim (see Front side door trim: Removal - Refitting) (72A, Side opening element trim).
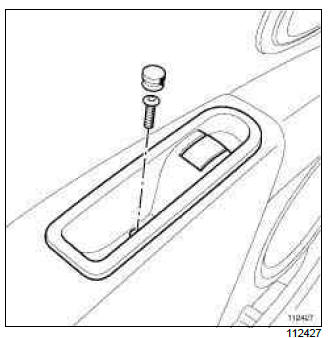
Front electric window switch on passenger door: Removal - Refitting
ELECTRIC FRONT WINDOW or ONE-TOUCH ELECTRIC FRONT WINDOW or PASSENGER ELECTRIC ONETOUCH WINDOW CONTROL
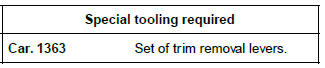
The front electric window switch (passenger side) is clipped to a plate.
The plate is clipped to the door trim.
REMOVAL
OPERATION FOR REMOVAL OF PART CONCERNED
- Unclip the upper section (1) of the door handle using the (Car. 1363).
- Disconnect the front electric window switch connector.
- Unclip the front window switch from the door handle upper section by pressing the clips (2).
- Remove the front door switch from the passenger door.
REFITTING
REFITTING OPERATION FOR PART CONCERNED
- Clip the front window switch on the door handle upper section.
- Connect the front electric window switch connector.
- Clip on the upper section of the door handle.
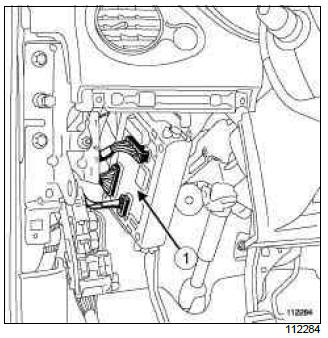
Rear electric window switch: Removal - Refitting
B85 or K85, and ELECTRIC REAR WINDOW
REMOVAL
OPERATION FOR REMOVAL OF PART CONCERNED
- Remove:
- the blanking cover using a small flat-blade screwdriver,
- the board mounting bolt.
- Extract the board towards the front.
- Disconnect the connector.
REFITTING
REFITTING OPERATION FOR PART CONCERNED
- Connect the connector.
- Refit the board inserting it from the rear.
- Refit:
- the board mounting bolt,
- the blanking cover.
Child safety switch: Removal - Refitting
B85 or K85, and ELECTRIC REAR WINDOW
REMOVAL
I - REMOVAL PREPARATION OPERATION
- Remove the driver's front side door trim (see Front side door trim: Removal - Refitting) (72A, Side opening element trim).
II - OPERATION FOR REMOVAL OF PART CONCERNED
- Remove the board by moving clips (1) and (2).
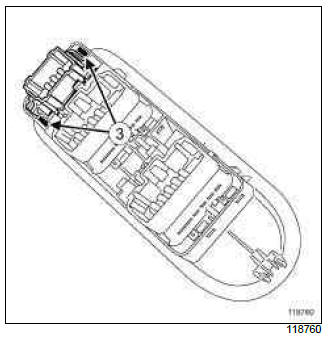
- Remove the child safety switch by pressing on the clips (3).
REFITTING
I - REFITTING OPERATION FOR PART CONCERNED
- Refit:
- the child safety switch on the plate,
- the plate onto the front side door trim.
II - FINAL OPERATION.
- Remove the driver's front side door trim (see Front side door trim: Removal - Refitting) (72A, Side opening element trim).
Electric sunroof: List and location of components
PANORAMIC SUNROOF
- UCH
- Sunroof mobile glass
- Sunroof open and close switch
- Sunroof motor/computer
I - UCH
UCH (1).
II - SUNROOF MOBILE GLASS
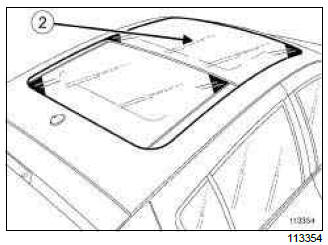
Sunroof mobile glass (2).
III - SUNROOF OPEN AND CLOSE SWITCH
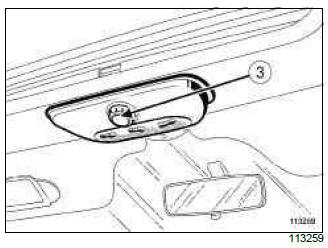
Sunroof open and close switch (3).
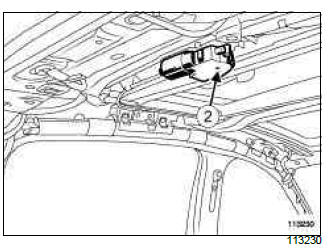
IV - SUNROOF MOTOR/COMPUTER
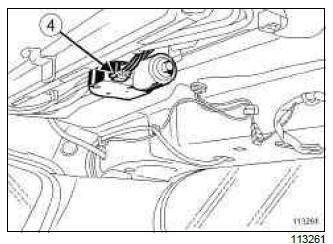
Sunroof motor/computer, located towards the rear of the roof (4).
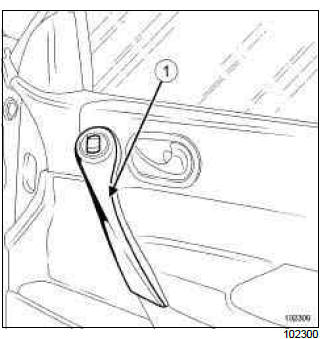
Sunroof opening motor: Removal - Refitting
PANORAMIC SUNROOF
REMOVAL
I - REMOVAL PREPARATION OPERATION
- Disconnect the battery (see 80A, Battery, Battery: Removal - Refitting, 80A-1) (MR 392, 80A, Battery).
- Remove the headlining (see Headlining: Removal - Refitting) (MR 393, 71A, Body internal trim).
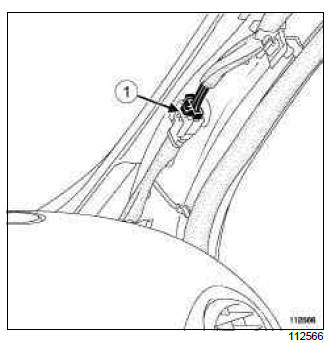
- Disconnect the sunroof supply and control connector (1).
Note: If there is an electrical fault with the motor, it is possible to move the sunroof manually (2) using an Allen key.
II - OPERATION FOR REMOVAL OF PART CONCERNED
- Disconnect the connector.
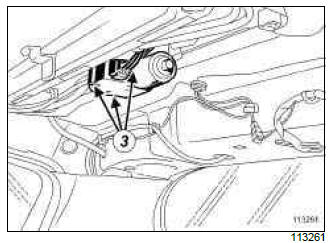
- Remove:
- the motor bolts (3),
- the motor.
REFITTING
I - REFITTING OPERATION FOR PART CONCERNED
- Refit the motor.
- Torque tighten the motor bolts (4 N.m).
- Connect the connector.
II - FINAL OPERATION.
- Refit the headlining (see Headlining: Removal - Refitting) (MR 393, 71A, Body internal trim).
- Connect the battery (see 80A, Battery, Battery: Removal - Refitting, 80A-1) (MR 392, 80A, Battery).
- Carry out the necessary operations without the diagnostic tool (see Battery: Initialisation) (MR 394, 80A, Battery).
Sunroof opening control: Removal - Refitting
PANORAMIC SUNROOF
REMOVAL
OPERATION FOR REMOVAL OF PART CONCERNED
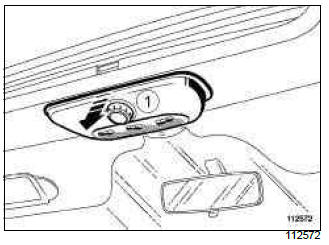
- Unclip the roof opening control using a flat-blade screwdriver (1).
- Disconnect the connectors.
REFITTING
REFITTING OPERATION FOR PART CONCERNED
- Connect the connectors.
- Clip the sunroof opening control.
READ NEXT:
 Parking Distance Control
Parking distance control: List and location of
components
REAR PROXIMITY RADAR
I - LIST OF COMPONENTS
The parking distance control function consists of:
rear proximity sensors,
a parking distance
Engine Compartment Connection Unit
Protection and Switching Unit: Removal - Refitting
IMPORTANT
Never apply pressure to the engine compartment
connection unit joint face (risk of moisture entering).
If the joint face is damaged, the
SEE MORE:
Driving
The Renault Clio IV (2014-2019) offers a satisfying driving experience with its nimble handling and responsive performance. Its compact size and maneuverability make it well-suited for urban driving and tight parking spaces. The precise steering and suspension tuning provide a balanced and confident
Your comfort
The Renault Clio IV (2014-2019) is designed with your comfort in mind. It features a well-crafted interior with quality materials and thoughtful ergonomics. The seats offer excellent support and adjustability, providing a comfortable driving experience. The cabin is designed to minimize noise and vi
