Renault Clio: Parking Distance Control
Parking distance control: List and location of components
REAR PROXIMITY RADAR
I - LIST OF COMPONENTS
The parking distance control function consists of:
- rear proximity sensors,
- a parking distance control buzzer,
- a parking distance control computer,
- a parking distance control switch.
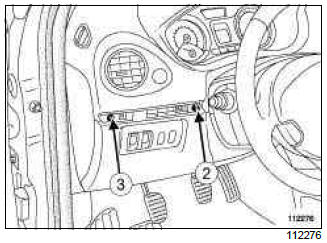
II - LOCATION OF COMPONENTS
Rear proximity sensors (1)

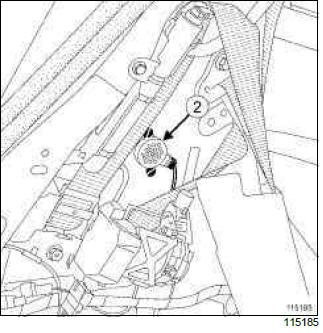
Rear parking distance control buzzer (2)
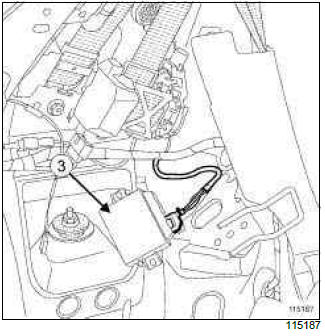
Parking distance control computer (3)
Parking distance control switch (4)
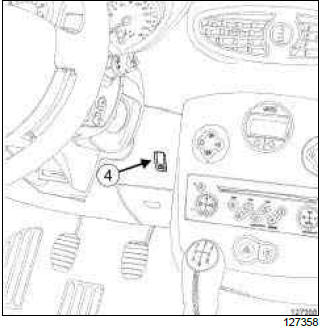
Parking distance control switch: Removal - Refitting
PROXIMITY RADAR
REMOVAL
I - OPERATION FOR REMOVAL OF PART CONCERNED
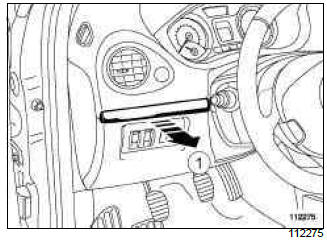
- Unclip the trim (1).
- Remove:
- the plastic rivet (2),
- the upper mounting bolt (3).
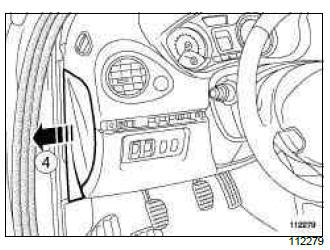
- Unclip the dashboard side panel (4).
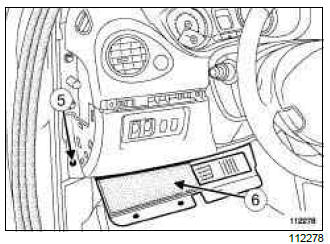
- Remove:
- the lower mounting bolt (5),
- the lower cover trim (6).
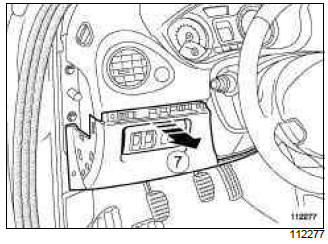
- Remove the lower cover (7).
- Disconnect the connectors.
II - OPERATION FOR REMOVAL OF PART CONCERNED
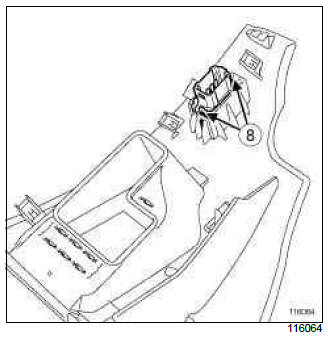
- Unclip the parking proximity sensor switch by pressing on the clips (8).
REFITTING
I - REFITTING OPERATION FOR PART CONCERNED
- Clip the parking proximity sensor switch onto the lower cover.
II - FINAL OPERATION
- Connect the lower cover connectors.
- Refit:
- the lower cover,
- the lower cover trim,
- the lower mounting bolt.
- Clip on the dashboard side panel.
- Refit:
- the upper mounting bolt,
- the plastic rivet.
- Clip the trim piece in place.
Parking distance control buzzer: Removal - Refitting
REAR PROXIMITY RADAR
REMOVAL
I - REMOVAL PREPARATION OPERATION
- Remove the rear quarter panel trim (see Quarter panel trim: Removal - Refitting) (MR 393, 71A, Body internal trim).
II - OPERATION FOR REMOVAL OF PART CONCERNED
- Disconnect the connector (1) from the parking distance control buzzer.
- Remove:
- the parking distance control buzzer rivets (2) by turning them a quarter of a turn,
- the parking distance control buzzer.
REFITTING
I - REFITTING OPERATION FOR PART CONCERNED
- Refit:
- the parking distance control buzzer,
- the parking distance control buzzer rivets.
- Connect the parking distance control buzzer connector.
II - FINAL OPERATION.
- Refit the rear quarter panel trim (see Quarter panel trim: Removal - Refitting) (MR 393, 71A, Body internal trim).
Parking distance control computer: Removal - Refitting
REAR PROXIMITY RADAR
REMOVAL
I - REMOVAL PREPARATION OPERATION
- Remove the rear left-hand wheel arch liner (see Rear wheel arch trim: Removal - Refitting) (MR 393, 71A, Body internal trim).
II - OPERATION FOR REMOVAL OF PART CONCERNED
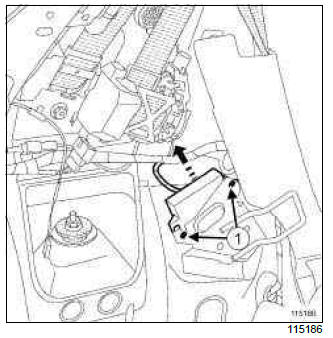
- Undo the parking distance control computer bolts (1) without removing them.
- Remove the computer upwards.
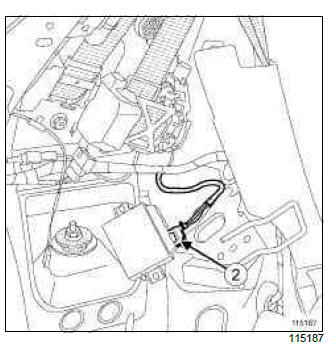
- Disconnect the connector (2) from the parking distance control computer.
REFITTING
I - REFITTING OPERATION FOR PART CONCERNED
- Connect the parking distance control computer connector.
- Position the computer on its support.
- Tighten the parking distance control computer bolts.
II - FINAL OPERATION.
- Refit the rear left-hand wheel arch liner (see Rear wheel arch trim: Removal - Refitting) (MR 393, 71A, Body internal trim).
- If replacing the parking distance control computer, carry out the necessary operations using the Diagnostic tool (see Fault finding - Replacement of components) (MR 394, 87F, Parking distance control).
Proximity radar: Removal - Refitting
REAR PROXIMITY RADAR
REMOVAL
I - REMOVAL PREPARATION OPERATION
- Remove the rear bumper (see Rear bumper: Removal - Refitting) (MR 393, 55A, Exterior protection).
WARNING
The distance control radars are fragile. Handle with care as the external part cannot withstand impacts.
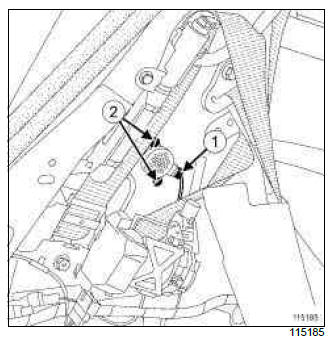
II - OPERATION FOR REMOVAL OF PART CONCERNED
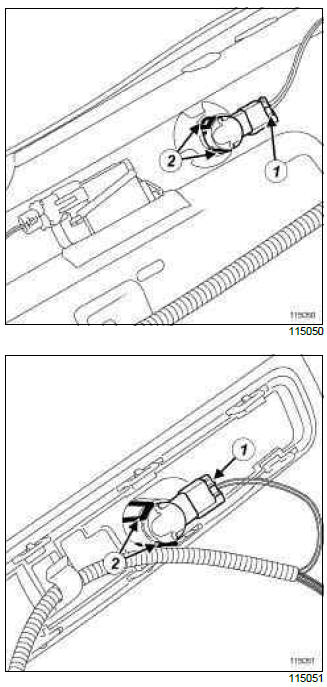
- Disconnect the connectors (1) from the proximity radar.
- Remove the radars by pressing on the clips (2).
REFITTING
I - REFITTING OPERATION FOR PART CONCERNED
- Refit the proximity radars onto the bumper.
- Connect the connectors to the proximity radars.
II - FINAL OPERATION.
- Refit the rear bumper (see Rear bumper: Removal - Refitting) (MR 393, 55A, Exterior protection).
READ NEXT:
 Engine Compartment Connection Unit
Protection and Switching Unit: Removal - Refitting
IMPORTANT
Never apply pressure to the engine compartment
connection unit joint face (risk of moisture entering).
If the joint face is damaged, the
Headlining wiring: Removal - Refitting
REMOVAL
I - REMOVAL PREPARATION OPERATION
Depending on the equipment level of the vehicle, remove
the covers for the interior rear-view mirror in
order to disconnect the rain sensor connector (see
SEE MORE:
Front seat base frame: Removal - Refitting
WITHOUT SPORT SEATS, and DOCUMENTATION PHASE 2
IMPORTANT
Before beginning work on any component of the
safety system, it is essential to lock the airbag computer
using the Diagnostic tool (see Airbag and
pretensioners: Precautions for the repair) (88C,
Airbag and pretensioners). When this function
Front seatback frame: Removal - Refitting
WITHOUT SPORT SEATS, and DOCUMENTATION PHASE 2
IMPORTANT
Before beginning work on any component of the
safety system, it is essential to lock the airbag computer
using the Diagnostic tool (see Airbag and
pretensioners: Precautions for the repair) (88C,
Airbag and pretensioners). When this function
