Renault Clio: Engine Compartment Connection Unit
Renault Clio III (2005-2013) Service Manual / Electrical Equipment / Engine Compartment Connection Unit
Protection and Switching Unit: Removal - Refitting
IMPORTANT
Never apply pressure to the engine compartment connection unit joint face (risk of moisture entering).
If the joint face is damaged, the unit will need to be replaced.
REMOVAL
I - REMOVAL PREPARATION OPERATION
- In the event of replacement:
- Carry out the necessary programming (see MR 394 Fault finding, 87G, Engine compartment connection unit, Fault finding - Replacement of components).
- Remove the battery tray (see 80A, Battery, Battery tray: Removal - Refitting, 80A-5)
II - REMOVAL STAGE FOR THE PART CONCERNED
- Remove:
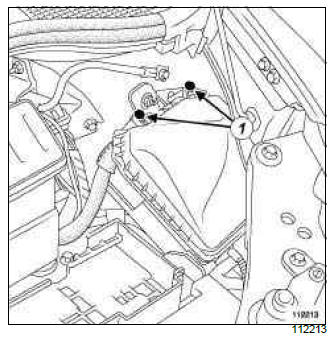
- the bolts (1) from the engine compartment connection unit cover,
- the cover.
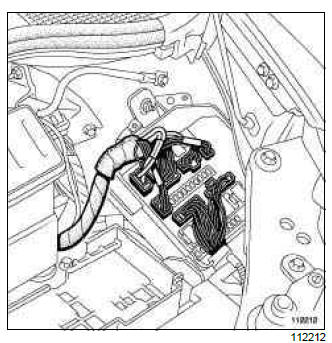
- Unclip each Protection and Switching Unit connector by pressing the connector retaining lug, without applying any pressure to the unit joint face.
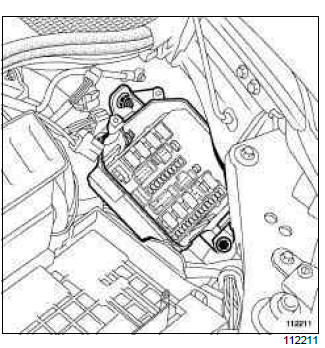
- Remove:
- the engine compartment connection unit bolts,
- the engine compartment connection unit.
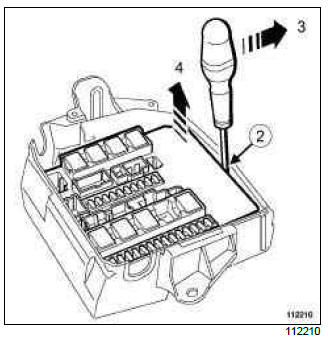
- Insert the (Car. 1597), observing the correct engagement position (2).
- Apply pressure at (3) using the tool to unclip the Protection and Switching Unit.
- Remove the Protection and Switching Unit at (4).
REFITTING
I - REFITTING PREPARATION OPERATION
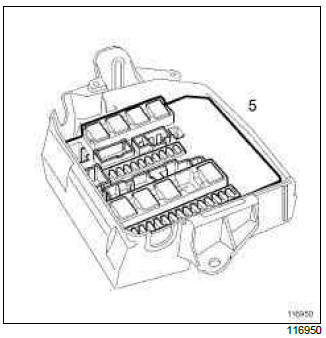
- Position the Protection and Switching Unit by inserting it at an angle into the unit (5).
- Clip the Protection and Switching Unit into the unit until you hear the characteristic " click ", indicating that it is correctly positioned.
II - REFITTING OPERATION FOR PART CONCERNED
- Fit the engine compartment connection unit in the engine compartment.
- Torque tighten the engine compartment connection unit bolts (4 Nm).
- Clip on the connectors; the characteristic " click " noise tells you that they are properly connected.
- Check that the wiring is in good condition.
WARNING
It is essential to observe the wiring harness routing to prevent it being damaged during refitting.
- Position the wiring foam pads and seals in their housings.
WARNING
The joint faces should be clean and dry.
- Check the condition and position of the seal on the cover.
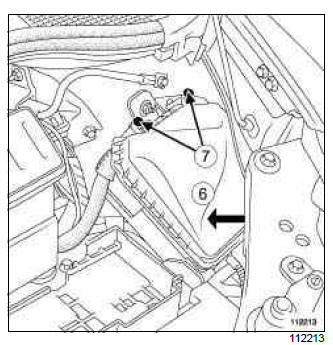
- Fit the cover on the engine compartment connection unit, starting by inserting it at (6).
WARNING
Position this part correctly; its position is determined by the position of the inner reinforcements.
- Torque tighten the engine compartment connection unit cover bolts (4 Nm) (7).
FINAL OPERATION.
- Refit the battery tray (see 80A, Battery, Battery tray: Removal - Refitting, 80A-5).
- In the event of replacement:
- Carry out the necessary programming (see MR 394 Fault finding, 87G, Engine compartment connection unit, Fault finding - Replacement of components).
READ NEXT:
 Headlining wiring: Removal - Refitting
REMOVAL
I - REMOVAL PREPARATION OPERATION
Depending on the equipment level of the vehicle, remove
the covers for the interior rear-view mirror in
order to disconnect the rain sensor connector (see
Front bumper wiring: Connector access
FOG LIGHTS
I - LOCATION OF CONNECTORS
R 33 connector (front end panel/front bumper connection).
II - ACCESS TO CONNECTORS
IMPORTANT
Consult the safety and cleanliness advice and
operation recommen
SEE MORE:
Rear brake calliper mounting: Removal - Refitting
DISC BRAKE
REMOVAL
I - REMOVAL PREPARATION OPERATION
Put the vehicle on a two-post lift (see Vehicle: Towing and lifting).
Remove:
the rear wheels (see 35A, Wheels and tyres,
Wheel: Removal - Refitting, 35A-1),
the rear brake pads (see 33A, Rear axle components,
Rear brake pads: Removal
Rear brake disc: Removal - Refitting
DISC BRAKE
Brake discs cannot be reground. If there is excessive
scoring or wear, they will need to be replaced (see
30A, General information, Brake: Specifications, 30A-9).
When replacing a brake disc, be sure to replace the
disc on the opposite side.
Be sure to replace the brake pads if the bra
© 2016-2026 Copyright Renault Clio Owners Club - 0.0039
