Renault Clio: Rear brake calliper mounting: Removal - Refitting
Renault Clio III (2005-2013) Service Manual / Chassis / Rear Axle Components / Rear brake calliper mounting: Removal - Refitting
DISC BRAKE
REMOVAL
I - REMOVAL PREPARATION OPERATION
- Put the vehicle on a two-post lift (see Vehicle: Towing and lifting).
- Remove:
- the rear wheels (see 35A, Wheels and tyres, Wheel: Removal - Refitting, 35A-1),
- the rear brake pads (see 33A, Rear axle components, Rear brake pads: Removal - Refitting, 33A-3),
- the upper guide pin bolt.
WARNING
Do not twist the brake hose.
- Suspend the brake calliper from the shock absorber without undoing the brake union.
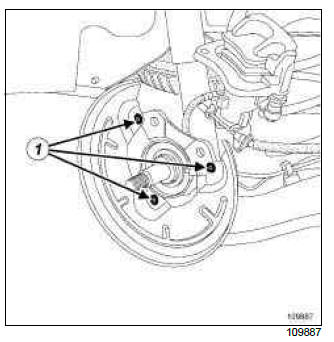
II - OPERATION FOR REMOVAL OF PART CONCERNED

- Remove:
- the two calliper support mounting bolts (1),
- the calliper mounting.
REFITTING
I - REFITTING PREPARATION OPERATION
- Clean the calliper mounting and the stub axle carrier.
- Coat the calliper mounting bolts with a FRENBLOC type product before fitting them.
- Always replace the guide pin bolts whenever they are removed.
II - OPERATION FOR REFITTING PART CONCERNED
- Refit:
- the calliper mounting,
- the calliper mounting bolts.
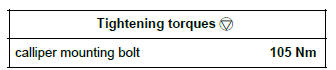
- Torque tighten calliper mounting bolt (105 Nm).
- Refit the calliper and the new upper guide pin bolt.
III - FINAL OPERATION
- Refit:
- the brake pads (see 33A, Rear axle components, Rear brake pads: Removal - Refitting, 33A- 3),
- the rear wheels (see 35A, Wheels and tyres, Wheel: Removal - Refitting, 35A-1).
- Check the brake fluid level.
Rear brake disc protector: Removal - Refitting
DISC BRAKE
REMOVAL
I - REMOVAL PREPARATION OPERATION
- Position the vehicle on a two-post lift (see Vehicle: Towing and lifting).
- Remove:
- the rear wheels (see 35A, Wheels and tyres, Wheel: Removal - Refitting, 35A-1),
- the rear brake pads (see 33A, Rear axle components, Rear brake pads: Removal - Refitting, 33A-3),
- the calliper mounting (see 33A, Rear axle components, Rear brake calliper mounting: Removal - Refitting, 33A-10),
- the rear brake disc (see 33A, Rear axle components, Rear brake disc: Removal - Refitting, 33A-12).
II - REMOVAL STAGE FOR THE PART CONCERNED
- Drill out the rivets (1).
- Remove the brake disc protector.
REFITTING
I - REFITTING PREPARATIONS OPERATION
- Clean any swarf from the stub-axle carrier
II - REFITTING OPERATION FOR PART CONCERNED
- Refit the brake disc protector.
- Refit the rivets.
III - FINAL OPERATION.
- Refit:
- the rear brake disc (see 33A, Rear axle components, Rear brake disc: Removal - Refitting, 33A-12),
- the calliper mounting (see 33A, Rear axle components, Rear brake calliper mounting: Removal - Refitting, 33A-10),
- the rear brake pads (see 33A, Rear axle components, Rear brake pads: Removal - Refitting, 33A-3),
- the rear wheels (see 35A, Wheels and tyres, Wheel: Removal - Refitting, 35A-1).
READ NEXT:
 Rear brake disc: Removal - Refitting
DISC BRAKE
Brake discs cannot be reground. If there is excessive
scoring or wear, they will need to be replaced (see
30A, General information, Brake: Specifications, 30A-9).
When replacing a brake d
Rear brake lining: Removal - Refitting
DRUM BRAKE
Replace all the brake pads on one axle at the same
time. Never mix brake pads of different brands or qualities.
REMOVAL
I - REMOVAL PREPARATION OPERATION
Position the vehicle on a two-pos
Rear brake cylinder: Removal - Refitting
DRUM BRAKE
REMOVAL
I - REMOVAL PREPARATION OPERATION
Put the vehicle on a two-post lift (see Vehicle: Towing and lifting).
Release the parking brake.
Remove:
the rear wheels (see 35A, Wheels an
SEE MORE:
Driving
The Renault Clio IV (2014-2019) offers a satisfying driving experience with its nimble handling and responsive performance. Its compact size and maneuverability make it well-suited for urban driving and tight parking spaces. The precise steering and suspension tuning provide a balanced and confident
Your comfort
The Renault Clio IV (2014-2019) is designed with your comfort in mind. It features a well-crafted interior with quality materials and thoughtful ergonomics. The seats offer excellent support and adjustability, providing a comfortable driving experience. The cabin is designed to minimize noise and vi
© 2016-2026 Copyright Renault Clio Owners Club - 0.004
