Renault Clio: Headlining wiring: Removal - Refitting
REMOVAL
I - REMOVAL PREPARATION OPERATION
- Depending on the equipment level of the vehicle, remove the covers for the interior rear-view mirror in order to disconnect the rain sensor connector (see 85A, Wiping - Washing, Rain and light sensor: Removal - Refitting, 85A-5).
- Remove the headlining (see Headlining: Removal - Refitting) (MR 393, 71A, Body internal trim).
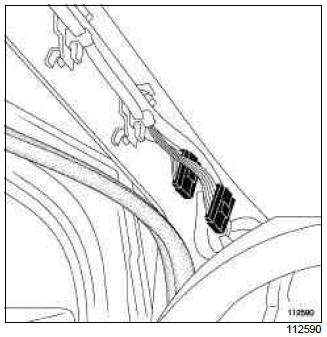
- Gently disconnect the wiring harness connector.
II - OPERATION FOR REMOVAL OF PART CONCERNED
- Mark out the routing of the wiring harness.
- Gently detach the wiring harness.
REFITTING
I - REFITTING OPERATION FOR PART CONCERNED
Note: It is possible to replace the headlining and keep the wiring harness, and vice-versa.
The wiring harness cannot be repaired. It must be replaced if it is cut, broken or burnt.
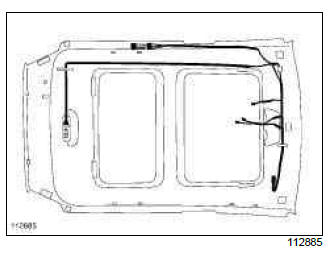
- Use a pasting nozzle to refit the wiring harness.
- Paste the wiring harness onto the routing that was marked out.
WARNING
The position of the connectors in relation to the side of the headlining must be respected. A mark on the harness must coincide with the edge of the headlining.
- Cut the bead, taking care not to damage the wiring harness.
Note: It is also possible to leave the faulty harness in place, and to glue the new harness alongside it.
II - FINAL OPERATION.
- Refit the headlining (see Headlining: Removal - Refitting) (MR 393, 71A, Body internal trim).
- Depending on the level of equipment of the vehicle, reconnect the rain sensor connector.
- Depending on the equipment level of the vehicle, refit the interior rear-view mirror covers (see 85A, Wiping - Washing, Rain and light sensor: Removal - Refitting, 85A-5).
Computers: List and location of components
- Passenger compartment fuse and relay box
- UCH
- Injection ECU
- Protection and Switching Unit
- Automatic gearbox electric control unit
- Preheating unit
- Electric control unit for discharge bulbs - additional cornering lights
- Engine fuse and relay box - power supply fuse board
- ABS - ESP electric control unit
- Radio - telephone electric control unit
- Radio
- Yaw speed and lateral acceleration sensor
- Airbag - pretensioner electric control unit
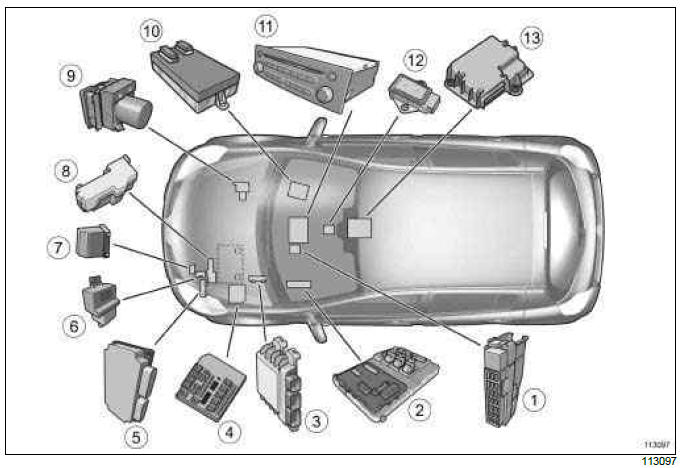
Note:
There are two types of UCH depending on the vehicle equipment level:
- a specific UCH for key-operated vehicles,
- a specific UCH for vehicles operated with a Renault card.
COMPUTERS INTEGRATED INTO COMPONENTS
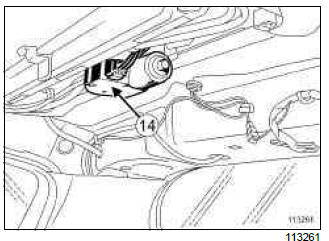
The sunroof electric control unit is integrated into the motor (14) (anti-pinch function).
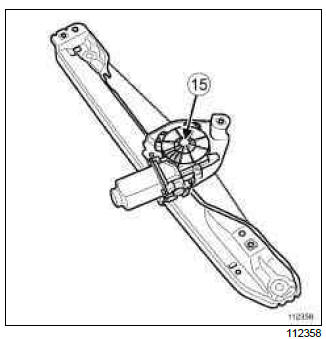
The anti-pinch function is integrated into the window winder motor (15).
Diagnostic socket: List and location of components
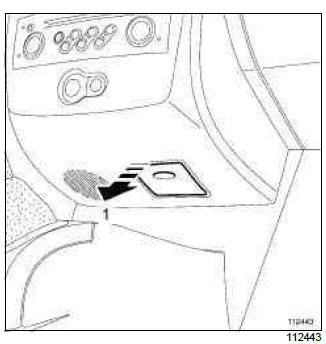
The diagnostic socket is located on the bottom part of the dashboard, above the centre console.
Remove the flap (1).
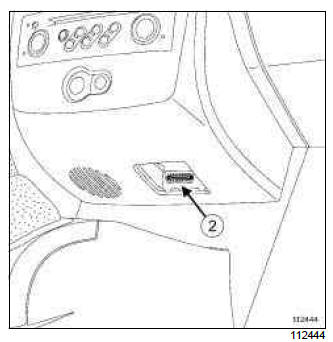
Diagnostic socket (2).
Wiring: Precautions for the repair
I - SAFETY
1 - Potentially dangerous components
Do not leave any unused +12V connectors exposed to the air without any protection (see Connector: Sealing and locking) (Technical Note 6015A, 88A, Wiring).
Check that there is no contact between the wiring and the fuel and brake pipes.
Avoid mounting the wiring in areas with a temperature above 100
READ NEXT:
 Front bumper wiring: Connector access
FOG LIGHTS
I - LOCATION OF CONNECTORS
R 33 connector (front end panel/front bumper connection).
II - ACCESS TO CONNECTORS
IMPORTANT
Consult the safety and cleanliness advice and
operation recommen
Front left-hand wiring: Connector access
I - LOCATION OF CONNECTORS
Connection R 107 (front left-hand wiring/dashboard
wiring connection) composed of two to four connectors
depending on equipment.
R 374 connector (front left-hand wi
Front left-hand wiring: Removal - Refitting
LEFT-HAND DRIVE
IMPORTANT
Consult the safety and cleanliness advice and operation
recommendations before carrying out any
repair (see 88A, Wiring harness, Wiring: Precautions
for the repair, 88A-5).
SEE MORE:
Driving
The Renault Clio IV (2014-2019) offers a satisfying driving experience with its nimble handling and responsive performance. Its compact size and maneuverability make it well-suited for urban driving and tight parking spaces. The precise steering and suspension tuning provide a balanced and confident
Your comfort
The Renault Clio IV (2014-2019) is designed with your comfort in mind. It features a well-crafted interior with quality materials and thoughtful ergonomics. The seats offer excellent support and adjustability, providing a comfortable driving experience. The cabin is designed to minimize noise and vi
