Renault Clio: Front bumper wiring: Connector access
FOG LIGHTS
I - LOCATION OF CONNECTORS

- R 33 connector (front end panel/front bumper connection).
II - ACCESS TO CONNECTORS
IMPORTANT
Consult the safety and cleanliness advice and operation recommendations before carrying out any repair (see 88A, Wiring harness, Wiring: Precautions for the repair, 88A-5).
WARNING
To prevent damaging the connectors, consult the disconnection procedure (see Connector: Disconnection and reconnection) (Technical Note 6015A, 88A, Wiring).
- Switch off the ignition.
- Disconnect the battery (see 80A, Battery, Battery: Removal - Refitting, 80A-1).
- Remove the front section of the front left-hand wheel arch liner (see Front wheel arch liner: Removal - Refitting) (MR 393, 55A, Exterior protection).
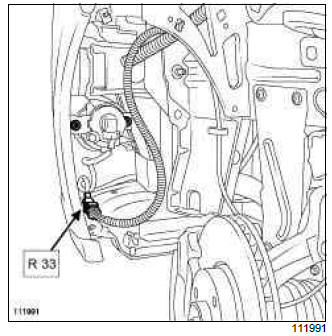
- Disconnect the R 33 connector.
Front bumper wiring: Removal - Refitting
FOG LIGHTS
IMPORTANT
Consult the safety and cleanliness advice and operation recommendations before carrying out any repair (see 88A, Wiring harness, Wiring: Precautions for the repair, 88A-5).
REMOVAL
I - REMOVAL PREPARATION OPERATION
- Position the vehicle on a two-post lift (see Vehicle: Towing and lifting) (MR 392, 02A, Lifting equipment).
- Switch off the ignition.
- Disconnect the battery (see 80A, Battery, Battery: Removal - Refitting, 80A-1).
- Remove:
- the front section of the front wheel arch liners (see Front wheel arch liner: Removal - Refitting) (MR 393, 55A, Exterior protection),
- the front bumper (see Front bumper: Removal - Refitting) (MR 393, 55A, Exterior protection).
II - OPERATION FOR REMOVAL OF PART CONCERNED
WARNING
To prevent any risk of noise, premature wear, short circuits, etc. after the refitting operation, mark the wiring routing and how to connect the connectors.
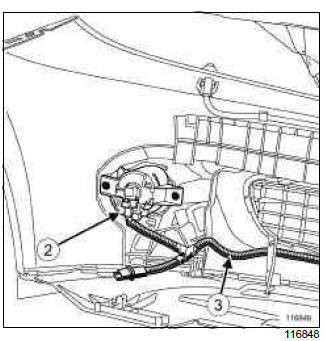
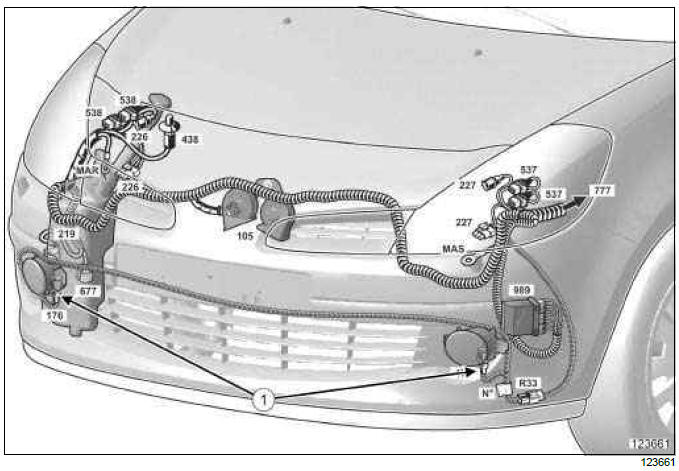
- Disconnect the (2) fog light connector (1).
- Mark the routing of the wiring in the front bumper.
- Unclip the front bumper wiring (3).
- Remove the wiring.
WARNING
To prevent any damage during the removal operation, check that the wiring is free from its mountings (retaining clip, plastic clip, adhesive tape, connector, etc.).
REFITTING
I - REFITTING PREPARATION OPERATION
- If replacing with more wiring, lock the unused connectors (see Connectors: Sealing and immobilisation) (Technical Note 6015A, 88A, Wiring).
II - REFITTING OPERATION FOR PART CONCERNED
- Reconnect the fog light connector.
- Clip the wiring onto the front bumper in the position marked during the removal operation.
WARNING
To prevent damage to the wiring harness when refitting, observe the original routing.
III - FINAL OPERATION.
- refit:
- the front bumper (see Front bumper: Removal - Refitting) (MR 393, 55A, Exterior protection),
- the front section of the front wheel arch liners (see Front wheel arch liner: Removal - Refitting) (MR 393, 55A, Exterior protection).
- Connect the battery (see 80A, Battery, Battery: Removal - Refitting, 80A-1).
- Check the operation of the fog lights.
READ NEXT:
 Front left-hand wiring: Connector access
I - LOCATION OF CONNECTORS
Connection R 107 (front left-hand wiring/dashboard
wiring connection) composed of two to four connectors
depending on equipment.
R 374 connector (front left-hand wi
Front left-hand wiring: Removal - Refitting
LEFT-HAND DRIVE
IMPORTANT
Consult the safety and cleanliness advice and operation
recommendations before carrying out any
repair (see 88A, Wiring harness, Wiring: Precautions
for the repair, 88A-5).
Engine wiring: Connector access
I - LOCATION OF CONNECTORS
R 67 connector (Engine wiring harness/front left-hand
wiring connection).
Depending on the engine, connection R 67 is composed
of three or four connectors.
K4J or K4
SEE MORE:
Driving
The Renault Clio IV (2014-2019) offers a satisfying driving experience with its nimble handling and responsive performance. Its compact size and maneuverability make it well-suited for urban driving and tight parking spaces. The precise steering and suspension tuning provide a balanced and confident
Your comfort
The Renault Clio IV (2014-2019) is designed with your comfort in mind. It features a well-crafted interior with quality materials and thoughtful ergonomics. The seats offer excellent support and adjustability, providing a comfortable driving experience. The cabin is designed to minimize noise and vi
