Renault Clio: Exhaust gas recirculation rigid pipe: Removal - Refitting
K9K, and 764 or 766 or 768 or 772
REMOVAL
I - REMOVAL PREPARATION OPERATION
- Position the vehicle on a two-post lift (see Vehicle: Towing and lifting) (MR 392, 02A, Lifting equipment).
- Remove the engine style cover.
- Disconnect the battery (see Battery: Removal - Refitting) (MR 392, 80A, Battery).
- Remove:
- the scuttle panel grille (see Scuttle panel grille: Removal - Refitting) (MR 393, 56A, Exterior equipment),
- the engine undertray,
- the engine tie-bar (see 19D, Engine mounting, Lower engine tie-bar: Removal - Refitting, 19D-13),
- the catalytic converter (see 19B, Exhaust, Catalytic converter: Removal - Refitting, 19B- 29) (K9K/760,762,764,766,768),
- the catalytic pre-converter (see 19B, Exhaust, Catalytic pre-converter: Removal - Refitting, 19B-23) (K9K772).
II - OPERATION FOR REMOVAL OF PART CONCERNED
1 - First fitting of the exhaust gas cooler recirculation assembly
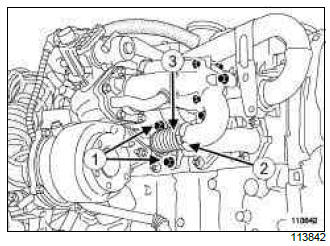
- Remove:
- the mounting bolts (1) from the rigid exhaust gas recirculation pipe,
- the snap-fit clamp (2) using the (Mot. 1567),
- the rigid exhaust gas recirculation pipe (3).
2 - Second fitting of the exhaust gas cooler recirculation assembly
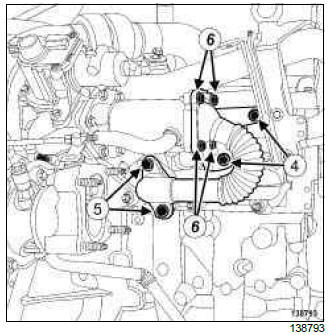
- Remove:
- the bolts (4) of the rigid pipe bracket from the cylinder head,
- the bolts (5) of the rigid pipe on the exhaust manifold then discard them in the waste bin,
- the bolts (6) of the rigid pipe on the exhaust gas cooler,
- the rigid pipe and its seal then discard them in the waste bin.
REFITTING
I - REFITTING PREPARATION OPERATION
- All the bearing faces must be carefully cleaned.
II - REFITTING OPERATION FOR PART CONCERNED
- Refit:
- the new rigid exhaust gas recirculation pipe with a new seal,
- the new exhaust gas recirculation pipe mounting bolts.
1 - First fitting of the exhaust gas cooler recirculation assembly
- parts always to be replaced: Exhaust gas recirculation rigid pipeparts always to be replaced: exhaust gas recirculation pipe boltparts always to be replaced: Exhaust gas recirculation pipe clip
- Refit the new rigid pipe, equipped with new bolts on the manifold, a new seal on the manifold and a new clip.
Note: The Parts Department only supplies clips for the rigid pipe with a tangential bolt.
- Adjust the rigid pipe in its location by screwing, without tightening, the bolts on the manifold and centring the rigid pipe on the EGR support at the timing end.
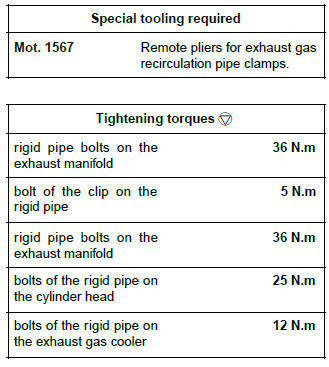
- Torque tighten:
- the rigid pipe bolts on the exhaust manifold (36 N.m),
- the bolt of the clip on the rigid pipe (5 N.m).
2 - Second fitting of the exhaust gas cooler recirculation assembly
- parts always to be replaced: Exhaust gas recirculation rigid pipeparts always to be replaced: exhaust gas recirculation pipe boltparts always to be replaced: Exhaust gas recirculation pipe seal
- Fit the new rigid pipe equipped with a new seal and new bolts on the manifold.
- Fit without tightening:
- the bolts of the rigid pipe on the exhaust gas recirculation cooler,
- the bolts of the rigid pipe on the manifold,
- the bolts of the rigid pipe on the cylinder head.
- Torque tighten:
- the rigid pipe bolts on the exhaust manifold (36 N.m),
- the bolts of the rigid pipe on the cylinder head (25 N.m),
- the bolts of the rigid pipe on the exhaust gas cooler (12 N.m).
III - FINAL OPERATION
- Refit:
- the catalytic pre-converter (see 19B, Exhaust, Catalytic pre-converter: Removal - Refitting, 19B-23) (K9K/772),
- the catalytic converter (see 19B, Exhaust, Catalytic converter: Removal - Refitting, 19B- 29) (K9K/760,762,764,766,768),
- the engine tie-bar (see 19D, Engine mounting, Lower engine tie-bar: Removal - Refitting, 19D-13),
- the engine undertray,
- the scuttle panel grille (see Scuttle panel grille: Removal - Refitting) (MR 393, 56A, Exterior equipment).
- Connect the battery (see Battery: Removal - Refitting) (MR 392, 80A, Battery).
- Refit the engine style cover.
K9K, and 750 or 752
REMOVAL
I - REMOVAL PREPARATION OPERATION
- Disconnect the battery (see Battery: Removal - Refitting) (MR 392, 80A, Battery)
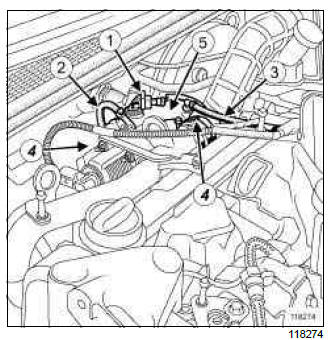
- Disconnect:
- the air temperature sensor connector (1),
- the vacuum pipe (2) between the turbocharger regulation valve and the turbocharger outlet air pipe,
- the vacuum pipe (3) between the air pressure sensor and the turbocharger outlet air pipe.
- Loosen the turbocharger outlet air pipe clips (4).
- Remove the turbocharger outlet air pipe (5).
II - OPERATION FOR REMOVAL OF PART CONCERNED
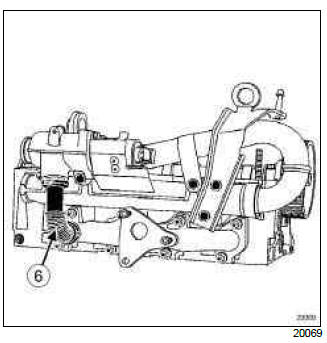
- Remove:
- the clips of the exhaust gas recirculation pipe using the (Mot. 1567),
- the exhaust gas recirculation rigid pipe (6).
REFITTING
I - REFITTING OPERATION FOR PART CONCERNED
- Refit:
- the exhaust gas recirculation rigid pipe,
- the clips to the exhaust gas recirculation pipe using the (Mot. 1567).
II - FINAL OPERATION
- Refit the turbocharger outlet air pipe.
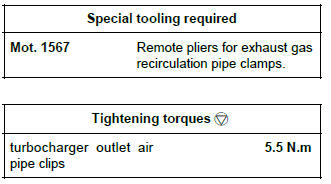
- Torque tighten the turbocharger outlet air pipe clips (5.5 N.m).
- Connect:
- the vacuum pipe between the air pressure sensor and the turbocharger outlet air pipe,
- the vacuum pipe between the turbocharger regulation valve and the turbocharger outlet air pipe,
- the air temperature sensor connector,
- the battery (see Battery: Removal - Refitting) (MR 392, 80A, Battery).

