Renault Clio: Expansion bottle: Removal - Refitting
Renault Clio III (2005-2013) Service Manual / Engine And Peripherals / Cooling / Expansion bottle: Removal - Refitting
REMOVAL
I - REMOVAL PREPARATION OPERATION
- Position the vehicle on a two-post lift (see Vehicle: Towing and lifting) (MR 393, 02A, Lifting equipment).
- Disconnect the battery (see Battery: Removal - Refitting) (MR 392, 80A, Battery).
- Remove:
- the front bumper (see Front bumper: Removal - Refitting) (MR 393, 55A, Exterior protection),
- the engine undertray.
II - OPERATION FOR REMOVAL OF PART CONCERNED
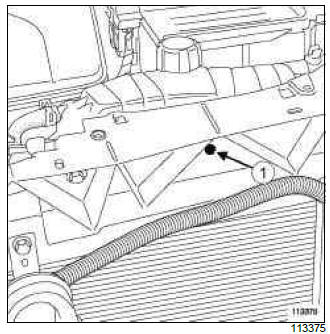
- Remove the clip (1).
- Remove the expansion bottle.
- Fit hose clamps to the expansion bottle hoses.
- Using the (Mot. 1448), remove:
- the clamp of the bottom hose of the expansion bottle,
- the clamp of the top hose of the expansion bottle,
- Disconnect:
- the expansion bottle's bottom hose,
- the expansion bottle's top hose.
- Remove the expansion bottle.
REFITTING
I - REFITTING OPERATION FOR PART CONCERNED
- Connect:
- the expansion bottle's top hose,
- the expansion bottle bottom hose.
- Using the (Mot. 1448), refit:
- the clamp of the top hose of the expansion bottle,
- the clamp of the bottom hose of the expansion bottle.
- Remove the hose clamps.
- Refit:
- the expansion bottle,
- the expansion bottle clip.
II - FINAL OPERATION.
- Top-up the coolant level in the expansion bottle.
- Refit:
- the engine undertray,
- the front bumper (see Front bumper: Removal - Refitting) (MR 393, 55A, Exterior protection).
- Connect the battery (see Battery: Removal - Refitting) (MR 392, 80A, Battery).
D4F, and 784 or 786
REMOVAL
I - REMOVAL PREPARATION OPERATION
- Position the vehicle on a two-post lift (see Vehicle: Towing and lifting) (MR 392, 02A, Lifting equipment).
- Disconnect the battery (see ) (MR 392, 80A, Battery).
- Remove:
- the engine undertray,
- the front bumper (see Front bumper: Removal - Refitting) (MR 393, 55A, Exterior protection).
- Remove the cover (1) from the power feed fuse board mounting.
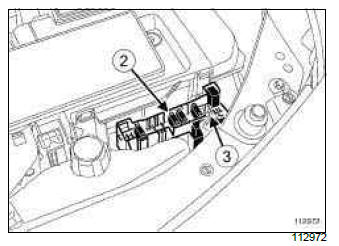
- Remove the green fuse (2) (30 A).
- Detach the fuse connector from the fuse mounting.
- Remove the power wiring harness nut (3) from the fuse mounting.
- Remove the power wiring harness from the fuse mounting.
- Detach the fuse board.
- Remove the air filter box air inlet pipe.
II - OPERATION FOR REMOVAL OF PART CONCERNED
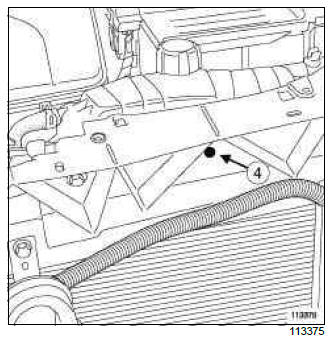
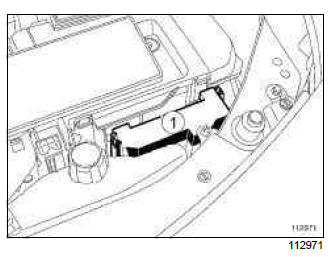
- Remove clip (4).
- Remove the expansion bottle.
- Fit the (Ms. 583) to the expansion bottle hoses.
- Using the (Mot. 1448), remove:
- the expansion bottle bottom hose clip,
- the expansion bottle top hose clip.
- Disconnect:
- the expansion bottle's bottom hose,
- the expansion bottle top hose.
- Remove the expansion bottle.
REFITTING
I - REFITTING OPERATION FOR PART CONCERNED
- Connect:
- the expansion bottle's top hose,
- the expansion bottle bottom hose.
- Using the (Mot. 1448), refit:
- the clamp of the top hose of the expansion bottle,
- the clamp of the bottom hose of the expansion bottle.
- Remove the (Ms. 583).
- Refit:
- the expansion bottle,
- the expansion bottle clip.
II - FINAL OPERATION.
- Clip the fuse board onto the battery tray.
- Position the fuse board wiring harness.
- Refit the fuse board wiring harness nut.
- Clip the 30 A fuse connector onto the fuse board.
- Refit:
- the 30 A fuse,
- the fuse board mounting cover,
- the air filter unit air inlet pipe.
- Top-up the coolant level in the expansion bottle.
- Refit:
- the front bumper (see Front bumper: Removal - Refitting) (MR 393, 55A, Exterior protection),
- the engine undertray.
- Connect the battery (see ) (MR 392, 80A, Battery).
READ NEXT:
 Exhaust: List and location of components
PIPE ASSEMBLY
D4F, and 740 or 742 or 764
(ZC1) cutting area between the catalytic
converter and the expansion
chamber
(ZC2) cutting area between the expansion
chamber and the silencer
D4F, and 784 or
Exhaust: Precautions for the repair
I - PARTS AND CONSUMABLES FOR THE REPAIR
1 - Parts always to be replaced:
the exhaust trunking (if fitted)
the seal or sealing ring on the connection between the
catalytic converter or catalytic
SEE MORE:
Driving
The Renault Clio IV (2014-2019) offers a satisfying driving experience with its nimble handling and responsive performance. Its compact size and maneuverability make it well-suited for urban driving and tight parking spaces. The precise steering and suspension tuning provide a balanced and confident
Your comfort
The Renault Clio IV (2014-2019) is designed with your comfort in mind. It features a well-crafted interior with quality materials and thoughtful ergonomics. The seats offer excellent support and adjustability, providing a comfortable driving experience. The cabin is designed to minimize noise and vi
© 2016-2026 Copyright Renault Clio Owners Club - 0.0034
