Renault Clio: Fan assembly: Removal - Refitting
LEFT-HAND DRIVE
REMOVAL
I - REMOVAL PREPARATION OPERATION
- Remove:
- the glovebox (see Glovebox: Removal - Refitting) (MR 393, 57A, Interior equipment),
- the front right-hand A-pillar air distribution duct (see 61A, Heating, Front footwell air distribution duct: Removal - Refitting, 61A-106).
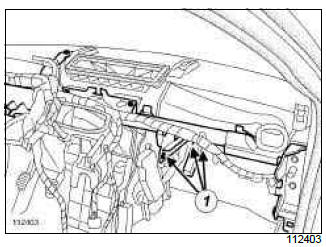
- Remove:
- the dashboard cross member reinforcement bolts (1),
- the dashboard cross member reinforcement tie-rod.
II - OPERATION FOR REMOVAL OF PART CONCERNED
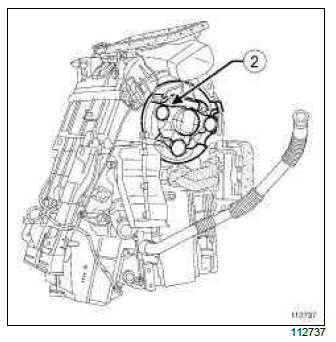
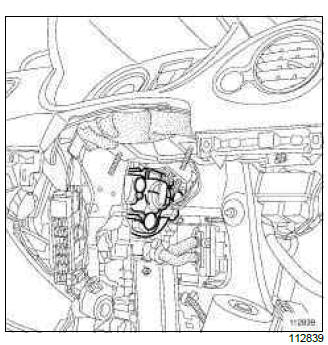
- Disconnect the blower assembly connector (2).
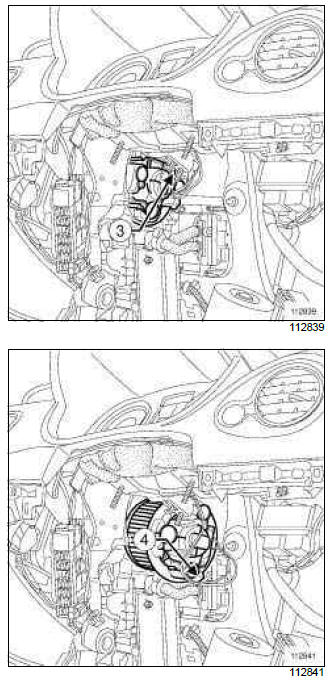
- Press on the tab at (3).
- Gently lift away the blower assembly.
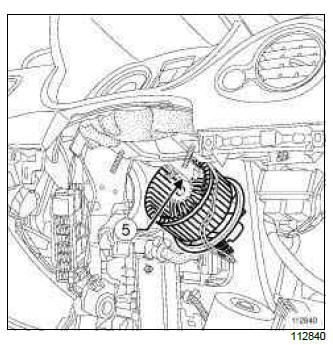
- Turn the blower assembly until the tab is facing downwards (4).
- Pivot the blower assembly around the cross member at (5).
- Remove the blower assembly.
REFITTING
I - REFITTING OPERATION FOR PART CONCERNED
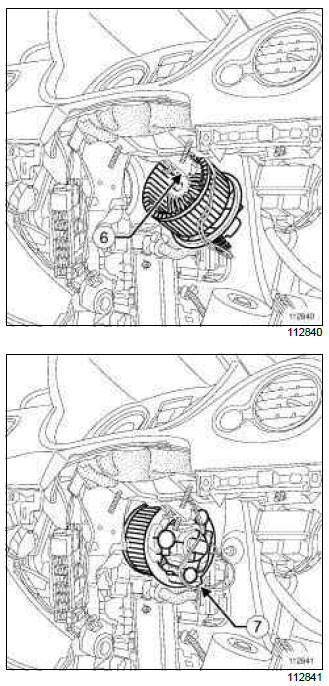
- Pivot the blower assembly around the cross member at (6).
- Turn the blower assembly until the tab is facing downwards (7).
- Refit the blower.
Note: When the blower assembly is replaced, it clicks when it is locked in position.
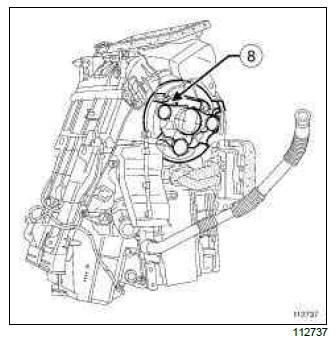
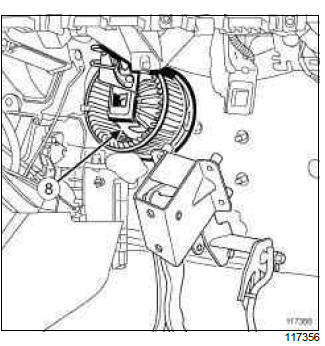
- Connect the blower assembly connector (8).
II - FINAL OPERATION.
- Refit:
- the dashboard cross member tie-rod,
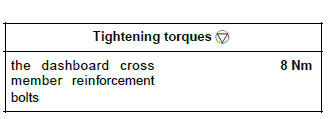
- the dashboard cross member reinforcement bolts (8 Nm).
- Refit:
- the front right-hand A-pillar air distribution duct (see 61A, Heating, Front footwell air distribution duct: Removal - Refitting, 61A-106),
- the glovebox (see Glovebox: Removal - Refitting) (MR 393, 57A, Interior equipment).
RIGHT-HAND DRIVE
REMOVAL
I - REMOVAL PREPARATION OPERATION
- Lock the airbag computer using the Diagnostic tool (see Fault finding - Replacement of components) ( MR 394, 88C, Airbags and pretensioners).
- Disconnect the battery (see Battery: Removal - Refitting) (MR 392, 80A, Battery).
- Remove:
- the driver's front airbag (see Driver's frontal airbag: Removal - Refitting) (MR 392, 88C, Airbag and pretensioners),
- the steering wheel (see Steering wheel: Removal - Refitting) (MR 392, 36B, Power-assisted steering),
- the centre console (see Centre console: Removal - Refitting) (MR 393, 57A, Interior equipment),
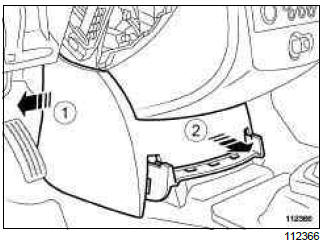
- Unclip the trim at (1) and (2) at the base of the dashboard.
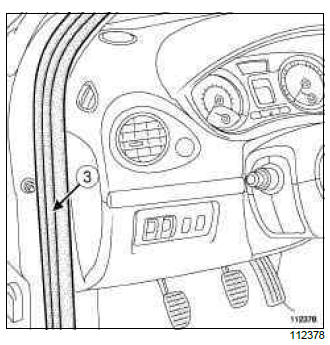
- Partially remove seal (3).
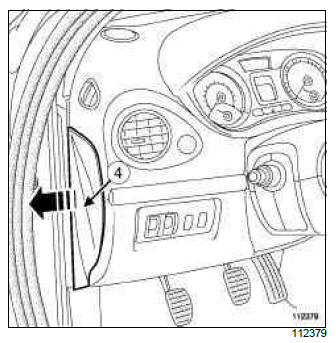
- Remove the side panel (4).
- Disconnect the inhibitor switch.
- Remove the bolt (5) from the base of the dashboard.
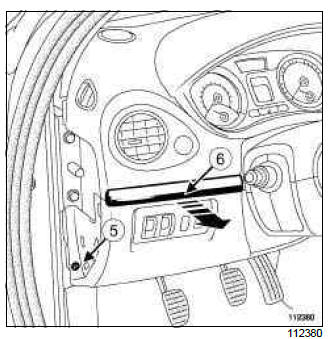
- Unclip the trim piece (6) from the driver's side dashboard lower cover.
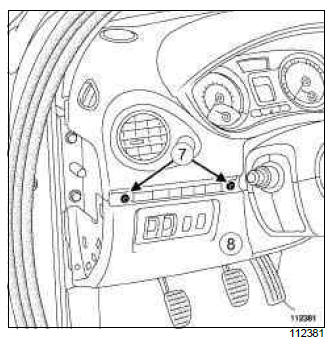
- Remove the bolts (7) from the driver's side dashboard lower cover.
- Take out the driver's side dashboard lower cover (8).
- Disconnect the connectors from the driver's side dashboard lower cover (depending on the equipment level).
- Remove the steering column (see Steering column: Removal - Refitting) (MR 392, 36B, Power-assisted steering).
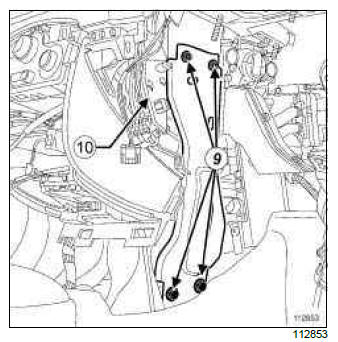
- Unclip the fuse box (10) from the dashboard cross member stiffener.
- Lift the floor carpet.
- Remove:
- the bolts (9) for the dashboard cross member stiffener,
- the dashboard cross member stiffener.
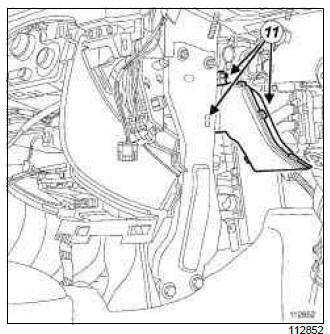
- Remove:
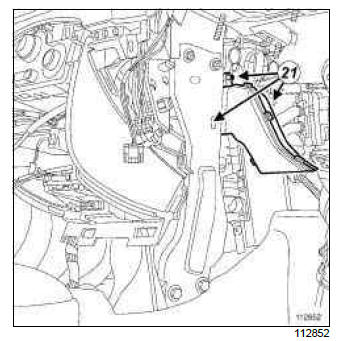
- the bolts (11) from the driver's side front footwell air distribution duct,
- the driver's side front footwell air distribution duct.
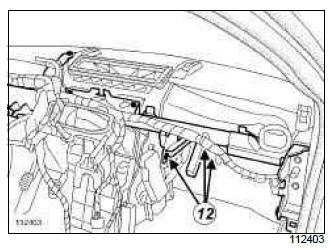
- Remove:
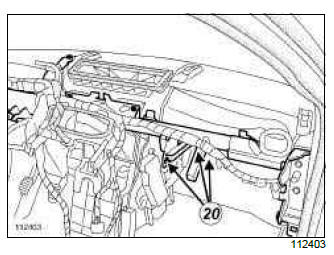
- the bolts (12) for the dashboard cross member connection piece,
- the dashboard cross member connection piece.
II - OPERATION FOR REMOVAL OF PART CONCERNED
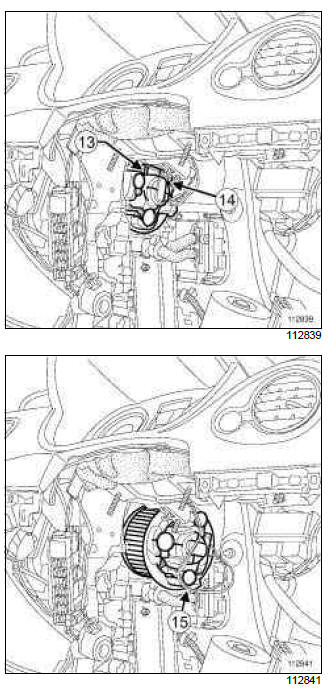
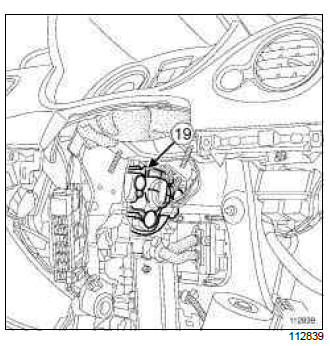
- Disconnect the motor-driven fan assembly connector (13).
- Press on the tab (14).
- Gently lift away the blower assembly.
- Turn the blower assembly until the tab is facing downwards (15).
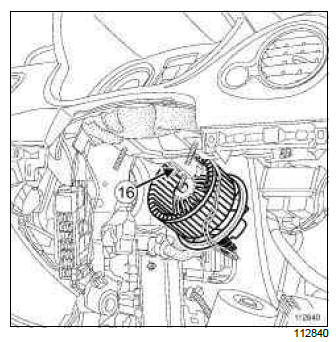
- Pivot the blower assembly around the cross member (16).
- Remove the blower assembly.
REFITTING
I - REFITTING OPERATION FOR PART CONCERNED
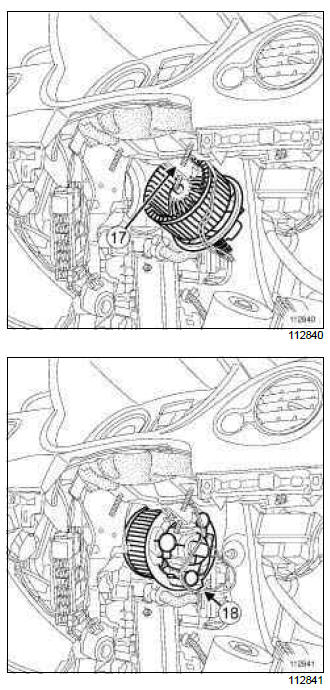
- Pivot the blower assembly around the cross member (17).
- Turn the blower assembly until the tab is facing downwards (18).
- Refit the blower.
Note: When the blower assembly is replaced, it clicks when it is locked in position.
- Connect the blower assembly connector (19).
II - FINAL OPERATION.
- Refit:
- the dashboard cross member connection piece,
- the bolts (20) for the dashboard cross member connection piece.
- Refit:
- the driver's side front footwell air distribution duct.
- the bolts (21) from the driver's side front footwell air distribution duct
- Refit:
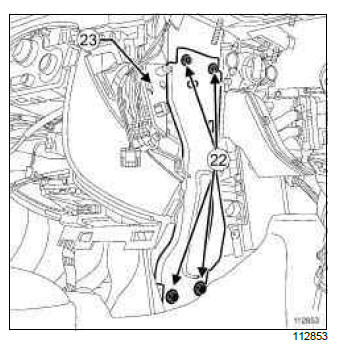
- the dashboard cross member stiffener,
- the bolts (22) for the dashboard cross member stiffener plate,
- Clip the fuse box (23) onto the dashboard cross member stiffener.
- Refit the steering column (see Steering column: Removal - Refitting) (MR 392, 36B, Power-assisted steering).
- Refit the floor carpet.
Note: Check that the floor carpet reaches under the accelerator pedal end-stop.
- Connect the connectors to the driver's side dashboard lower cover (depending on the equipment level).
- Position the driver's side dashboard lower cover.
- Refit:
- the bolts from the driver's side dashboard lower cover,
- the bolts to the base of the dashboard.
- Clip on the driver's side dashboard lower cover trim piece.
- Connect the inhibitor switch.
- Refit:
- the side panel,
- the seal.
- Clip on the dashboard lower trim.
- Refit:
- the centre console (see Centre console: Removal - Refitting) (MR 393, 57A, Interior equipment),
- the steering wheel (see Steering wheel: Removal - Refitting) (MR 392, 36B, Power-assisted steering),
- the driver's front airbag (see Driver's frontal airbag: Removal - Refitting) (MR 392, 88C, Airbag and pretensioners).
- Connect the battery (see Battery: Removal - Refitting) (MR 392, 80A, Battery).
- Unlock the airbag computer using the Diagnostic tool (see Fault finding - Replacement of components) (MR 394, 88C, Airbags and pretensioners).
LEFT-HAND DRIVE, and SCHOOL VEHICLE
REMOVAL
I - REMOVAL PREPARATION OPERATION
- Disconnect the battery (see Battery: Removal - Refitting) (MR 392, 80A, Battery).

- Remove:
- the driving school electric control unit (see Driving school repeater electrical control unit: Removal - Refitting) (MR 392, 84A, Control - Signals),
- the interior cover (1) behind the Driving school electric control unit,
- the glovebox (2) (see Glovebox: Removal - Refitting) (MR 393, 57A, Interior equipment),
- the front right-hand A-pillar air distribution duct (see 61A, Heating, Front footwell air distribution duct: Removal - Refitting, 61A-106).
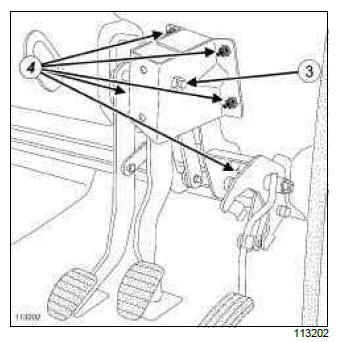
- From the instructor's side, remove:
- the brake and clutch pedal shaft (3),
- the nuts (4) from the pedal assembly.
II - OPERATION FOR REMOVAL OF PART CONCERNED
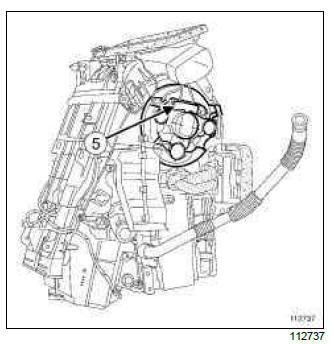
- Disconnect the motor-driven fan assembly connector (5).
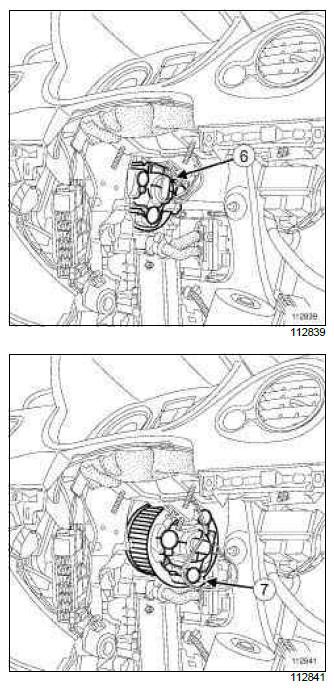
- Press on the tab at (6).
- Gently lift away the blower assembly.
- Turn the blower assembly until the tab is facing downwards (7).
- Pivot the blower assembly around the cross member at (8).
- Remove the blower assembly.
REFITTING
I - REFITTING OPERATION FOR PART CONCERNED
- Refit the blower.
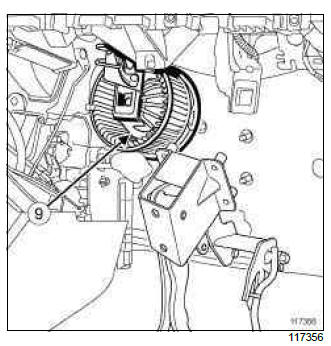
- Pivot the blower assembly around the cross member at (9).
- Position the blower assembly in its housing with the tab downwards.
Note: When the blower assembly is replaced, it clicks when it is locked in position.
- Turn the blower assembly until the tab (6) is facing upwards.
- Connect the blower assembly connector (5).
II - FINAL OPERATION.
- To the instructor's side, refit:
- the pedal assembly nuts,
- the brake and clutch pedal shaft.
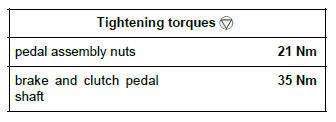
- Torque tighten:
- the pedal assembly nuts (21 Nm),
- the brake and clutch pedal shaft (35 Nm).
- Refit:
- the front right-hand A-pillar air distribution duct (see 61A, Heating, Front footwell air distribution duct: Removal - Refitting, 61A-106),
- the glovebox (see Glovebox: Removal - Refitting) (MR 393, 57A, Interior equipment),
- the interior cover behind the driving school electric control unit,
- the driving school electric control unit (see Driving school repeater electrical control unit: Removal - Refitting) (MR 392, 84A, Control - Signals),
- Connect the battery (see Battery: Removal - Refitting) (MR 392, 80A, Battery).
READ NEXT:
 Heating resistor relays: Removal - Refitting
LEFT-HAND DRIVE
REMOVAL
I - REMOVAL PREPARATION OPERATION
Partially remove seal (1).
Remove the side panel (2).
Remove the bolt (3) from the base of the dashboard.
Unclip the trim piece (4
Heating resistors: Removal - Refitting
REMOVAL
I - REMOVAL PREPARATION OPERATION
Remove the centre console (see Centre console:
Removal - Refitting) (MR 393, 57A, Interior equipment).
Unclip the trim at (1) and (2) at the base of th
Passenger compartment fan assembly control unit: Removal - Refitting
REMOVAL
I - REMOVAL PREPARATION OPERATION
Disconnect the battery (see Battery: Removal - Refitting)
(80A, Battery).
Partially remove the seal (1).
Remove the side panel (2).
Remove the
SEE MORE:
Driving
The Renault Clio IV (2014-2019) offers a satisfying driving experience with its nimble handling and responsive performance. Its compact size and maneuverability make it well-suited for urban driving and tight parking spaces. The precise steering and suspension tuning provide a balanced and confident
Your comfort
The Renault Clio IV (2014-2019) is designed with your comfort in mind. It features a well-crafted interior with quality materials and thoughtful ergonomics. The seats offer excellent support and adjustability, providing a comfortable driving experience. The cabin is designed to minimize noise and vi
