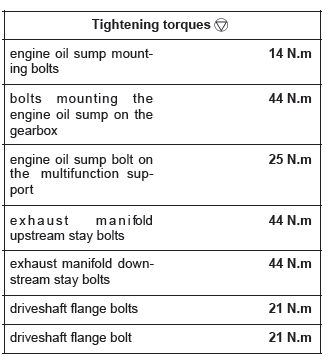
Renault Clio: Lower cover: Removal - Refitting
K9K
REMOVAL
- Position the vehicle on a two-post lift (see Vehicle: Towing and lifting) (02A, Lifting equipment).
- Remove:
- the resonator on the battery,
- the battery covers.
- Disconnect the battery (see Battery: Removal - Refitting) (80A, Battery).
- Remove the engine undertray.
- Drain the engine oil (see 10A, Engine and cylinder block assembly, Engine oil: Draining - Refilling, 10A-12).
- Remove:
- the dipstick,
- the front bumper (see Front bumper: Removal - Refitting) (55A, Exterior protection).
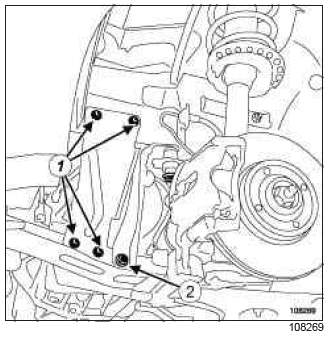
- Remove:
- the left-hand side reinforcement bolts (1),
- the left-hand side reinforcement,
- the lower bolt (2) from the side tie rods.
- Fit the cooling assembly to the upper cross member using safety strap(s).
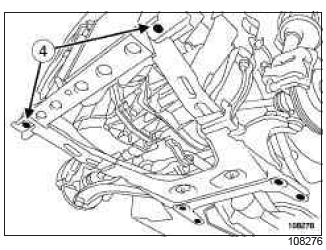
- Remove:
- the bumper bolts from the radiator cross member,
- the bolts (4) from the radiator lower cross member,
- the radiator lower cross member.
- Disconnect the connector from the oil level sensor.
I - FIRST FITTING OF RIGHT-HAND DRIVESHAFT RELAY BEARING
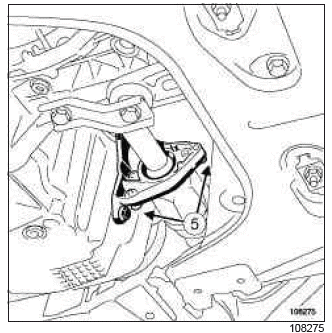
- Remove:
- the bolts from right-hand driveshaft bracket (5) on the relay bearing,
- the relay bearing bolts from the sump,
- the sump bolts from the multifunction support.
II - SECOND FITTING OF RIGHT-HAND DRIVESHAFT RELAY BEARING
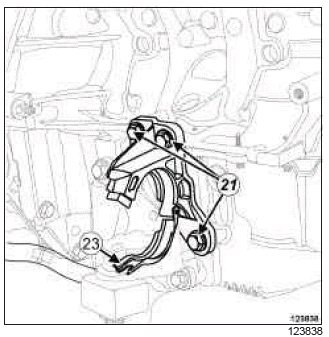
- Remove:
- the half-shell bolt (23),
- the bolts (21) of the right-hand driveshaft relay bearing on the engine.
- Extract the relay bearing by sliding it towards the gearbox then turning it around the right-hand driveshaft.
III - OPERATION FOR REMOVAL OF PART CONCERNED
- Remove:
- the sump bolt on the gearbox,
- the sump bolts,
- the sump,
- the sump seal.
Note: If the sump cannot be extracted because it is in contact with the oil pump strainer, do not force the removal of the sump as this may damage the oil splash plate.
Loosen the oil pump bolts by a few turns (the tip of your finger should pass between the bolt head and the oil pump casing) using 10 mm and 13 mm open-jawed spanners and while tilting the sump towards the front of the vehicle.
REFITTING
WARNING
To ensure proper sealing, the gasket surfaces must be clean, dry and not greasy (avoid any finger marks).
WARNING
Applying excess sealant could cause it to be squeezed out when parts are tightened. A mixture of sealant and fluid could damage certain components (engine, radiator, etc.).
- Apply four beads of ADHESIVE SILICONE SEALANT, part number 77 11 227 484, at (7) with a diameter of 5 mm.
- Apply two dabs of ADHESIVE SILICONE SEALANT, part number 77 11 227 484, at (8) with a diameter of 7 mm at the connection between the crankshaft closure panel and the cylinder block.
- Fit the sump.
Note: If the oil pump was loosened beforehand in order to extract the sump, position the sump in order to pass the oil pump strainer into the oil splash plate of the sump.
Position a component jack to support the sump.
Tilt the sump towards the front of the vehicle, in order to facilitate access to the oil pump bolts.
Torque tighten the oil pump bolts (25 N.m) using the small torque wrench 77 11 226 888.
Fit the sump and then follow the following instructions.
Note: Before pressing the sump on the cylinder block, check that the sump seal is still in place and that it has not come out of the grooves on the sides.
- Tighten:
- the sump bolts on the gearbox, without locking them,
- to torque the sump bolts on the gearbox (44 N.m),
- in order and to torque the sump bolts (14 N.m).
AIR CONDITIONING
- Tighten to torque the sump bolts on the multifunction support (21 N.m).
- Proceed in the reverse order to removal.
WARNING
A shim of 10 mm in thickness must be placed between the radiator cross member and the sub-frame.
Centre the radiator cross member pin in the sub-frame hole at the level of the lower arm front mounting, to torque tighten the radiator cross member mountings.
- Torque tighten:
- the radiator cross member bolts (105 N.m),
- the relay bearing bolts (44 N.m).
- Refit the front bumper (see Front bumper: Removal - Refitting) (55A, Exterior protection).
- Top up the engine oil (see 10A, Engine and cylinder block assembly, Engine oil: Draining - Refilling, 10A-12).
- Connect the battery (see Battery: Removal - Refitting) (80A, Battery).
D4F

REMOVAL
I - REMOVAL PREPARATION OPERATION
- Position the vehicle on a two-post lift (see Vehicle: Towing and lifting) (MR 392, 02A, Lifting equipment).
- Remove:
- the dipstick,
- the engine undertray.
- Drain the engine oil (see 10A, Engine and cylinder block assembly, Engine oil: Draining - Refilling, 10A-12).
II - OPERATION FOR REMOVAL OF PART CONCERNED
D4F, and 784
- Remove the bolts from the sump on the gearbox.
- Remove the sump bolts.
- If the sump is fitted with ADHESIVE SILICONE
SEALANT :
- cut the ADHESIVE SILICONE SEALANT using the (Mot. 1716),
- gradually detach the sump,
- remove the sump.
- If the sump is fitted with a seal:
- remove the sump, rotating it forwards,
- remove the seal from the sump.
REFITTING
I - REFITTING PREPARATIONS OPERATION
- Clean the sump sealing faces using SUPER CLEANER FOR SEALING FACES.
- Use SURFACE CLEANER to degrease the sump sealing faces.
WARNING
Do not scratch the aluminium joint faces: any surface damage to the joint faces may cause leaks.
WARNING
The joint faces must be clean, dry and free from grease (avoid finger marks).
- Fit a specific new after-sales seal to a steel sump or apply a beading of SILICONE ADHESIVE SEALANT to an aluminium sump.
II - REFITTING OPERATION FOR PART CONCERNED
- Fit the sump.
- Refit the sump bolts.
- Pre-tighten in order and to torque the sump bolts (initial torque) (8 Nm).
- Tighten to torque and in order the sump bolts (10 Nm).
D4F, and 784
- Refit the sump bolts onto the gearbox.
- Torque tighten the sump bolts on the gearbox (44 Nm).
III - FINAL OPERATION.
- Wipe any possible traces of oil from the sump.
- Top up the engine oil (see 10A, Engine and cylinder block assembly, Engine oil: Draining - Refilling, 10A-12).
- Check for leaks from the sump.
- Refit:
- the engine undertray,
- the dipstick.
K4J or K4M
REMOVAL
I - REMOVAL PREPARATION OPERATION
- Position the vehicle on a two-post lift (see Vehicle: Towing and lifting) (02A, Lifting equipment).
- Disconnect the battery (see Battery: Removal - Refitting) (80A, Battery).
- Remove:
- the engine undertray bolts,
- the engine undertray.
- Drain the engine oil (see 10A, Engine and cylinder block assembly, Engine oil: Draining - Refilling, 10A-12).
- Remove:
- the dipstick,
- the front wheels (see Wheel: Removal - Refitting) (35A, Wheels and tyres),
- the front wheel arch liners (see Front wheel arch liner: Removal - Refitting) (55A, Exterior protection),
- the front bumper (see Front bumper: Removal - Refitting) (55A, Exterior protection),
- the radiator mounting cross member (see Radiator mounting cross member: Removal - Refitting) (41A, Front lower structure).
- Disconnect the oil level sensor.
K4J - K4M, and 800 or 801 or 804
- Remove:
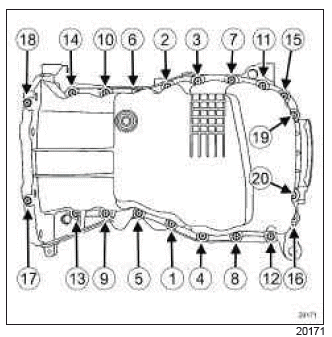
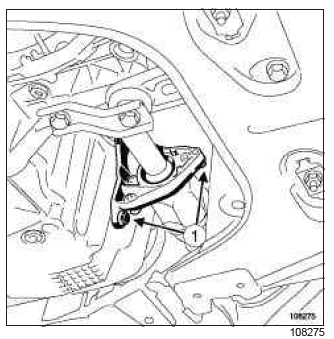
- the right-hand driveshaft flange bolts (1) on the driveshaft relay bearing,
- the relay bearing bolts on the engine oil sump,
- the relay bearing.
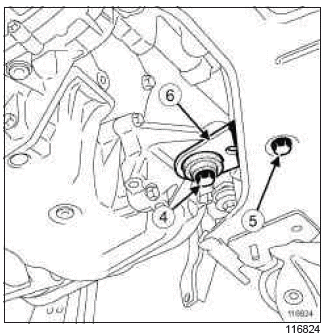
K4M, and 862
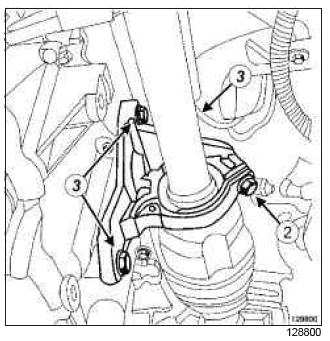
- Remove:
- the right-hand driveshaft flange bolt (2) on the relay bearing,
- the bolts (3) from the driveshaft relay bearing,
- the driveshaft relay bearing.
- Remove the bolts (4) from the exhaust manifold downstream stay.
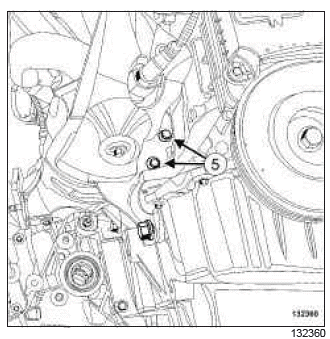
- Remove the bolts (5) from the exhaust manifold upstream stay.
II - OPERATION FOR REMOVAL OF PART CONCERNED
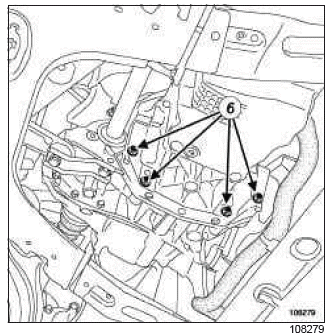
K4J - K4M, and 800 or 801 or 804
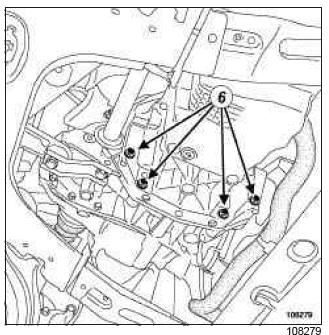
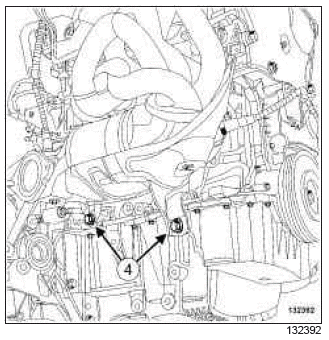
- Remove the bolts (6) from the engine oil sump on the gearbox.
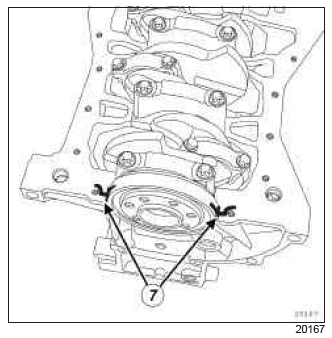
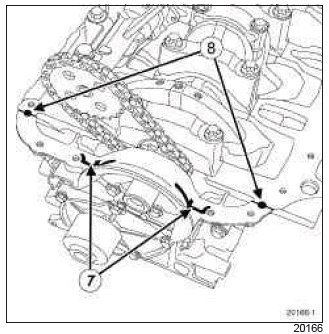
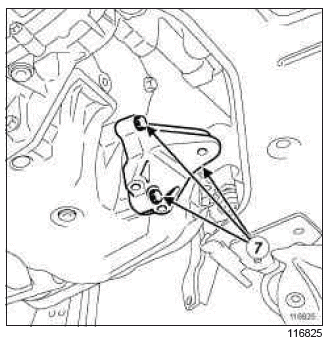
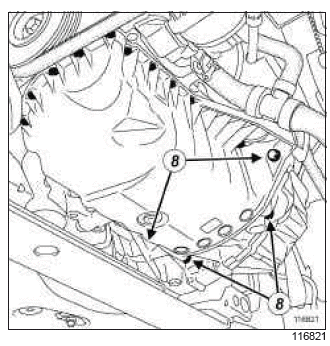
K4M, and 862
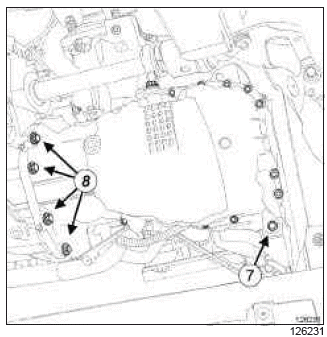
- Remove:
- the engine oil sump bolt (7) on the multifunction support,
- the engine oil sump bolts (8) on the gearbox.
- Remove:
- the sump bolts,
- the engine oil sump,
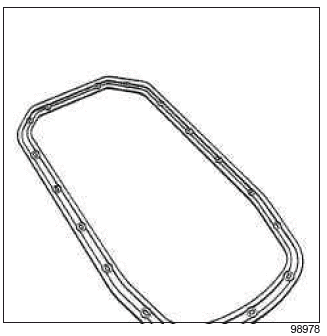
- the engine oil sump seal.
REFITTING
I - REFITTING PREPARATION OPERATION
- parts always to be replaced: engine oil sump seal.
WARNING
Do not scrape the joint faces of the aluminium, any damage caused to the joint face will result in a risk of leaks.
- Clean the cylinder block joint face using SUPER CLEANING AGENT FOR JOINT FACES (see ) (04B, Consumables - Products).
WARNING
To ensure proper sealing, the gasket surfaces must be clean, dry and not greasy (avoid any finger marks).
- Use SURFACE CLEANER (see ) (04B, Consumables Products) to degrease:
- the sump joint face if it is to be reused,
- the cylinder block gasket face.
WARNING
Applying excess sealant could cause it to be squeezed out when parts are tightened. Mixing of the sealant with fluid could result in damage to certain components (engine, radiator, etc.).

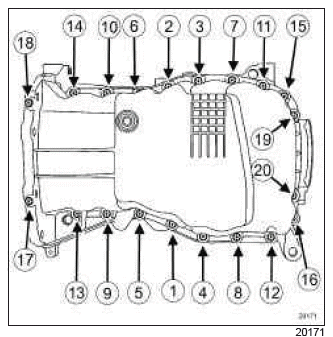
- Apply:
- four beads (9) of MASTIXO (see ) (04B, Consumables - Products) with a diameter of 5 mm,
- two drops (10) of MASTIXO (see ) (04B, Consumables - Products) with a diameter of 5 mm.
II - REFITTING OPERATION FOR PART CONCERNED
- Refit:
- a new engine oil sump seal,
- the engine oil sump,
- the engine oil sump bolts without tightening them,
- the engine oil sump bolts on the gearbox without tightening them.
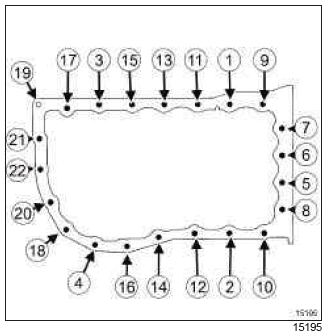
- Torque tighten the engine oil sump bolts (14 N.m) (1), (2), (19), (20), (17) and (18).
- Tighten to torque and in order the engine oil sump mounting bolts (14 N.m).
- Torque tighten the bolts mounting the engine oil sump on the gearbox (44 N.m).
K4M, and 862
- Torque tighten the engine oil sump bolt on the multifunction support (25 N.m).
III - FINAL OPERATION
K4M, and 862
- Tighten to torque:
- the exhaust manifold upstream stay bolts (44 N.m),
- the exhaust manifold downstream stay bolts (44 N.m).
- Refit:
- the relay bearing,
- the relay bearing bolts on the engine oil sump,
- the right-hand driveshaft flange bolts on the relay bearing.
- Refit the relay bearing bolts.
K4J - K4M, and 800 or 801 or 804
- Refit the driveshaft flange bolts.
- Torque tighten the driveshaft flange bolts (21 N.m).
K4M, and 862
- Refit the driveshaft flange bolt.
- Torque tighten the driveshaft flange bolt (21 N.m).
- Connect the oil level sensor.
WARNING
Place a 10 mm thick shim between the radiator cross member and the sub-frame and centre the radiator cross member pin in the sub-frame hole at the level of the lower arm front mounting to torque tighten the radiator cross member mountings.
- Refit:
- the radiator mounting cross member (see Radiator mounting cross member: Removal - Refitting) (41A, Front lower structure),
- the front bumper (see Front bumper: Removal - Refitting) (55A, Exterior protection),
- the front wheel arch liners (see Front wheel arch liner: Removal - Refitting) (55A, Exterior protection),
- the front wheels (see Wheel: Removal - Refitting) (35A, Wheels and tyres),
- the dipstick.
- Top up the engine oil (see 10A, Engine and cylinder block assembly, Engine oil: Draining - Refilling, 10A-12).
- Refit the engine undertray.
- Connect the battery (see Battery: Removal - Refitting) (80A, Battery).
M4R
REMOVAL
I - REMOVAL PREPARATION OPERATION
- Position the vehicle on a two-post lift (see Vehicle: Towing and lifting).
- Remove the engine undertray.
- Drain the engine oil (see 10A, Engine and cylinder block assembly, Engine oil: Draining - Refilling, 10A-12).
II - REMOVAL OF PART CONCERNED
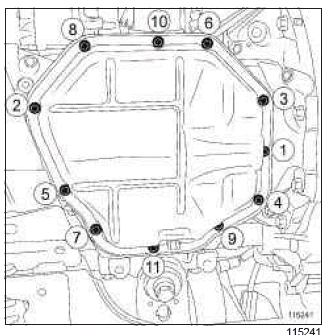
- Remove the sump mounting bolts in the above order.
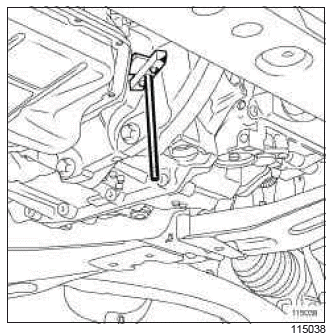
- Detach the sump using the (Mot. 1716) and a hammer.
- Remove the sump.
IMPORTANT Note the quantity of oil in the sump.
REFITTING
I - REFITTING PREPARATION OPERATION
- Clean the sealing surfaces using the DECAPJOINT product.
IMPORTANT
- Do not scratch the aluminium sealing surfaces.
- Wear goggles.
- Wear gloves during the operation.
WARNING Applying excess sealant could cause it to be squeezed out when parts are tightened. A mixture of sealant and fluid could damage certain components (engine, radiator, etc.)
WARNING The gasket faces must be clean, dry and free from grease (avoid finger marks).
- Check that the sump is not:
- scratched,
- deformed.
- If this is the case, replace the sump.
- a Check that the baseplate is not scratched.
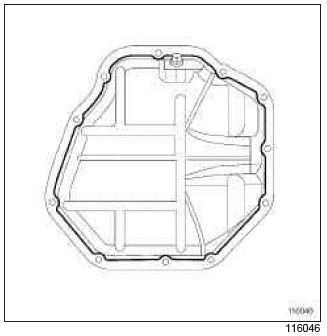
- Apply a bead of SILICONE ADHESIVE SEALANT (77 11 227 484) approximately 5 mm in diameter, approximately 8 mm away from the inside rim of the sump to ensure a good seal.
II - REFITTING THE PART CONCERNED
- Fit the sump.
- Finger tighten the mounting bolts in the above order until they make contact with the sump.
- Tighten to torque and in order the sump mounting bolts (10 Nm).
III - FINAL OPERATION
- Top up the engine oil (see 10A, Engine and cylinder block assembly, Engine oil: Draining - Refilling, 10A-12).
- Refit the engine undertray.
F4R
REMOVAL
I - REMOVAL PREPARATION OPERATION
- Position the vehicle on a two-post lift (see Vehicle: Towing and lifting) (MR 392, 02A, Lifting equipment).
- Disconnect the battery (see Battery: Removal - Refitting) (MR 392, 80A, Battery).
- Remove:
- the front bumper (see Front bumper: Removal - Refitting) (MR 393, 55A, Exterior protection),
- the engine undertray.
- Drain the engine oil (see 10A, Engine and cylinder block assembly, Engine oil: Draining - Refilling, 10A-12).
- Refit the drain plug with its old seal.
- Strap the cooling unit in place.
- Remove the radiator mounting cross member (see Radiator mounting cross member: Removal - Refitting) (MR 393, 41A, Front lower structure).
1 - Standard removal of sump
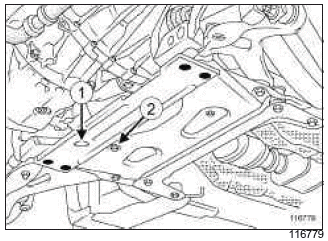
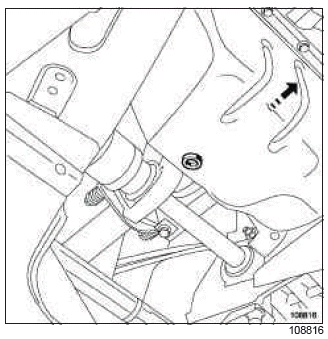
- Remove the mounting bolt (1) from the lower engine tie-bar, engine side.
- Undo the mounting bolt (2) on the lower engine tie-bar, sub-frame side.
- Move the lower engine tie-bar to one side.
2 - Replacement of the sump
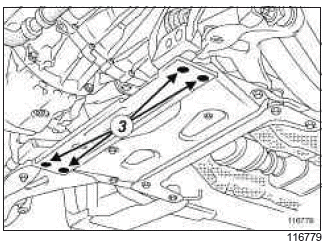
- Remove:
- the mounting nuts (3) from the reinforcement lower cross member,
- the reinforcement lower cross member.
- Remove the mounting bolt (4) from the lower engine tie-bar, engine side.
- Undo the mounting bolt (5) on the lower engine tie-bar, sub-frame side.
- Move the lower engine tie-bar (6) to one side.
- Remove:
- the mounting bolts (7) from the engine tie-bar support, engine side,
- the engine tie-bar support, engine side.
II - OPERATION FOR REMOVAL OF PART CONCERNED
- Remove:
- the bolts (8) mounting the sump on the gearbox,
- the bolts mounting the sump on the cylinder block,
- the sump.
REFITTING
I - REFITTING PREPARATIONS OPERATION
- Clean:
- the sump joint face,
- the cylinder block joint face.
II - REFITTING OPERATION FOR PART CONCERNED
- Refit:
- the sump with its new seal,
- the bolts mounting the sump on the cylinder block,
- the bolts mounting the sump on the gearbox.
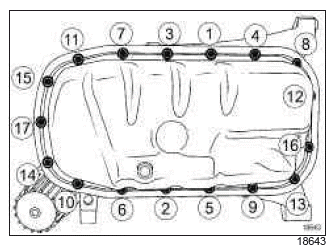
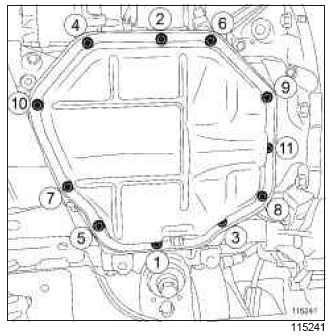
- Torque tighten and in order:
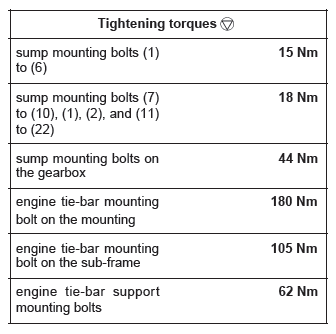
- the sump mounting bolts (1) to (6) (15 Nm),
- the sump mounting bolts (7) to (10), (1), (2), and (11) to (22) (18 Nm),
- the sump mounting bolts on the gearbox (44 Nm).
- Clean around the sides of the sump.
- Remove the drain plug and its old seal.
- Refit the drain plug with its new seal.
WARNING Systematically replace the gaskets.
1 - Standard refitting of sump
- Fit the lower engine tie-bar.
- Refit the lower engine tie-bar mounting bolt, engine side.
- Torque tighten:
- the engine tie-bar mounting bolt on the mounting (180 Nm),
- the engine tie-bar mounting bolt on the sub-frame (105 Nm).
2 - Replacement of the sump
- Refit:
- the lower cross member.
- the reinforcement lower cross member mounting nuts,
- Refit:
- the engine tie-bar support, engine side,
- the engine tie-bar support mounting bolts, engine side.
- Torque tighten the engine tie-bar support mounting bolts (62 Nm).
- Fit the lower engine tie-bar.
- Refit the lower engine tie-bar mounting bolt, engine side.
- Torque tighten:
- the engine tie-bar mounting bolt on its mounting (180 Nm),
- the engine tie-bar mounting bolt on the sub-frame (105 Nm).
III - FINAL OPERATION
- Perform the following operations:
- top up the engine oil (see 10A, Engine and cylinder block assembly, Engine oil: Draining - Refilling, 10A-12),
- check the engine oil level using the dipstick.
- Connect the battery (see Battery: Removal - Refitting) (MR 392, 80A, Battery).
- Start the engine and let it run for 5 minutes.
- Check that there are no leaks between the cylinder block and the sump.
- Refit the engine undertray.
READ NEXT:
 Conrod bearing shell:
Removal - Refitting
Conrod bearing shell:
Removal - Refitting
K9K
IMPORTANT To avoid all risk of damage to the systems, apply the
safety and cleanliness instructions and operation recommendations before
carrying out any repair (see Vehicle: Precautions for th
Oil pump: Removal -
Refitting
D4F, and 740 or 742 or 764
REMOVAL
I - REMOVAL PREPARATION OPERATION
Position the vehicle on a two-post lift (see Vehicle:
Towing and lifting) (MR 392, 02A, Lifting equipment).
Disconnect the bat
Multifunction support:
Removal - Refitting
D4F, and 740 or 742 or 764
REMOVAL
I - REMOVAL PREPARATION OPERATION
Position the vehicle on a two-post lift (see Vehicle:
Towing and lifting) (MR 392, 02A, Lifting equipment).
Disconnect the bat
SEE MORE:
Driving
The Renault Clio IV (2014-2019) offers a satisfying driving experience with its nimble handling and responsive performance. Its compact size and maneuverability make it well-suited for urban driving and tight parking spaces. The precise steering and suspension tuning provide a balanced and confident
Your comfort
The Renault Clio IV (2014-2019) is designed with your comfort in mind. It features a well-crafted interior with quality materials and thoughtful ergonomics. The seats offer excellent support and adjustability, providing a comfortable driving experience. The cabin is designed to minimize noise and vi
