Renault Clio: Front bumper: Stripping - Rebuilding
EQUIPMENT LEVEL EA1 or EQUIPMENT LEVEL EA2 or EQUIPMENT LEVEL EA3 or EQUIPMENT LEVEL EA4 or EQUIPMENT LEVEL EA5, and DOCUMENTATION PHASE 1
STRIPPING
I - STRIPPING PREPARATION OPERATION
- Remove the front bumper (see 55A, Exterior protection, Front bumper: Removal - Refitting, 55A-1).
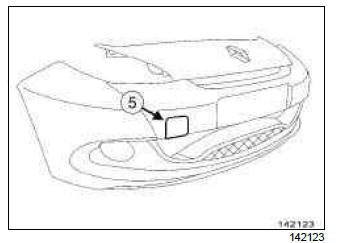
II - STRIPPING OPERATION FOR PART CONCERNED

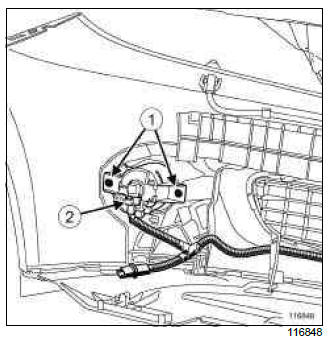
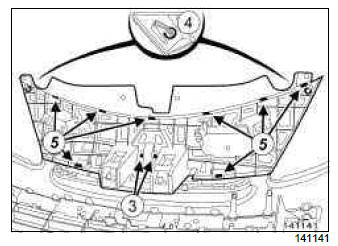
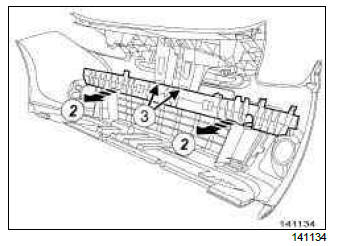
- Remove the bolts (1).
- Disconnect the connectors (2).
- Remove the fog lights.
- Note the wiring harness position.
- Remove the wiring harness.
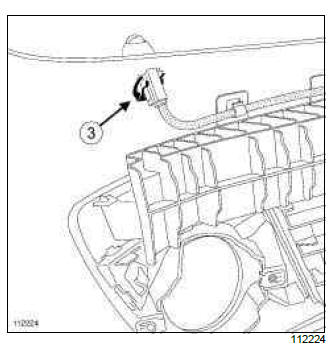
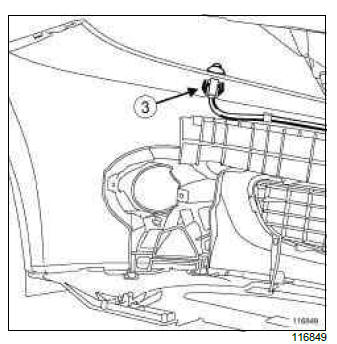
- Unclip the clips (3).
- Remove the headlight washer jets (depending on the equipment level).
- Note the position of the headlight washer jet pipes (depending on equipment level).
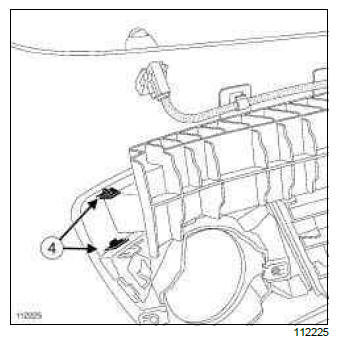
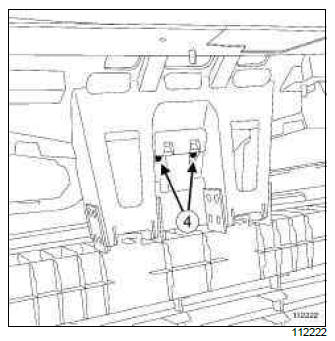
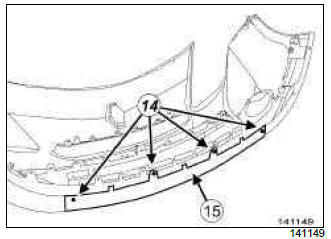
- Unclip the clips (4).
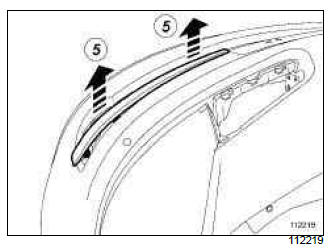
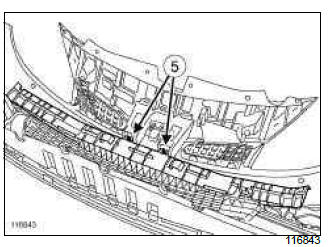
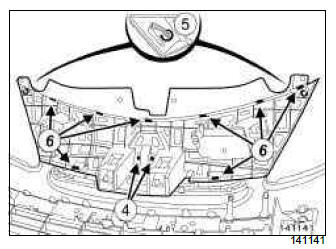
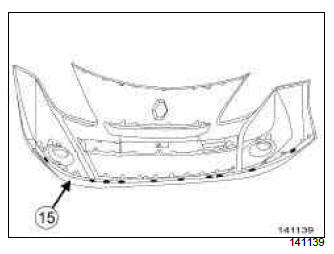
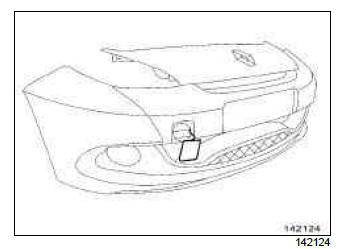
- Unclip the impact strips (5).

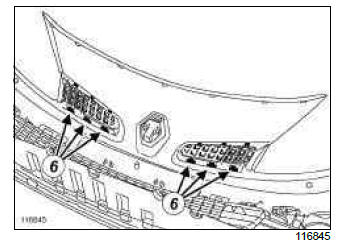
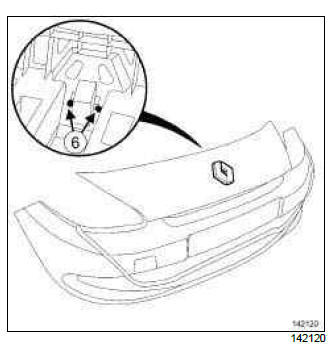
- Unclip:
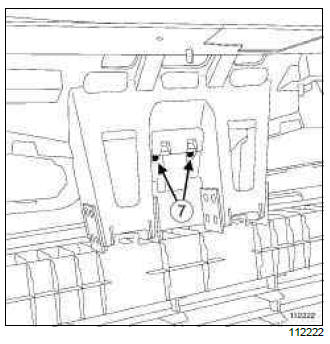
- the clips (6),
- the fog light supports.
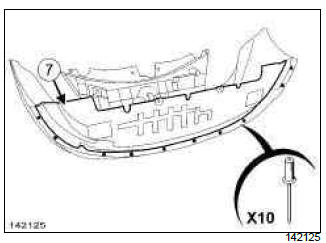
- Remove:
- the bolts (7),
- the front badge.
hot climate vehicle
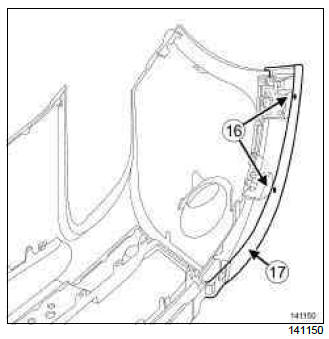
- Unclip the stone guard grille.
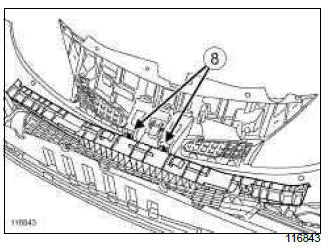
- Unclip the absorber (8).
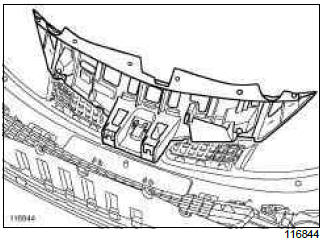
- Unclip the stiffener.
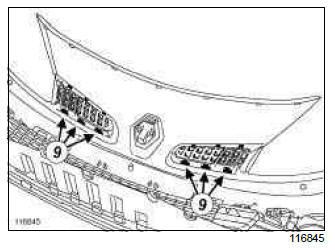
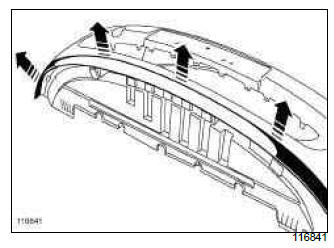
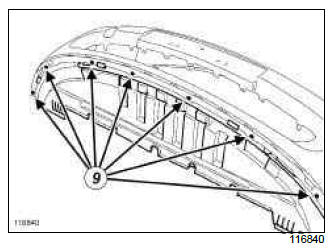
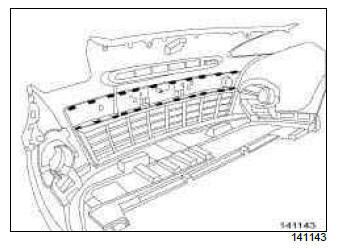
- Unclip the radiator half-grilles (9).
- Remove the radiator half-grilles.
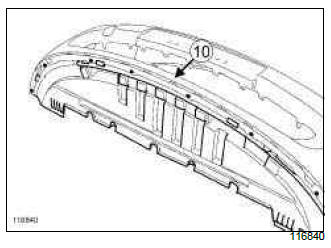
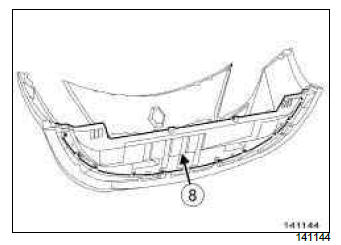
- Drill out rivets (10).
- Remove the sump.
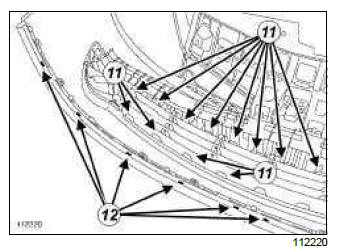
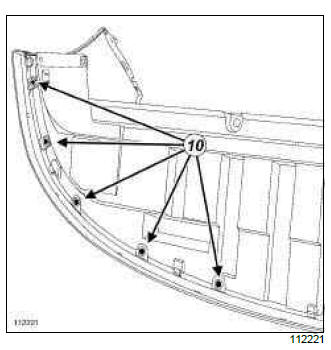
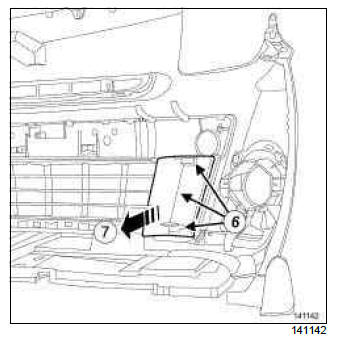
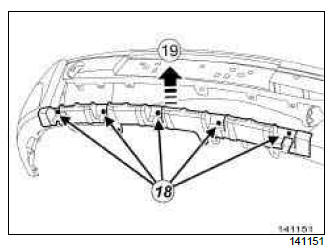
- Unclip the clips (11).
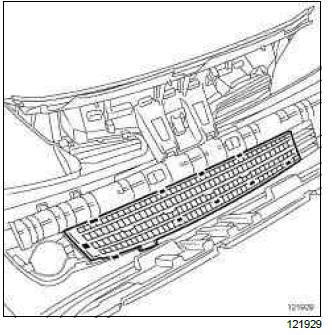
- Remove the front bumper bottom grille.
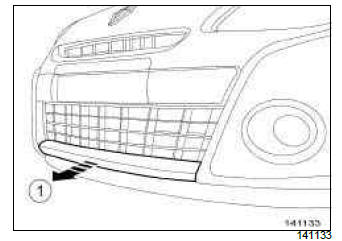
- Unclip the clips (12).
- Remove the lower trim.
REBUILDING
I - REBUILDING OPERATION FOR PART CONCERNED
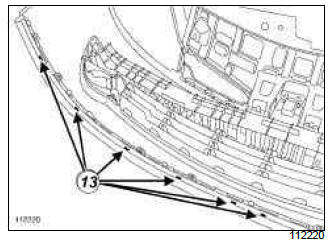
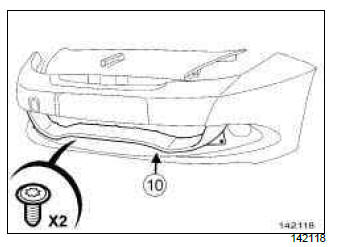
- Position the lower trim strip.
- Drill a hole at the position (13) of each of the clips using a 4.5 mm drill bit.
- Rivet the lower trim.
- Refit the lower cover.
- Insert rivets into the lower cover.
- Clip in the lower grille.
- Refit the fog light supports.
- Clip on:
- the clips (6),
- the impact strips,
- the radiator half-grilles,
- the stiffener,
- the absorber,
- the stone guard grille (hot climate vehicle).
- Refit:
- the front badge,
- the bolts (7),
- the headlight washer jets (depending on the equipment level),
- the clips (3) (depending on the equipment level),
- the headlight washer jet pipes (depending on the equipment level),
- the fog light wiring harness (depending on the equipment level),
- the fog lights (depending on the equipment level),
- the bolts (1).
- Connect the connectors.
II - FINAL OPERATION.
- Refit the front bumper (see 55A, Exterior protection, Front bumper: Removal - Refitting, 55A-1).
EQUIPMENT LEVEL SPORT, and DOCUMENTATION PHASE 1
STRIPPING
I - STRIPPING PREPARATION OPERATION
- Remove the front bumper (see 55A, Exterior protection, Front bumper: Removal - Refitting, 55A-1).
II - STRIPPING OPERATION FOR PART CONCERNED
- Remove the bolts (1).
- Disconnect the connectors (2).
- Remove the fog lights.
- Note the wiring harness position.
- Remove the wiring harness.
- Unclip the clips (3).
- Remove the headlight washer jets.
- Store the position of the headlight washer pipes.
- Remove the bolts (4).
- Remove the front badge.
- Unclip the absorber (5).
- Unclip the stiffener.
- Unclip the radiator half-grilles (6).
- Remove the radiator half-grilles.
- Unclip:
- the clips (7),
- the fog light supports.
- Unclip the clips.
- Remove the lower grille (8).
- Unclip the lower trim piece.
- Drill out the rivets (9).
- Remove the sump.
REBUILDING
I - REBUILDING OPERATION FOR PART CONCERNED
- Refit and rivet the lower cover.
- Clip:
- the lower trim strip starting with the centre of the part (10),
- the lower grille.
- Refit the fog light supports.
- Clip:
- the clips (7),
- the radiator half-grilles,
- the stiffener,
- the absorber.
- Refit:
- the front badge,
- the bolts (4),
- the headlight washer jets,
- the clips (3),
- the fog light wiring harness,
- the fog lights,
- the bolts (1).
- Connect the connectors.
II - FINAL OPERATION
- Refit the front bumper (see 55A, Exterior protection, Front bumper: Removal - Refitting, 55A-1).
EQUIPMENT LEVEL EAG
STRIPPING
I - STRIPPING PREPARATION OPERATION
- Position the vehicle on a two-post lift (see Vehicle: Towing and lifting) (02A, Lifting equipment).
- Remove:
- the front wheels (see Wheel: Removal - Refitting) (35A, Wheels and tyres),
- the front wheel arch liners (see 55A, Exterior protection, Front wheel arch liner: Removal - Refitting, 55A-41),
- the front bumper (see 55A, Exterior protection, Front bumper: Removal - Refitting, 55A-1).
II - STRIPPING OPERATION FOR PART CONCERNED
- Remove:
- the front bumper wiring (see Front bumper wiring: Removal - Refitting) (88A, Wiring),
- the front fog lights (see Front fog light: Removal - Refitting) (80B, Headlights).
HEADLIGHT WASHERS WITH BLADE
- Remove the headlight washer jets (see Headlight washer jet: Removal - Refitting) (85A, Wiping - Washing).
- Mark the position of the headlight washer jet pipe on the front bumper.
- Remove the headlight washer jet pipe from the front bumper.
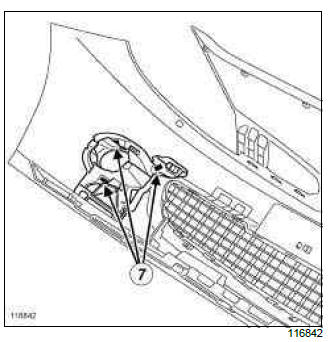
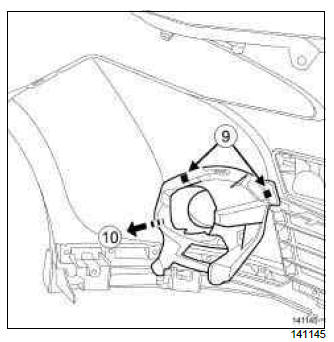
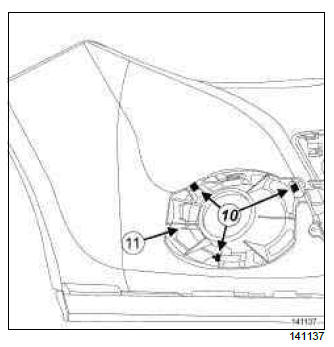
- Unclip the absorber at (1) by pressing the clips (2).
- Remove the absorber.
- Remove the front badge bolts (3).
- Cut the front bumper clips (4).
- Unclip:
- the front badge,
- the stiffener by pressing the clips (5).
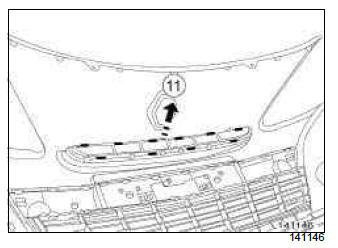
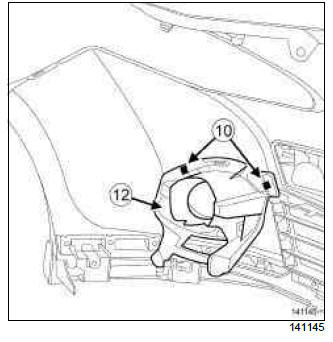
- Unclip the blanking covers by pressing the clips (6).
- Remove the blanking covers at (7).
- Unclip the impact strips by pressing the clips.
- Remove the impact strips from the front of the front bumper, starting with the side impact strips.
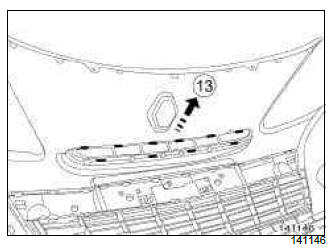
- Drill the rivets out.
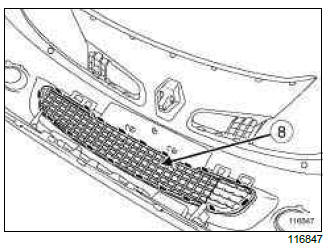
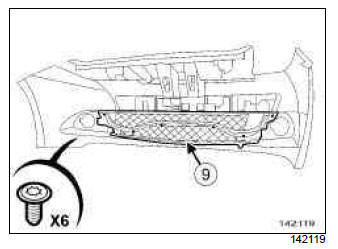
- Remove the diffuser (8).
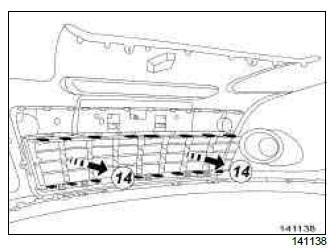
- Remove:
- the front fog light mounting clips (9),
- the front fog light mountings at (10).
- Unclip the upper radiator grille by pressing the clips.
- Remove the upper radiator grille at (11).
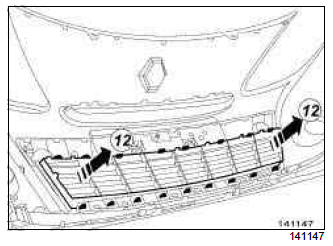
- Unclip the lower radiator grille by pressing the clips.
- Remove the lower radiator grille at (12).
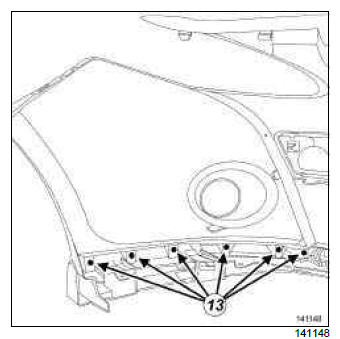
- Remove the bolts (13) from the side spoilers.
- Drill out the rivets (14).
- Remove the centre spoiler (15).
- Drill out the rivets of the side spoilers (16).
- Remove:
- the side spoilers (17),
- the side spoiler mountings.
- Drill out the rivets (18).
- Remove the centre spoiler mounting at (19).
REBUILDING
I - REBUILDING PREPARATION OPERATION
- parts always to be replaced: front bumper rivet (50,05,02,18).
- parts always to be replaced: Front bumper clip (50,05,02,17).
- Check the clips of the front fog light mountings, and replace them if necessary.
II - REBUILDING OPERATION FOR PART CONCERNED
- Refit and rivet the centre spoiler mounting using the rivet gun.
- Refit the side spoiler mountings.
- Refit and rivet using the rivet gun :
- the side spoilers,
- the centre spoiler.
- Clip:
- the lower radiator grille,
- the upper radiator grille.
- Refit the front fog light mountings.
- Refit and rivet the diffuser using the rivet gun.
- Clip:
- the impact strips on the front bumper,
- the blanking covers,
- the stiffener,
- the front badge.
- Attach the stiffener using new front bumper clips.
- Refit the front badge bolts.
- Clip the absorber into place.
HEADLIGHT WASHERS WITH BLADE
- Refit:
- the headlight washer jet pipe on the bumper as marked before removal,
- the headlight washer jets (see Headlight washer jet: Removal - Refitting) (85A, Wiping - Washing).
- Refit:
- the front fog lights (see Front fog light: Removal - Refitting) (80B, Headlights),
- the front bumper wiring (see Front bumper wiring: Removal - Refitting) (88A, Wiring).
III - FINAL OPERATION
- Refit:
- the front bumper (see 55A, Exterior protection, Front bumper: Removal - Refitting, 55A-1),
- the front wheel arch liners (see 55A, Exterior protection, Front wheel arch liner: Removal - Refitting, 55A-41),
- the front wheels (see Wheel: Removal - Refitting) (35A, Wheels and tyres).
EQUIPMENT LEVEL E3 LEISURE or EQUIPMENT LEVEL EA1 or EQUIPMENT LEVEL EA2 or EQUIPMENT LEVEL EA3 or EQUIPMENT LEVEL EA5, and DOCUMENTATION PHASE 2
STRIPPING
I - STRIPPING PREPARATION OPERATION
- Position the vehicle on a two-post lift (see Vehicle: Towing and lifting) (02A, Lifting equipment).
- Remove:
- the front wheels (see Wheel: Removal - Refitting) (35A, Wheels and tyres),
- the front wheel arch liners (see 55A, Exterior protection, Front wheel arch liner: Removal - Refitting, 55A-41),
- the front bumper (see 55A, Exterior protection, Front bumper: Removal - Refitting, 55A-1).
II - STRIPPING OPERATION FOR PART CONCERNED
FOG LIGHTS
- Remove:
- the front bumper wiring (see Front bumper wiring: Removal - Refitting) (88A, Wiring),
- the front fog lights (see Front fog light: Removal - Refitting) (85A, Wiping - Washing).
FOG LIGHTS, and HEADLIGHT WASHERS WITH BLADE
- Remove the headlight washer jets (see Headlight washer jet: Removal - Refitting) (80B, Headlights).
- Mark the position of the headlight washer jet pipe on the front bumper.
- Remove the headlight washer jet pipe from the front bumper.
EQUIPMENT LEVEL E3 LEISURE or EQUIPMENT LEVEL EA3 or EQUIPMENT LEVEL EA5
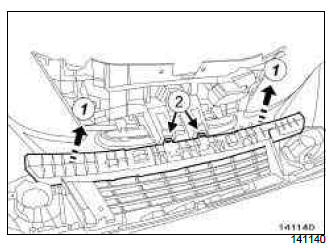
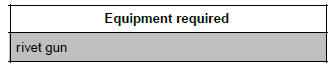
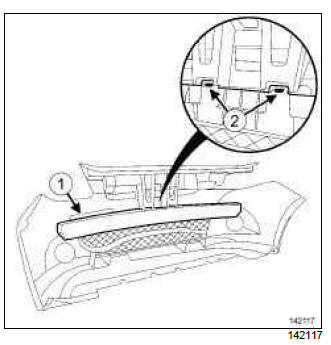
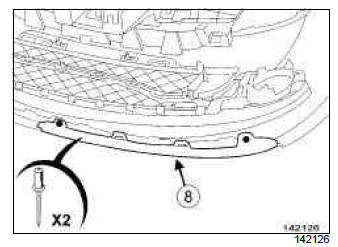
- Detach the lower centre trim piece from the front bumper at (1).
- Unclip (2) the absorber by pressing the clips (3).
- Remove the bolts (4).
- Cut the front bumper clips (5).
- Unclip:
- the front badge,
- the stiffener by pressing the clips (6).

- Unclip the blanking covers by pressing the clips (7).
- Remove the blanking covers at (8).
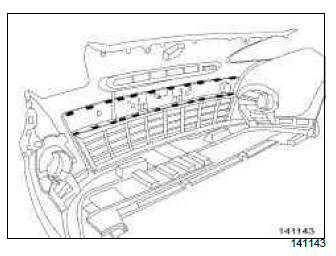
- Unclip the impact strips by pressing the clips.
- Remove the impact strips from the front of the front bumper, starting with the side impact strips.
- Drill the rivets out.
- Remove the diffuser (9).
- Remove:
- the clips (10),
- the front fog light trims (11).
FOG LIGHTS
- Remove:
- the clips (10),
- the front fog light mountings (12).
- Unclip the upper grille by pressing the clips.
- Remove the upper grille at (13).
- Unclip the centre grille by pressing the clips.
- Remove the centre grille at (14).
- Remove:
- the spoiler clips,
- the spoiler (15).
REBUILDING
I - REBUILDING PREPARATION OPERATION
- parts always to be replaced: front bumper rivet (50,05,02,18).
- parts always to be replaced: Front bumper clip (50,05,02,17).
EQUIPMENT LEVEL E3 LEISURE or EQUIPMENT LEVEL EA3 or EQUIPMENT LEVEL EA5
- parts always to be replaced: Front bumper trim (50,05,02,08).
- Use a LINT-FREE CLOTH with HEPTANE (see Vehicle: Parts and consumables for the repair) (04B, Consumables - Products) to clean the part of the front bumper in contact with the lower centre trim piece.
- Use a clean and dry LINT-FREE CLOTH (see Vehicle: Parts and consumables for the repair) (04B, Consumables - Products) to wipe the part of the front bumper in contact with the lower centre trim piece.
- Check the clips of the front fog light trims, and replace them if necessary.
FOG LIGHTS
- Check the clips of the front fog light mountings, and replace them if necessary.
II - REBUILDING THE PART CONCERNED
- Position the spoiler.
- Drill a hole at the position of each clip using a 4.5 mm drill bit.
- Rivet the spoiler.
- Clip:
- the lower radiator grille,
- the upper radiator grille.
FOG LIGHTS
- Refit the front fog light mountings.
- Refit the front fog light trims.
- Refit and rivet the diffuser.
- Clip:
- the impact strips,
- the blanking covers,
- the stiffener,
- the front badge.
- Attach the stiffener using new front bumper clips.
- Refit the front badge bolts.
- Clip the absorber into place.
EQUIPMENT LEVEL E3 LEISURE or EQUIPMENT LEVEL EA3 or EQUIPMENT LEVEL EA5
- Bond a new lower centre trim piece on the front bumper.
FOG LIGHTS, and HEADLIGHT WASHERS WITH BLADE
- Refit:
- the headlight washer jet pipe on the front bumper as marked during removal,
- the headlight washer jets (see Headlight washer jet: Removal - Refitting) (85A, Wiping - Washing).
FOG LIGHTS
- Refit:
- the front fog lights (see Front fog light: Removal - Refitting) (80B, Headlights).
- the front bumper wiring (see Front bumper wiring: Removal - Refitting) (88A, Wiring).
III - FINAL OPERATION
- Refit:
- the front bumper (see 55A, Exterior protection, Front bumper: Removal - Refitting, 55A-1),
- the front wheel arch liners (see 55A, Exterior protection, Front wheel arch liner: Removal - Refitting, 55A-41),
- the front wheels (see Wheel: Removal - Refitting) (35A, Wheels and tyres).
EQUIPMENT LEVEL EAC or EQUIPMENT LEVEL SPORT, and DOCUMENTATION PHASE 2
STRIPPING
I - STRIPPING PREPARATION OPERATION
- Position the vehicle on a two-post lift (see Vehicle: Towing and lifting) (02A, Lifting equipment).
- Remove:
- the front wheels (see Wheel: Removal - Refitting) (35A, Wheels and tyres),
- the front wheel arch liners (see 55A, Exterior protection, Front wheel arch liner: Removal - Refitting, 55A-41),
- the front bumper (see 55A, Exterior protection, Front bumper: Removal - Refitting, 55A-1).
II - STRIPPING OPERATION FOR PART CONCERNED
FOG LIGHTS
- Remove:
- the front bumper wiring (see Front bumper wiring: Removal - Refitting) (88A, Wiring),
- the front fog lights (see Front fog light: Removal - Refitting) (80B, Headlights).
HEADLIGHT WASHERS WITH BLADE
- Remove the headlight washer jets (see Headlight washer jet: Removal - Refitting) (85A, Wiping - Washing).
- Mark the position of the headlight washer jet pipe on the front bumper.
- Remove the headlight washer jet pipe from the front bumper.
- Unclip the absorber (1) by pressing on the clips (2).
WITHOUT ADDITIONAL HEADLIGHTS

- Unclip the front fog light trims by pressing on the clips (3).
- Remove the front fog light trims at (4).
- Unclip the tow eye flap (5).
- Remove the tow eye flap.
- Remove:
- the bolts (6),
- the front badge.
- Unclip the stiffener.
- Drill the rivets out.
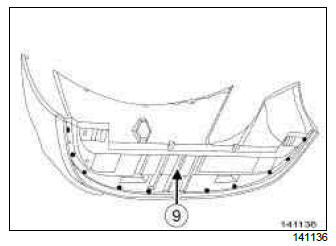
- Remove the diffuser (7).
- Drill the rivets out.
- Remove the aerodynamic fins (8).
- Remove the bolts.
- Unclip the centre grille (9).
- Remove:
- the bolts,
- the centre trim of the front bumper (10).

- Drill the rivets out.
- Remove:
- the pins,
- the upper trim of the front bumper (11).
REBUILDING
I - REBUILDING PREPARATION OPERATION
- parts always to be replaced: front bumper rivet (50,05,02,18).
II - REBUILDING OPERATION FOR PART CONCERNED
- Refit and rivet the upper trim of the front bumper using a rivet gun.
- Refit the front bumper centre trim.
- Clip on the centre grille.
- Refit and rivet using a rivet gun :
- the aerodynamic fins,
- the diffuser.
- Clip on the stiffener.
- Refit:
- the front badge,
- the tow eye flap.
WITHOUT ADDITIONAL HEADLIGHTS
- Refit the fog light trims (4).
- Refit the absorber (1).
HEADLIGHT WASHERS WITH BLADE
- Refit:
- the headlight washer jet pipe on the front bumper,
- the headlight washer jets (see Headlight washer jet: Removal - Refitting) (85A, Wiping - Washing).
FOG LIGHTS
- Refit:
- the front fog lights (see Front fog light: Removal - Refitting) (80B, Headlights),
- the front bumper wiring (see Front bumper wiring: Removal - Refitting) (88A, Wiring).
III - FINAL OPERATION
- Refit:
- the front bumper (see 55A, Exterior protection, Front bumper: Removal - Refitting, 55A-1)
- the front wheel arch liners (see 55A, Exterior protection, Front wheel arch liner: Removal - Refitting, 55A-41),
- the front wheels (see Wheel: Removal - Refitting) (35A, Wheels and tyres).
READ NEXT:
 Rear bumper: Removal - Refitting
EQUIPMENT LEVEL EA1 or EQUIPMENT LEVEL EA2 or EQUIPMENT LEVEL EA3 or
EQUIPMENT LEVEL EA4
or EQUIPMENT LEVEL EA5, and DOCUMENTATION PHASE 1 - EQUIPMENT LEVEL E3 LEISURE
or
EQUIPMENT LEVEL EA1 or EQUI
Aerodynamic diffuser: Removal - Refitting
EQUIPMENT LEVEL EAC or EQUIPMENT LEVEL SPORT
REMOVAL
I - REMOVAL PREPARATION OPERATION
Position the vehicle on a two-post lift (see Vehicle:
Towing and lifting) (02A, Lifting equipment).
II - OPER
Front side door protective strip: Removal - Refitting
REMOVAL
I - REMOVAL PREPARATION OPERATION
Unclip the blanking cover (1).
Remove the bolt.
Remove the side mounted indicator (2) using a small
flat screwdriver.
Disconnect the power supply co
SEE MORE:
Electronic stability program
(ESC) with understeer control
and traction control
Electronic stability control ESC
This system helps you to keep control
of the vehicle in critical driving conditions
(avoiding an obstacle, loss of grip
on a bend, etc.).
Operating principle
A sensor in the steering wheel detects
the direction selected by the driver.
Other sensors througho
Emergency brake assist
This system supplements the ABS
and helps reduce vehicle stopping distances.
Operating principle
The system is for detecting an emergency
braking situation. In this case,
the braking assistance immediately develops
maximum power and may trigger
ABS regulation.
ABS braking is maintained as
