Renault Clio: Ignition switch: Removal - Refitting
Renault Clio III (2005-2013) Service Manual / Electrical Equipment / Engine Immobiliser / Ignition switch: Removal - Refitting
REMOVAL
I - REMOVAL PREPARATION OPERATION
- Disconnect the battery (see 80A, Battery, Battery: Removal - Refitting, 80A-1).
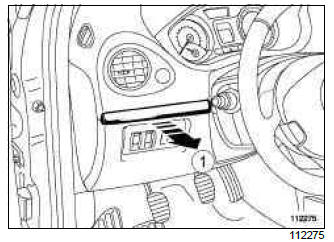
- Unclip trim (1).
- Remove:
- the plastic rivet (2),
- bolt (3).
- Remove the door seal.
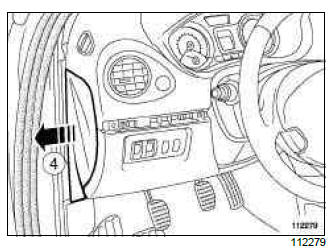
- Unclip the dashboard side face (4).
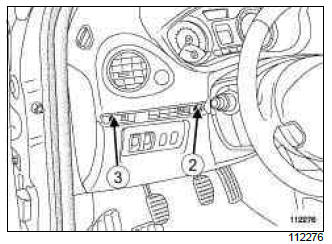
- Remove:
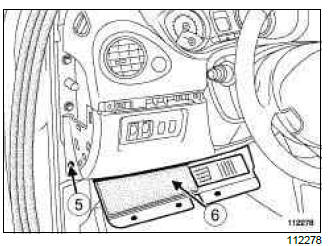
- the bolt (5),
- the dashboard lower trim (6).
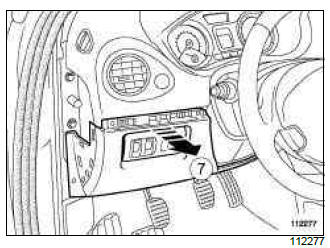
- Remove the lower cover (7).
- Disconnect the connectors.
- Remove:
- the driver's side front airbag (see 88C, Air bag and Pretensioners, Driver's frontal airbag: Removal - Refitting, 88C-22),
- the steering wheel (see Steering wheel: Removal - Refitting) (MR 392, 36B, Power-assisted steering).
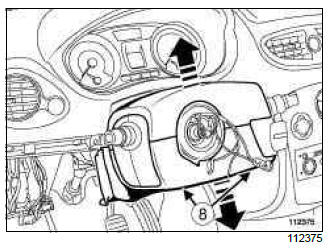
- Remove the bolts (8) under the lower half cowling.
- Unclip the lower and upper half cowling.
- Unclip the upper half cowling from the dashboard gaiter (9).
- Pull the lower half cowling out from the steering column adjustment handle.
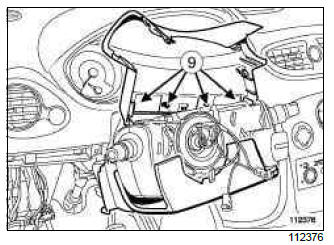
- Remove:
- the steering column switch assembly (see 84A, Control - Signals, Steering column switch assembly: Removal - Refitting, 84A-4),
- the antenna/transponder ring (see 82A, Engine immobiliser, Transponder ring: Removal - Refitting, 82A-13).
- Unclip the wiring harness clip.
II - OPERATION FOR REMOVAL OF PART CONCERNED
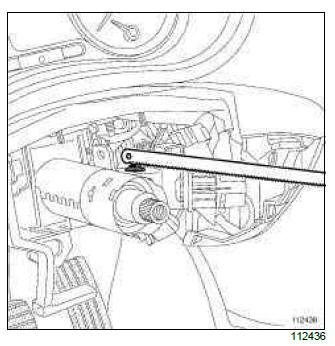
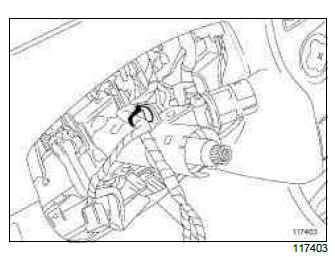
- Make a saw mark on the shear bolt.
- Remove the bolt (11).
- Disconnect the connector.
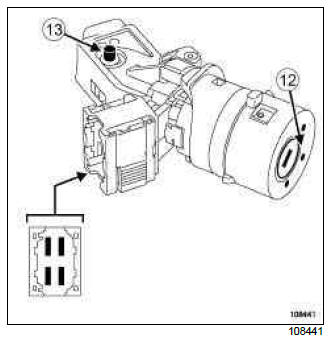
- Position the ignition key between the first and second position (+Accessories and +APC) (12).
- Press on the retaining lug (13).
- Remove the ignition switch.
REFITTING
I - REFITTING PREPARATIONS OPERATION
Note: To protect against tampering, always secure the ignition switch with a shear bolt.
Be sure to recover the sheared-off part of the bolt after it has been tightened.
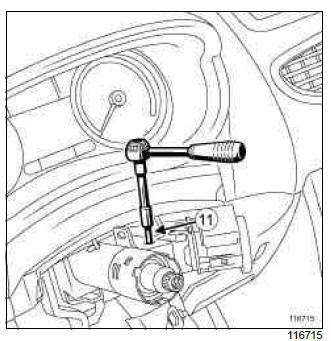
II - REFITTING OPERATION FOR PART CONCERNED
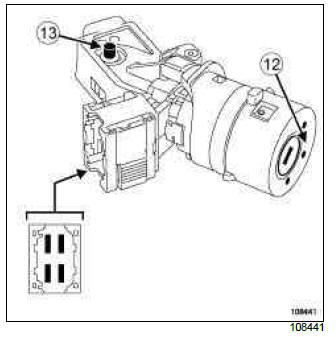
- Position the ignition key between the first and second position (+Accessories and +APC) (12).
- Press on the retaining lug (13).
- Fit the ignition switch.
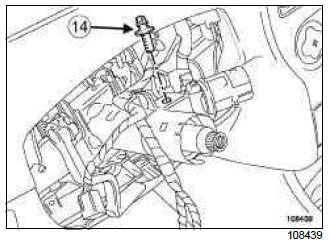
- Tighten the shear bolt (14) until the bolt head shears off.
- Connect the starter switch connector.
- Lock the starter switch connector.
III - FINAL OPERATION.
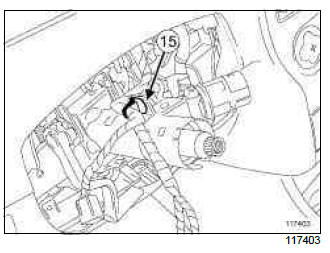
- Clip on the wiring harness clip (15).
- Refit:
- the antenna/transponder ring (see 82A, Engine immobiliser, Transponder ring: Removal - Refitting, 82A-13),
- the steering column switch assembly (see 84A, Control - Signals, Steering column switch assembly: Removal - Refitting, 84A-4),
- the lower half-shell.
- Clip on:
- the dashboard gaiter on the upper half cowling (9),
- the upper half cowling to the lower half cowling.
- Refit:
- the bolts (8) under the lower half cowling,
- the steering wheel (see Steering wheel: Removal - Refitting) (MR 392, 36B, Power-assisted steering),
- the driver's front airbag (see 88C, Air bag and Pretensioners, Driver's frontal airbag: Removal - Refitting, 88C-22).
- Connect the connectors on the lower cover (7).
- Refit:
- the lower cover (7),
- the dashboard lower trim (6).
- Tighten:
- the dashboard lower trim bolt (5)
- the lower cover bolt (3),
- Clip on:
- the plastic rivet,
- the dashboard side panel,
- the trim (1),
- the door seal,
- Connect the battery (see 80A, Battery, Battery: Removal - Refitting, 80A-1).
READ NEXT:
 Transponder ring: Removal - Refitting
VEHICLE WITH KEY
REMOVAL
I - REMOVAL PREPARATION OPERATION
Unclip trim (1).
Remove:
the plasti-rivet (2),
the bolt (3).
Remove the door seal.
Unclip the dashboard side face (4).
Start button: Removal - Refitting
VEHICLE WITH CARD
REMOVAL
I - REMOVAL PREPARATION OPERATION
Remove the centre console (see Centre console:
Removal - Refitting) (MR 393, 57A, Interior equipment).
Unclip the trim at (1) and (2
Electric steering column lock: Removal - Refitting
REMOVAL
I - REMOVAL PREPARATION OPERATION
Lock the airbag computer using the Diagnostic tool
to unlock the steering column lock (see Fault finding
- Replacement of components) (MR 394, 88C,
Airb
SEE MORE:
Ignition: Specifications
D4F or F4R or K4J or K4M or M4R
Coils: Removal - Refitting
D4F, and 740 or 742 or 764
REMOVAL
I - REMOVAL PREPARATION OPERATION
Disconnect the battery (see Battery: Removal - Refitting)
(MR 392, 80A, Battery).
Remove the air filter unit (see 12A, Fuel mixture, Air filter unit:
Removal - Refit
Plugs: Removal - Refitting
D4F, and 740 - D4F, and 784 or 786
Spark plug electrode gap
REMOVAL
I - REMOVAL PREPARATION OPERATION
D4F, and 784
Remove the turbocharger air outlet pipe bolt (2) from
the inlet distributor.
Remove the turbocharger air outlet pipe clip (3) from
the turbocharger.
Note:
If the clip (4) is re
© 2016-2026 Copyright Renault Clio Owners Club - 0.0036
