Renault Clio: Transponder ring: Removal - Refitting
Renault Clio III (2005-2013) Service Manual / Electrical Equipment / Engine Immobiliser / Transponder ring: Removal - Refitting
VEHICLE WITH KEY
REMOVAL
I - REMOVAL PREPARATION OPERATION
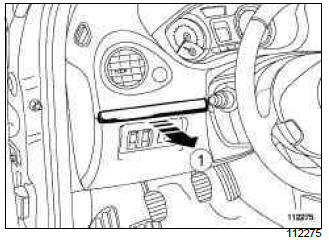
- Unclip trim (1).

- Remove:
- the plasti-rivet (2),
- the bolt (3).
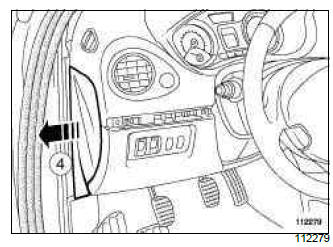
- Remove the door seal.
- Unclip the dashboard side face (4).
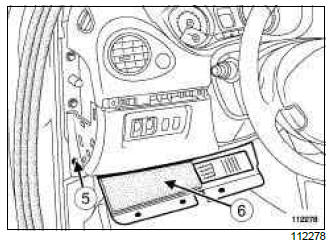
- Remove:
- the bolt (5),
- the dashboard lower trim (6).
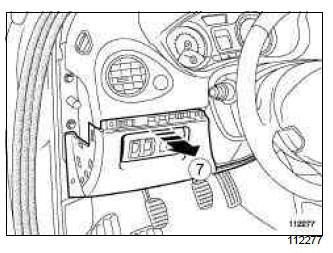
- Remove the lower cover (7).
- Disconnect the connectors.
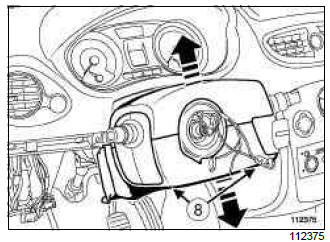
- Remove the bolts (8) under the lower half cowling.
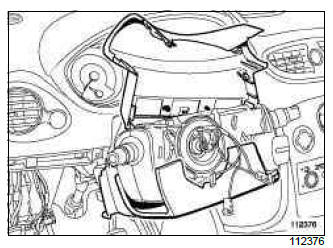
- Unclip the lower and upper half cowling.
- Remove the bolts (8) under the lower half cowling.
- Unclip the lower and upper half cowling.
II - OPERATION FOR REMOVAL OF PART CONCERNED
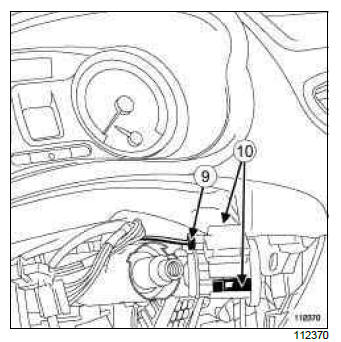
- Unclip the two antenna/transponder ring tabs (10).
- Remove the antenna/transponder ring.
- Disconnect the connector (9).
REFITTING
I - REFITTING OPERATION FOR PART CONCERNED
- Clip on the antenna/transponder ring.
- Connect the antenna/transponder ring connector.
II - FINAL OPERATION
- Refit the lower half-shell.
- Clip the upper half cowling onto the lower half cowling.
- Tighten the bolts (8) under the lower half cowling.
- Connect the connectors on the lower cover (7).
- Refit the lower cover (7).
- Tighten the bolts (3), (5).
- Clip on:
- the plastic rivet,
- the dashboard side panel,
- the trim (1),
- the door seal,
- the dashboard lower trim (6).
READ NEXT:
 Start button: Removal - Refitting
VEHICLE WITH CARD
REMOVAL
I - REMOVAL PREPARATION OPERATION
Remove the centre console (see Centre console:
Removal - Refitting) (MR 393, 57A, Interior equipment).
Unclip the trim at (1) and (2
Electric steering column lock: Removal - Refitting
REMOVAL
I - REMOVAL PREPARATION OPERATION
Lock the airbag computer using the Diagnostic tool
to unlock the steering column lock (see Fault finding
- Replacement of components) (MR 394, 88C,
Airb
Battery for remote door locking control: Removal - Refitting
REMOVAL
OPERATION FOR REMOVAL OF PART
CONCERNED
VEHICLE WITH KEY
Remove the bolt (1).
Open the key with a coin (2).
VEHICLE WITH CARD
Remove the mechanical insert (3).
REFITTING
I - REFITT
SEE MORE:
Pre-postheating unit: Removal - Refitting
K9K
REMOVAL
I - REMOVAL PREPARATION OPERATION
Remove:
the battery (see Battery: Removal - Refitting),
the battery tray (see Battery tray: Removal - Refitting)
(MR 392, 80A, Battery).
II - OPERATION FOR REMOVAL OF PART
CONCERNED
Remove the pre-postheating unit mounting bolt (8).
Heater plugs: Removal - Refitting
K9K, and 764 or 772
REMOVAL
I - REMOVAL PREPARATION OPERATION
Remove the air filter box inlet air pipe (1).
Remove the turbocharger outlet air pipe retaining pins (2).
Remove:
the turbocharger outlet air pipe bolt (3),
the turbocharger outlet air pipe
Undo the clip (4) from the int
© 2016-2026 Copyright Renault Clio Owners Club - 0.0035
