Renault Clio: Injector leak flow: Check
Renault Clio III (2005-2013) Service Manual / Engine And Peripherals / Diesel Injection / Injector leak flow: Check
K9K, and 750 or 752 or 764 or 766 or 768
Note: Vehicles equipped with the K9K*768 engine may or may not be equipped with an intercooler.
- Disconnect the battery (see Battery: Removal - Refitting) (MR 392, 80A, Battery).
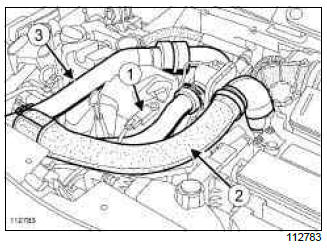
- Disconnect the inlet pressure sensor (1).
- Remove the air duct (3) between the intercooler and the turbocharger.
K9K, and 750 or 766 or 768
- Remove the air duct (2) between the air filter and the intercooler.
- Unclip the cover of the diesel rail protector.
- Remove:
- the diesel anti-splash shield bolt,
- the diesel anti-splash shield.
K9K, and 764
- Disconnect the four return pipes from the four injectors.
- Connect the four transparent hoses of the (Mot.1771) to the injectors instead of the injector fuel return pipes.
- Place the correct blanking plug on the injector fuel return connectors.
K9K, and 766 or 768
- Connect the four transparent hoses of the (Mot.1711) to the injectors instead of the injector fuel return pipes.
- Place the correct blanking plug on the injector fuel return connectors.
- Insert these hoses in the four graduated measuring cylinders of the (Mot. 1711).
- Refit the air duct between the air filter and the intercooler.
K9K, and 750 or 766 or 768
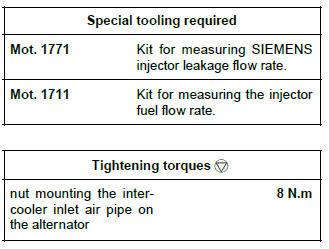
- Loosen the intercooler inlet air pipe nut on the alternator.
- Fit the air duct between the turbocharger and the intercooler air inlet pipe.
- Tighten the bolt of the air duct on the rocker cover.
- Torque tighten the nut mounting the intercooler inlet air pipe on the alternator (8 N.m).
- Connect:
- the inlet pressure sensor,
- the battery (see Battery: Removal - Refitting) (MR 392, 80A, Battery).
- Follow the procedures described in the fault finding
repair manual (see MR 394 Fault finding, 13B, Diesel
injection, Fault finding - Tests):
- TEST 6: Major leak in injectors / injectors open,
- TEST 7: Incorrect injection quantity.
IMPORTANT
Do not leave any object (tools or other) on the side of the engine housing during the entire operation.
Position the tools so that they do not fall during the " engine running " phase of the test.
READ NEXT:
 Diesel injector: Configurations
K9K, and 750 or 752 or 766 or 768
To configure the injectors, (see MR 394 Fault finding,
Diesel Injection, Configuration and programming).
Diesel injector: Removal - Refitting
K9K, and 764 or 772
High pressure pipe: Check
K9K
WARNING
After any operation, check that there are no diesel
fuel leaks
Reprime the diesel circuit using the priming pump.
Disconnect the battery (see Battery: Removal - Refitting)
(MR 392, 80
Accelerometer: Removal - Refitting
K9K, and 750 or 752 or 760 or 762 or 766 or 768
Note:
Vehicles equipped with the K9K*768 engine may or
may not be equipped with an intercooler.
REMOVAL
I - REMOVAL PREPARATION OPERATION
Remove the
SEE MORE:
Driving
The Renault Clio IV (2014-2019) offers a satisfying driving experience with its nimble handling and responsive performance. Its compact size and maneuverability make it well-suited for urban driving and tight parking spaces. The precise steering and suspension tuning provide a balanced and confident
Your comfort
The Renault Clio IV (2014-2019) is designed with your comfort in mind. It features a well-crafted interior with quality materials and thoughtful ergonomics. The seats offer excellent support and adjustability, providing a comfortable driving experience. The cabin is designed to minimize noise and vi
© 2016-2026 Copyright Renault Clio Owners Club - 0.0062
