Renault Clio: K4J
REMOVAL
I - REMOVAL PREPARATION OPERATION
- Position the vehicle on a two-post lift (see Vehicle: Towing and lifting) (MR 392, 02A, Lifting equipment).
- Remove:
- the battery (see Battery: Removal - Refitting) (MR 392, 80A, Battery),
- the battery tray (see ) (MR 392, 80A, Battery),
- the scuttle panel grille (see Scuttle panel grille: Removal - Refitting) (MR 393, 56A, Exterior equipment),
- the scoop under the scuttle panel grille (see Scoop under the scuttle panel grille: Removal - Refitting) (MR 393, 56A, Exterior equipment),
- the front right-hand wheel (see Wheel: Removal - Refitting) (MR 392, 35A, Wheels and tyres),
- the front right-hand wheel arch liner (see Front wheel arch liner: Removal - Refitting) (MR 393, 55A, Exterior protection),
- the accessories belt (see 11A, Top and front of engine, Accessories belt: Removal - Refitting, 11A-5),
- the air filter box (see 12A, Fuel mixture, Air filter unit: Removal - Refitting, 12A-17),
- the throttle valve (see 12A, Fuel mixture, Throttle valve: Removal - Refitting, 12A-33),
- the right-hand suspended mounting support (see 19D, Engine mounting, Right-hand suspended engine mounting: Removal - Refitting, 19D-22),
- the timing belt (see 11A, Top and front of engine, Timing belt: Removal - Refitting, 11A-48).
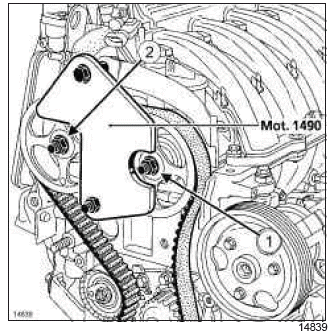
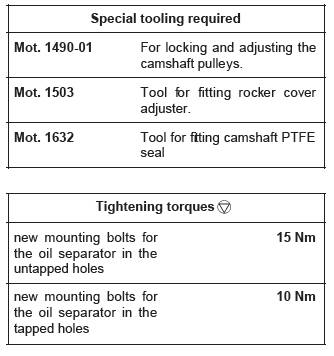
- Position the (Mot. 1490-01) on the camshaft pulleys.
- Remove:
- the nut from the inlet camshaft pulley (1) and from the exhaust camshaft pulley (2),
- the (Mot. 1490-01),
- the camshaft pulleys.
- Remove:
- the intake distributor (see 12A, Fuel mixture, Inlet distributor: Removal - Refitting, 12A-45),
- the ignition coils (see 17A, Ignition, Coils: Removal - Refitting, 17A-2),
- the spark plugs (see 17A, Ignition, Plugs: Removal - Refitting, 17A-11).
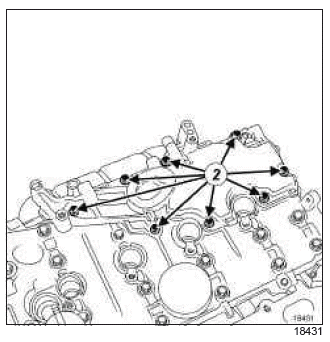
- Remove:
- the engine lifting eye at the timing end,
- the mounting bolts (2) from the oil decanter,
- the oil decanter.
II - OPERATION FOR REMOVAL OF PART CONCERNED
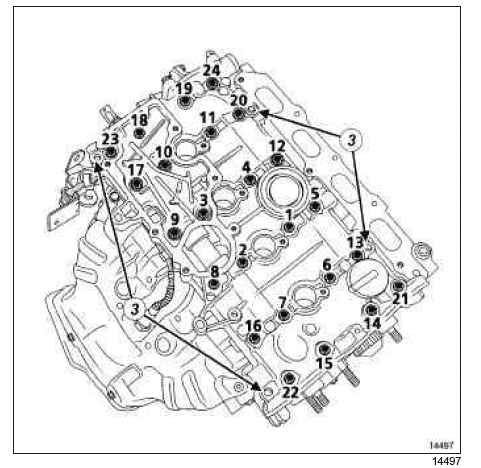
- Remove the rocker cover mounting bolts.
- Detach the rocker cover vertically by tapping the lugs (3) with a copper hammer.
- Remove the rocker cover.
REFITTING
I - REFITTING PREPARATIONS OPERATION
IMPORTANT
Do not scratch the aluminium sealing surfaces.
Wear goggles.
Wear gloves during the operation.
WARNING
Do not allow this product to drip onto the paintwork.
Take care when cleaning to prevent any foreign bodies entering the oil pipes supplying oil under pressure to the hydraulic tappets, the camshafts (oil galleries are located both in the cylinder block and the cylinder head), and the oil return pipes.
Failure to follow this advice could block the oil-ways, and rapidly destroy the engine.
- Clean the rocker cover gasket face with DECAPJOINT to dissolve any gasket still adhering.
- Apply the product to the section to be cleaned; wait approximately ten minutes, then remove the residue using a wooden spatula.
Note: The gasket faces on the rocker cover must be clean, dry and free from grease (avoid finger marks).
- Lubricate the cylinder head camshaft bearings with engine oil.
WARNING
Do not put oil on the cylinder head rocker cover.
WARNING
Applying excess sealant could cause it to be squeezed out when parts are tightened. The mixture of sealant and fluid may damage some components (engine, radiator, etc.).
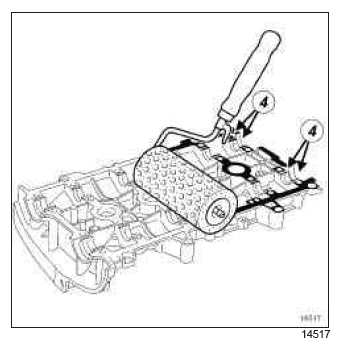
- Using a stipple roller, apply LOCTITE 518 to the gasket face until it turns reddish in colour.
- Use a cloth to remove any LOCTITE 518 in the six bearing channels (4) on the rocker cover.
II - REFITTING OPERATION FOR PART CONCERNED
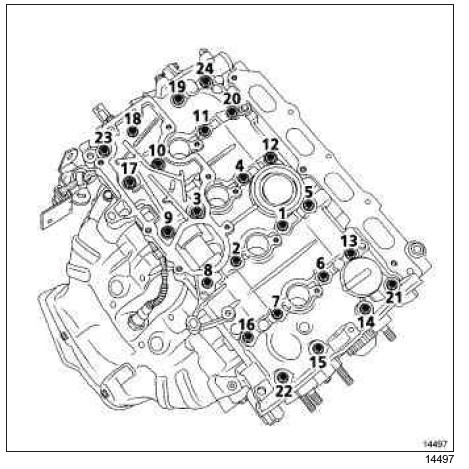
- Refit the rocker cover.
- Tighten to torque and in order:
- bolts 22, 23, 20, 13 (8 Nm),
- bolts 1 to 12, 14 to 19 and 21 to 24 (14.5 Nm).
- Slacken bolts 22, 23, 20 and 13, in order.
- Tighten to torque and in order bolts 22, 23, 20, 13 (14.5 Nm)
III - FINAL OPERATION.
Note: The gasket face on the oil decanter must be clean, dry and free from grease (avoid finger marks).'
WARNING
Applying excess sealant could cause it to be squeezed out when parts are tightened. The mixture of sealant and fluid may damage some components (engine, radiator, etc.).
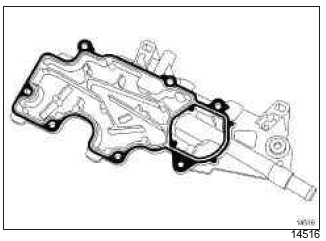
- Using a stipple roller, apply LOCTITE 518 to the gasket face until it turns reddish in colour.
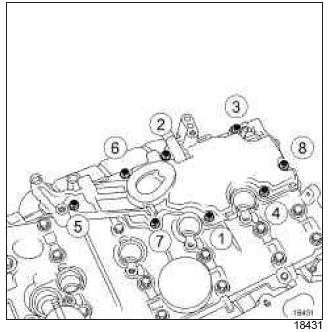
- Refit the oil decanter.
- Torque tighten and in order:
- the new mounting bolts for the oil separator in the untapped holes (15 Nm),
- the new mounting bolts for the oil separator in the tapped holes (10 Nm).
- Refit the engine lifting eye at the engine timing end.
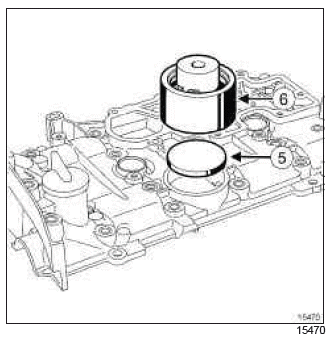
- Refit:
- the rocker cover disc (5) using the (Mot. 1503) (6),
- the spark plugs (see 17A, Ignition, Plugs: Removal - Refitting, 17A-11),
- the ignition coils (see 17A, Ignition, Coils: Removal - Refitting, 17A-2),
- the intake distributor (see 12A, Fuel mixture, Inlet distributor: Removal - Refitting, 12A-45).
1 - Fitting the camshaft gaskets
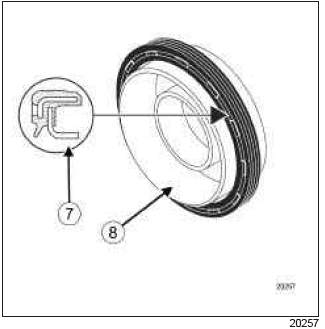
- The elastomer seals on these engines come fitted with a flat lip seal (7) and a protector (8) (also used to fit the seal on the engine).
2 - Fitting the exhaust camshaft seal
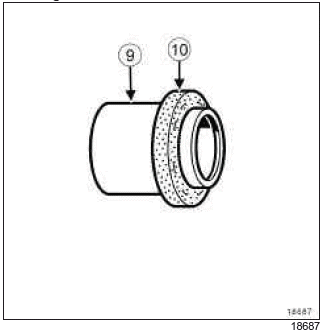
WARNING
When handling, be sure to hold the seal by the protector (9), as this type of seal is highly FRAGILE.
It is strictly forbidden to touch the elastomer seal (10) in order to prevent any oil leaks once the seal is fitted to the engine.
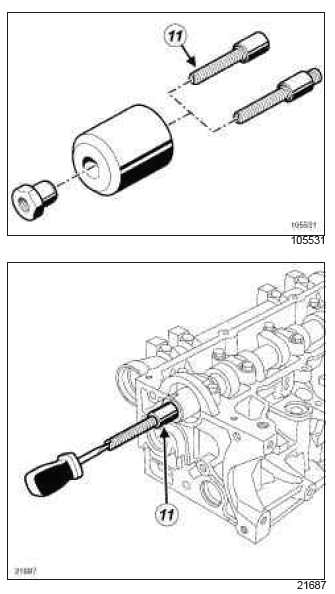
- Screw the stud (11) of the (Mot. 1632) onto the camshaft.
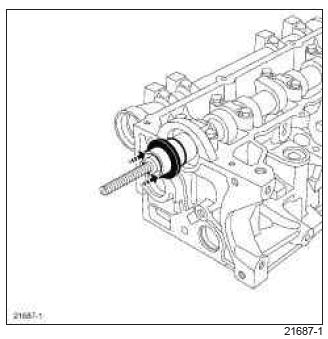
- Mount the protector with its gasket in place onto the camshaft (taking care not to touch the gasket).
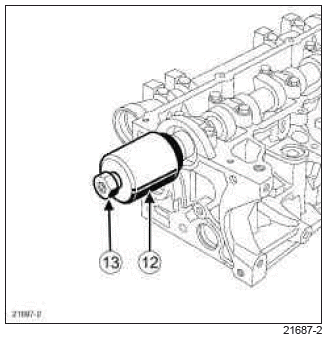
- Fit the cover (12) and the collar nut (13) of the (Mot.1632).
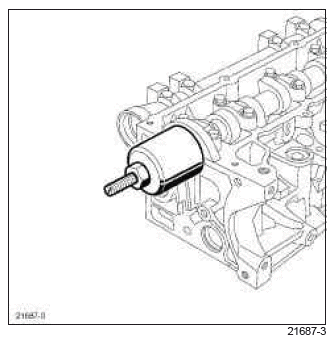
- Screw on the collar nut until the cover touches the cylinder head.
- Remove the nut, cover, protector and threaded rod.
3 Fitting the inlet camshaft seal
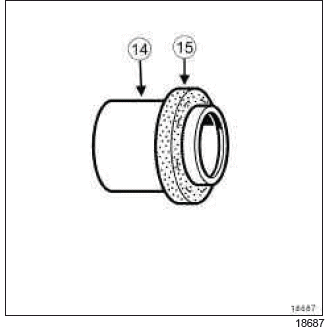
WARNING
When handling, be sure to hold the seal by the protector (14), as this type of seal is highly FRAGILE. It is strictly forbidden to touch the elastomer seal (15) in order to prevent any oil leaks once the seal is fitted to the engine.
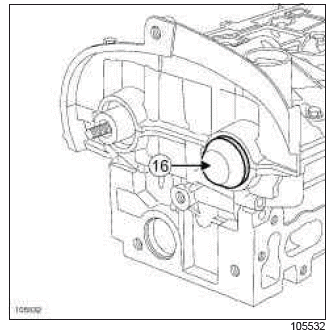
- Fit the protector (16) fitted with the seal onto the camshaft (taking care not to touch the seal).
- Push the centre of the protector to force the seal into its housing.
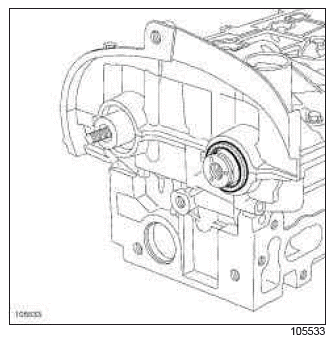
- Remove the seal protector, taking care not to drop the seal.
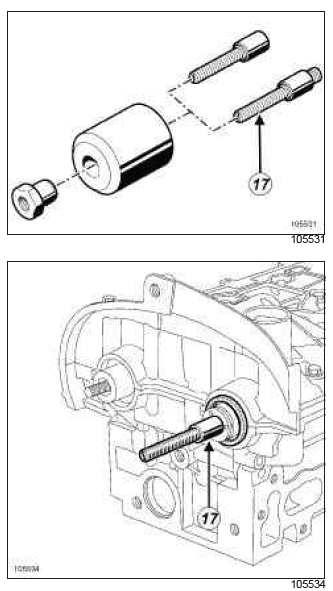
- Fit the stud (17) on the camshaft using the (Mot.1632).
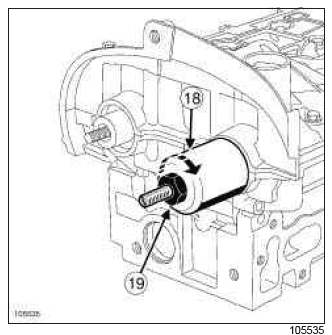
- Fit the cover (18) and the collar nut (19) of the (Mot.1632).
- Screw on the collar nut until the cover touches the cylinder head.
- Remove the nut, cover and threaded rod.
- Refit the timing belt (see 11A, Top and front of engine, Timing belt: Removal - Refitting, 11A- 48).
WARNING
Follow the second procedure for refitting the timing belt.
- Refit:
- the right-hand suspended mounting support (see 19D, Engine mounting, Right-hand suspended engine mounting: Removal - Refitting, 19D-22),
- the throttle valve (see 12A, Fuel mixture, Throttle valve: Removal - Refitting, 12A-33),
- the air filter box (see 12A, Fuel mixture, Air filter unit: Removal - Refitting, 12A-17),
- the accessories belt (see 11A, Top and front of engine, Accessories belt: Removal - Refitting, 11A-5),
- the front right-hand wheel arch liner (see Front wheel arch liner: Removal - Refitting) (MR 393, 55A, Exterior protection),
- the front right-hand wheel (see Wheel: Removal - Refitting) (MR 392, 35A, Wheels and tyres),
- the scoop under the scuttle panel grille (see Scoop under the scuttle panel grille: Removal - Refitting) (MR 393, 56A, Exterior equipment),
- the scuttle panel grille (see Scuttle panel grille: Removal - Refitting) (MR 393, 56A, Exterior equipment),
- the battery tray (see ) (MR 392, 80A, Battery),
- the battery (see Battery: Removal - Refitting) (MR 392, 80A, Battery).

