Renault Clio: K9K, and 764 or 772
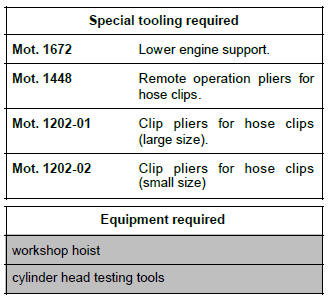
REMOVAL
I - REMOVAL PREPARATION OPERATION
- Position the vehicle on a two-post lift (see Vehicle: Towing and lifting) (02A, Lifting equipment).
- Remove:
- the engine cover,
- the engine undertray,
- the radiator mounting cross member bolt on the right-hand side,
- the sub-frame tie-rod bolt on the left-hand side.
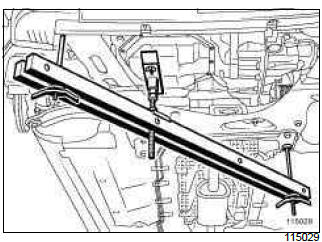
- Fit the lower engine support tool (Mot. 1672).
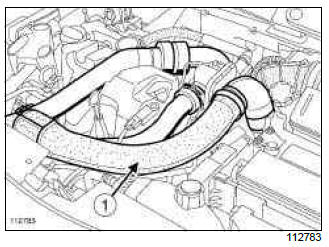
- Remove:
- the air filter unit air inlet pipe (1),
- the battery (see Battery: Removal - Refitting) (80A, Battery),
- the battery tray (see Battery: Removal - Refitting) (80A, Battery),
- the air filter unit (see 12A, Fuel mixture, Air filter unit: Removal - Refitting, 12A-17).
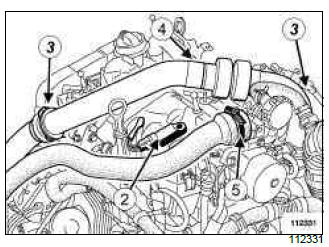
- Disconnect the connector (2) from the inlet air pressure sensor.
- Move aside the turbocharger air outlet pipe retaining pins (3).
- Remove:
- the bolt (4) from the turbocharger air outlet pipe,
- the turbocharger air outlet pipe.
- Loosen the clip (5) on the intercooler air outlet pipe.
- Disconnect the intercooler air outlet pipe.
- Remove the scuttle panel grille (see Scuttle panel grille: Removal - Refitting) (56A, Exterior equipment).
- Drain the cooling system (see 19A, Cooling, Cooling system: Draining - Refilling, 19A-16).
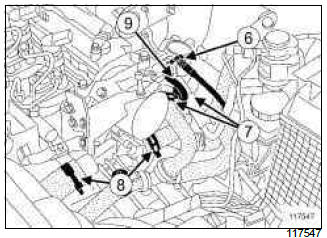
- Disconnect the vacuum pipe union (6) from the vacuum pump.
- Separate the clip (7) on the EGR cooler hoses using the (Mot. 1448) or (Mot. 1202-01) or (Mot. 1202- 02).
- Disconnect the EGR cooler hoses.
- Separate the clip (8) on the water chamber hoses using the (Mot. 1448) or (Mot. 1202-01) or (Mot.1202-02).
- Disconnect:
- the water chamber hoses,
- the coolant temperature sensor connector (9).
- Disconnect:
- the oil vapour rebreathing pipe on the rocker cover,
- the turbocharging pressure regulation valve pipe.
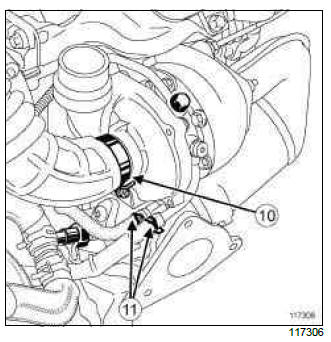
- Loosen the clip (10) of the air outlet pipe on the air filter unit.
- Disconnect the air outlet pipe from the air filter unit.
- Remove the air outlet pipe from the air filter box.
K9K, and 772
- Remove the turbocharger cooling hose clip (11) using the (Mot. 1448) or (Mot. 1202-01) or (Mot. 1202- 02).
- Disconnect the turbocharger cooling hoses.
- Remove the nuts from the connecting hose on the catalytic converter (K9K*764) or on the catalytic pre-converter (K9K*772).
- Move aside the connecting hose.
- Remove the seal between the connecting hose and the catalytic converter (K9K*764) or the catalytic pre-converter (K9K*772).
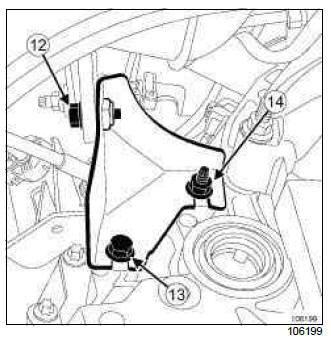
- Remove the bolt (12) from the upstream strut on the catalytic converter (K9K*764) or on the catalytic pre-converter (K9K*772).
- Undo:
- the upstream strut bolt (13) on the cylinder block,
- the upstream strut nut (14) on the cylinder block.
- Remove the upstream strut.
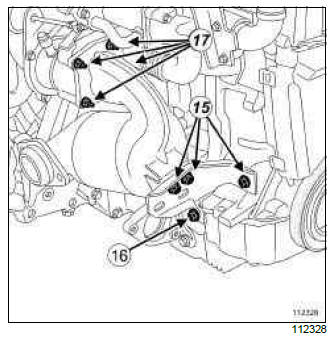
- Remove:
- the bolts from the lifting eye, timing end,
- the lifting eye on the timing end,
- the upper bolts (15) from the downstream strut on the catalytic converter (K9K*764) or catalytic pre-converter (K9K*772).
- Undo the downstream strut lower bolt (16).
- Remove:
- the downstream strut,
- the nuts (17) from the catalytic converter (K9K*764) or from the catalytic pre-converter (K9K*772) on the turbocharger.
- Move the catalytic pre-converter towards the timing.
- Remove the seal between the turbocharger and the catalytic converter (K9K*764) or the catalytic pre-converter (K9K*772).
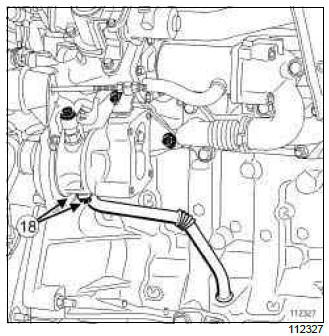
- Remove:
- the bolts (18) from the turbocharger oil return pipe,
- the turbocharger oil return pipe,
- the accessories belt (see 11A, Top and front of engine, Accessories belt: Removal - Refitting, 11A-5),
- the timing belt (see 11A, Top and front of engine, Timing belt: Removal - Refitting, 11A-48),
- the rocker cover (see 11A, Top and front of engine, Rocker cover: Removal - Refitting, 11A-183).
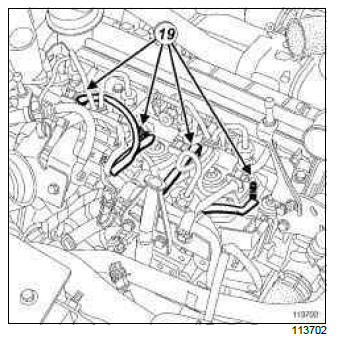
- Disconnect:
- the heater plugs (19),
- the exhaust gas recirculation solenoid valve connector,
- the damper valve connector (if fitted).
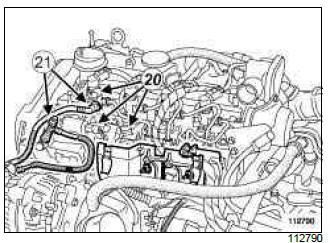
- Disconnect the high pressure pump connectors (20).
- Unclip the clip on the injector rail protector mounting.
- Move aside the wiring of the injector rail protector mounting.
- Disconnect the diesel supply and return pipes (21) from the high pressure pump then fit the blanking plugs.
- Plug the openings.
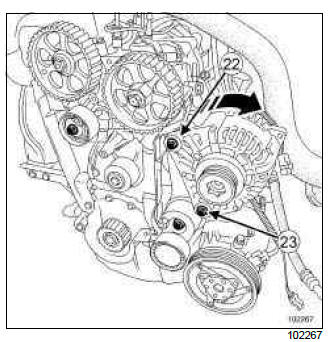
- Disconnect the alternator connector.
- Remove the alternator electrical wiring nut.
- Move aside the alternator electrical wiring.
- Remove the alternator upper bolt (22).
- Loosen the alternator lower bolt (23).
- Tilt the alternator forward.
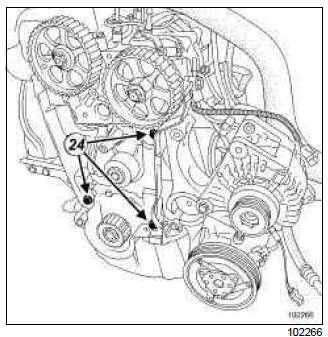
- Remove:
- the inner timing cover bolts (24),
- the inner timing cover.
II - OPERATION FOR REMOVAL OF PART CONCERNED
- Refit:
- the lifting eye on the timing end,
- the timing end lifting eye bolts.
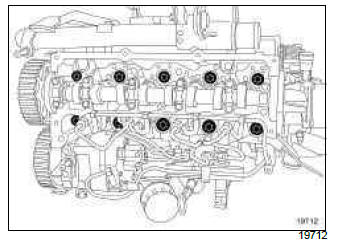
- Remove the cylinder head bolts.
- Fit workshop hoist.
- Remove the cylinder head.
REFITTING
I - REFITTING PREPARATION OPERATION
- parts always to be replaced: Cylinder head gasket.
- parts always to be replaced: seal between turbocharger and catalytic converter.
- parts always to be replaced: cylinder head bolts.
- parts always to be replaced: seal between catalytic converter and exhaust downpipe hose.
IMPORTANT
Wear goggles with side protectors for this operation.
IMPORTANT
Wear gloves during this operation.
WARNING
Do not scrape the joint faces of the aluminium, any damage caused to the joint face will result in a risk of leaks.
- Use a GREY ABRASIVE PAD to clean the joint faces
of:
- the cylinder head,
- the cylinder block
- Use SURFACE CLEANER (see Vehicle: Parts
and consumables for the repair) (04B, Consumables
- Products) to degrease the joint faces of:
- the cylinder head,
- the cylinder block.
WARNING
To ensure proper sealing, the gasket surfaces must be clean, dry and not greasy (avoid any finger marks).
WARNING
Protect the oilway so that foreign bodies do not enter the oil pipes in the cylinder head.
Failure to follow this instruction could lead to the blocking of the oilways, resulting in a rapid deterioration of the camshaft.
- Check for gasket face deformation using a ruler and a set of shims.
- The maximum deformation is 0.05 mm.
WARNING
No regrinding of the cylinder head is permitted.
- Test the cylinder head to detect any possible cracks using cylinder head testing tools.
- Strip down the cylinder head (see ) (Technical Note 6006A, 10A, Engine and peripherals).
WARNING
In order to ensure that the bolts are correctly tightened, use a syringe to remove any oil which may be in the cylinder head mounting holes.
- Fit a new cylinder head seal, centred by two dowels.
- Bring the pistons to mid-stroke position to prevent any risk of contact with the valves when tightening the cylinder head.
II - REFITTING OPERATION FOR PART CONCERNED
- Refit the cylinder head.
WARNING
Do not retighten the cylinder head bolts after applying this procedure.
- Remove workshop hoist.
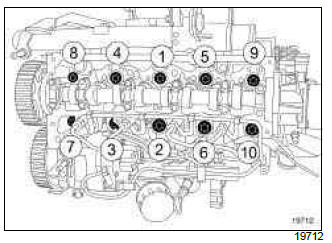
- Refit new cylinder head bolts.
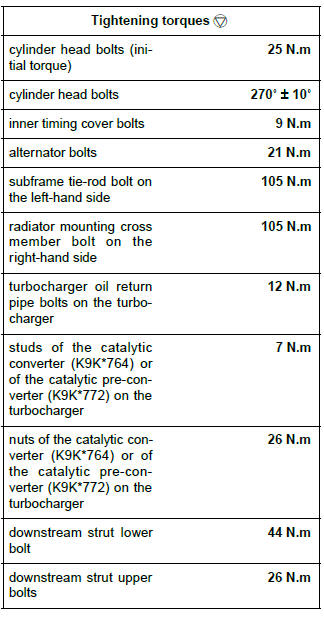
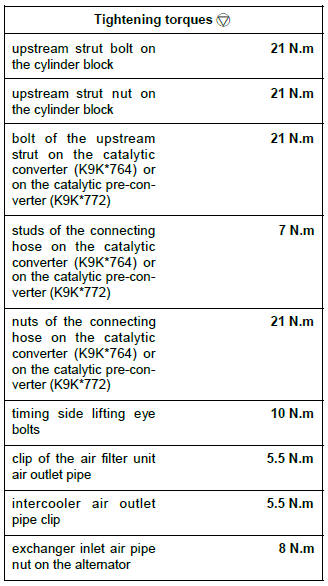
- Pretighten to torque and in order the cylinder head bolts (initial torque) (25 N.m).
- Check that all of the cylinder head bolts are tightened to the correct torque.
- Angle tighten in order the cylinder head bolts (270

