Renault Clio: Non-side Opening Element Mechanisms
Renault Clio III (2005-2013) Service Manual / Mechanisms And Accessories / Non-side Opening Element Mechanisms
Bonnet release control: Removal - Refitting
REMOVAL
I - REMOVAL PREPARATION OPERATION
- Remove:
- the wheel arch liners (see 55A, Exterior protection, Front wheel arch liner: Removal - Refitting, 55A-41),
- the front bumper (see 55A, Exterior protection, Front bumper: Removal - Refitting, 55A-1),
- the bonnet catch (see 52A, Non-side opening element mechanisms, Bonnet lock: Removal - Refitting, 52A-5),
- the battery (see Battery: Removal - Refitting) (MR 392, 80A, Battery).
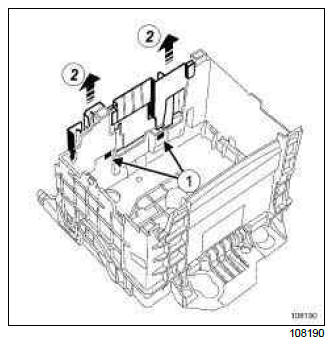
- Unclip the power supply fuse support plate at (1).
- Pull out the fuse board support (2).
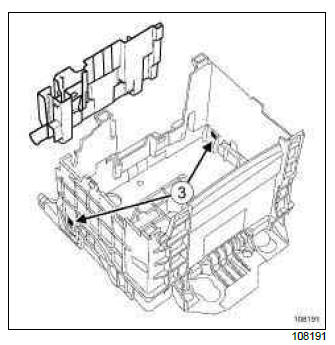
- Unclip the thermal protection shield at (3).
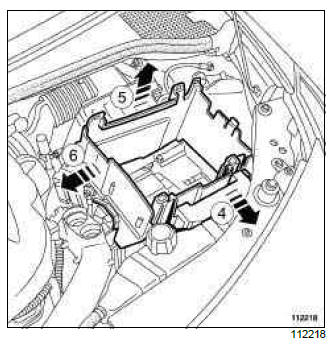
- Keep the fuse board support held away (4).
- Remove the heat protection shield (5) and (6).
- Remove the air filter box (see Air filter unit: Removal - Refitting) (MR 392, 12A, Fuel mixture).
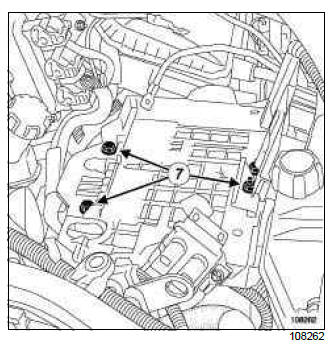
- Remove the bolts (7).
- Unclip the various wiring harnesses.
- Remove the battery support.
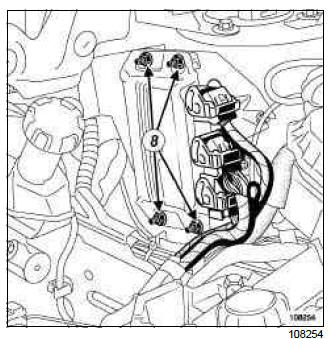
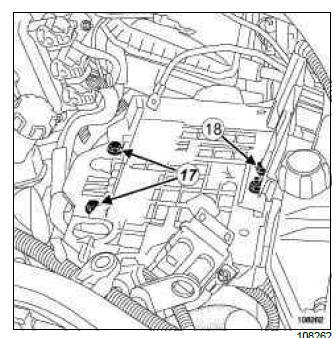
- Remove nuts (8).
- Remove the fuel injection computer without disconnecting it.
- Remove the injection computer support (three nuts).
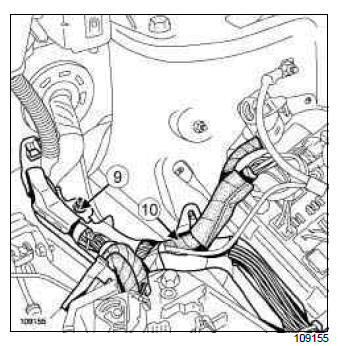
- Remove the nut (9).
- Remove the wiring harness support (10).
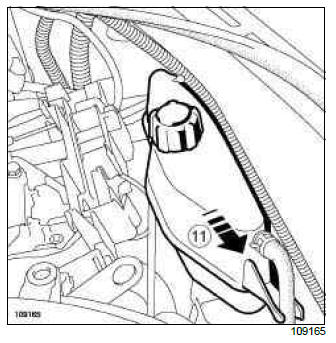
- Unclip the expansion bottle (11)
- Position the expansion bottle so that it does not hamper removal of the bonnet release cable.
- Remove the front door sill lining (see Front door sill lining: Removal - Refitting) (MR 393, 71A, Body internal trim).
II - OPERATION FOR REMOVAL OF PART CONCERNED
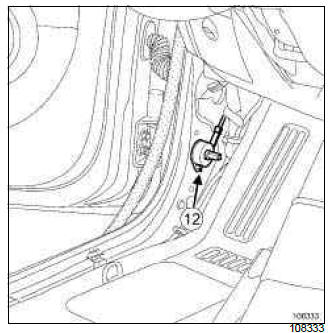
- Remove the bolt (12).
- Unclip the bonnet release control.
- Note the route of the bonnet release cable.
- Remove the bulkhead cable routing blanking piece.
- Remove the bonnet release cable.
REFITTING
I - REFITTING OPERATION FOR PART CONCERNED
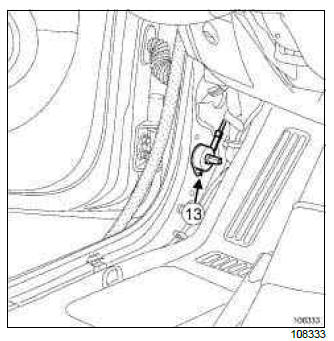
- Refit:
- the bonnet release cable,
- the cable routing blanking piece,
- the bonnet release control,
- the bolt (13).
II - FINAL OPERATION.
- Refit:
- the front door sill lining (see Front door sill lining: Removal - Refitting) (MR 393, 71A, Body internal trim),
- the expansion bottle,
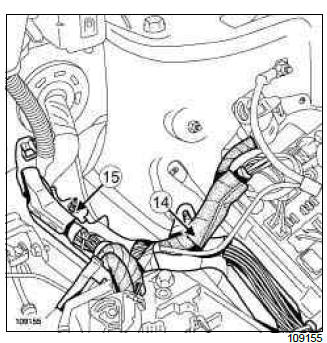
- Refit:
- the wiring harness guide (14),
- the nut (15).
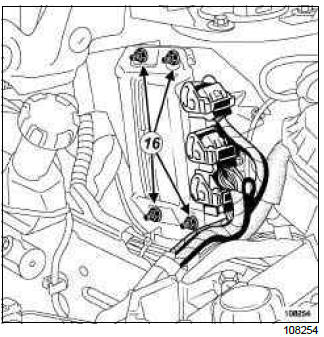
- Refit:
- the fuel injection computer support (three nuts).
- the computer,
- the nuts (16).
- Refit:
- the battery mounting,
- the various cable harnesses,
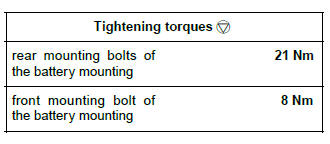
- the rear mounting bolts of the battery mounting (21 Nm), (17),
- the front mounting bolt of the battery mounting (8 Nm), (18),
- the air filter box (see Air filter unit: Removal - Refitting) (MR 392, 12A, Fuel mixture),
- the heat shield,
- the power supply fuse board support.
- the battery (see Battery: Removal - Refitting) (MR 392, 80A, Battery),
- the bonnet catch (see 52A, Non-side opening element mechanisms, Bonnet lock: Removal - Refitting, 52A-5),
- the front bumper (see 55A, Exterior protection, Front bumper: Removal - Refitting, 55A-1),
- the front wheel arch liners (see 55A, Exterior protection, Front wheel arch liner: Removal - Refitting, 55A-41).
- Bonnet lock: Removal - Refitting
- Sunroof opening control: Removal - Refitting
- Sunroof mobile panel: Removal - Refitting
- Sunroof sun visors: Removal - Refitting
READ NEXT:
 Bonnet lock: Removal - Refitting
REMOVAL
I - REMOVAL PREPARATION OPERATION
Remove the front bumper (see 55A, Exterior protection,
Front bumper: Removal - Refitting, 55A-1).
II - OPERATION FOR REMOVAL OF PART
CONCERNED
Remove
Sunroof opening control: Removal - Refitting
PANORAMIC SUNROOF
REMOVAL
OPERATION FOR REMOVAL OF PART
CONCERNED
Unclip the roof opening control using a flat-blade screwdriver (1).
Disconnect the connectors.
REFITTING
REFITTING OPERATION FOR
Sunroof mobile panel: Removal - Refitting
PANORAMIC SUNROOF
REMOVAL
I - REMOVAL PREPARATION OPERATION
Open the moving panel.
II - OPERATION FOR REMOVAL OF PART
CONCERNED
Remove the rear bolts (1) from the mobile panel.
Remove:
th
SEE MORE:
Specialised bodywork tools: Use
USING THE DASHBOARD CROSS MEMBER
REMOVAL TOOL Car. 1765
Use this tool as indicated in the dashboard removal
procedure.
Fit the tool Car. 1765 as far as the stop (10).
Screw the rod (11) onto the body (10) as far as the
stop.
Firmly lock tool body in the same way as a lock nut
against th
Structural bodywork documentation: Use
B85 or C85
I - CLASSIFYING INFORMATION
This information is classified in two complementary
documents:
1 - Vehicle structure bodywork repair procedures
(MR of the vehicle concerned)
This document comprises two sections:
a - Section 0:
This section does not contain repair methods, it only
contains des
© 2016-2026 Copyright Renault Clio Owners Club - 0.0036
