Renault Clio: Sunroof sun visors: Removal - Refitting
PANORAMIC SUNROOF
IMPORTANT
Before working on or near a safety system component; make sure that the airbag computer is locked using the Diagnostic tool. When this function is activated, all the triggering lines are inhibited and the airbag warning light on the instrument panel is continuously lit (ignition on).
IMPORTANT
Handling the pyrotechnic systems (airbags or pretensioners) near to a heat source or flame is prohibited: there is a risk of triggering the airbags or pretensioners.
REMOVAL
I - REMOVAL PREPARATION OPERATION
- Lock the airbag computer using the Diagnostic tool (see Fault finding - Replacement of components) (MR 394, 88C, Airbag and pretensioner).
- Disconnect the battery (see Battery: Removal - Refitting) (MR 392, 80A, Battery).
- Remove the headlining (see Headlining: Removal - Refitting) (MR 393, 71A, Body internal trim).
II - OPERATION FOR REMOVAL OF PART CONCERNED
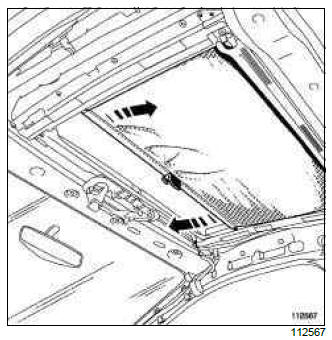
- Remove the sunroof screen from the runners with a rotating movement.
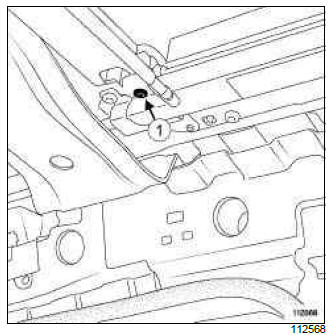
- Remove:
- the bolts (1),
- the sunroof screen.
REFITTING
I - REFITTING OPERATION FOR PART CONCERNED
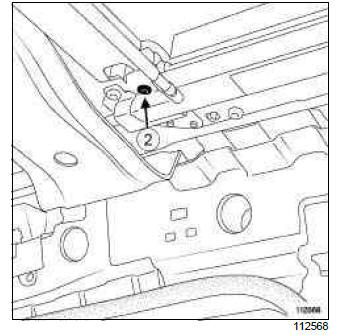
- Position the screen.
- Torque tighten the screen mounting bolts (25 Nm) (2).
- Refit the screen in the runners.
II - FINAL OPERATION.
- Refit the headlining (see Headlining: Removal - Refitting) (MR 393, 71A, Body internal trim).
- Connect the battery (see Battery: Removal - Refitting) (MR 392, 80A, Battery).
- Unlock the airbag computer using the Diagnostic tool (see Fault finding - Replacement of components) (MR 394, 88C, Airbag and pretensioners).
Sunroof water drain pipe: Removal - Refitting
IMPORTANT
Before working on or near a safety system component; make sure that the airbag computer is locked using the Diagnostic tool. When this function is activated, all the trigger lines are inhibited and the airbag warning light on the instrument panel is continuously lit (with the ignition on).
IMPORTANT
Handling the pyrotechnic systems (airbags or pretensioners) near to a heat source or flame is prohibited: there is a risk of triggering the airbags or pretensioners.
REMOVAL
I - REMOVAL PREPARATION OPERATION
- Lock the airbag computer using the Diagnostic tool (see Fault finding - Replacement of components) (MR 394, 88C, Airbag and pretensioners).
- Disconnect the battery (see Battery: Removal - Refitting) (MR 392, 80A, Battery).
- Remove the headlining (see Headlining: Removal - Refitting) (MR 393, 71A, Body internal trim).
1 - Special features for preparing to remove the front drain pipes
- Remove:
- the centre console (see 57A, Interior equipment, Centre console: Removal - Refitting, 57A- 14),
- the dashboard (see 57A, Interior equipment, Dashboard: Removal - Refitting, 57A-1),
- the front wheel arch liners (see 55A, Exterior protection, Front wheel arch liner: Removal - Refitting, 55A-41).
2 - Special features for preparing to remove the rear drain pipes
- Remove:
- the rear end panel trim (see Rear end panel lining: Removal - Refitting) (MR 393, 71A, Body internal trim),
- the rear wheel arch trim (see Rear wheel arch trim: Removal - Refitting) (MR 393, 71A, Body internal trim),
- the rear wheel arch liner (see 55A, Exterior protection, Rear wheel arch liner: Removal - Refitting, 55A-43).
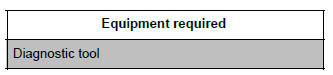
II - OPERATION FOR REMOVAL OF PART CONCERNED
- Retrieve the anti-return valve.
- Remove the water drain pipe from inside the vehicle.
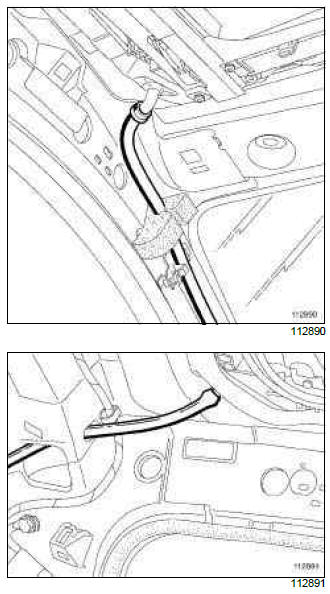
REFITTING
I - REFITTING OPERATION FOR PART CONCERNED
- Turn:
- the drain pipe correctly in position.
- the anti-return valve on the drain pipe.
II - FINAL OPERATION.
1 - Special features of the final operation for the rear drain pipes
- Refit:
- the rear wheel arch liner (see 55A, Exterior protection, Rear wheel arch liner: Removal - Refitting, 55A-43),
- the rear wheel arch trim (see Rear wheel arch trim: Removal - Refitting) (MR 393, 71A, Body internal trim),
- the rear end panel trim (see Rear end panel lining: Removal - Refitting) (MR 393, 71A, Body internal trim).
- Refit the headlining (see Headlining: Removal - Refitting) (MR 393, 71A, Body internal trim).
- Connect the battery (see Battery: Removal - Refitting) (MR 392, 80A, Battery).
- Unlock the airbag computer using the Diagnostic tool (see Fault finding - Replacement of components) (MR 394, 88C, Airbag and pretensioners).
2 - Special features for the final operation on the front drain pipes
- Refit:
- the front wheel arch liners (see 55A, Exterior protection, Front wheel arch liner: Removal - Refitting, 55A-41),
- the dashboard (see 57A, Interior equipment, Dashboard: Removal - Refitting, 57A-1),
- the centre console (see 57A, Interior equipment, Centre console: Removal - Refitting, 57A- 14).
- Refit the headlining (see Headlining: Removal - Refitting) (MR 393, 71A, Body internal trim).
- Connect the battery (see Battery: Removal - Refitting) (MR 392, 80A, Battery).
- Unlock the airbag computer using the Diagnostic tool (see Fault finding - Replacement of components) (MR 394, 88C, Airbag and pretensioners).
READ NEXT:
 Windscreen: Removal - Refitting
WARNING
Leave the rain sensor in place on the old windscreen
during the replacement operation.
REMOVAL
I - REMOVAL PREPARATION OPERATION
Remove:
the scuttle panel grille (see 56A, Exterior equipm
Front side door sliding window: Removal - Refitting
Note:
If the window is broken, replace the sealing film
(see Door sealing film: Removal - Refitting) (MR
393, 65A, Door sealing).
REMOVAL
I - REMOVAL PREPARATION OPERATION
Remove:
the door trim (s
SEE MORE:
Driving
The Renault Clio IV (2014-2019) offers a satisfying driving experience with its nimble handling and responsive performance. Its compact size and maneuverability make it well-suited for urban driving and tight parking spaces. The precise steering and suspension tuning provide a balanced and confident
Your comfort
The Renault Clio IV (2014-2019) is designed with your comfort in mind. It features a well-crafted interior with quality materials and thoughtful ergonomics. The seats offer excellent support and adjustability, providing a comfortable driving experience. The cabin is designed to minimize noise and vi
