Renault Clio: Oil pump: Removal - Refitting
D4F, and 740 or 742 or 764
REMOVAL
I - REMOVAL PREPARATION OPERATION
- Position the vehicle on a two-post lift (see Vehicle: Towing and lifting) (MR 392, 02A, Lifting equipment).
- Disconnect the battery (see Battery: Removal - Refitting) (MR 392, 80A, Battery).
- Remove:
- the dipstick,
- the engine undertray,
- the front right-hand wheel (see Wheel: Removal - Refitting) (MR 392, 35A, Wheels and tyres),
- the wheel arch liner (see Front wheel arch liner: Removal - Refitting) (MR 393, 55A, Exterior protection),
- the accessories belt (see 11A, Top and front of engine, Accessories belt: Removal - Refitting, 11A-5),
- the timing belt (see 11A, Top and front of engine, Timing belt: Removal - Refitting, 11A-48).
- Drain the oil from the engine (see 10A, Engine and cylinder block assembly, Engine oil: Draining - Refilling, 10A-12).
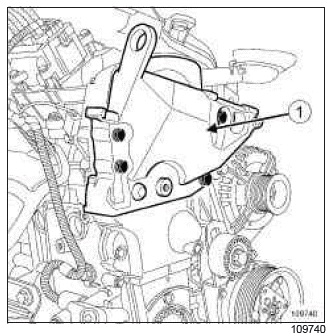
- Refit the upper timing cover (1).
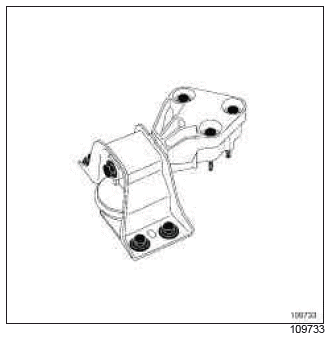
- Refit the right-hand suspended mounting support (see 19D, Engine mounting, Right-hand suspended engine mounting: Removal - Refitting, 19D-22).
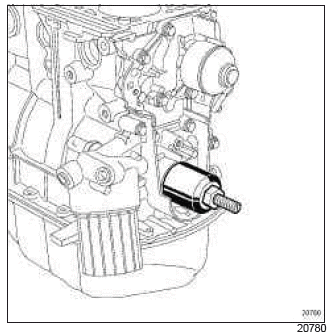
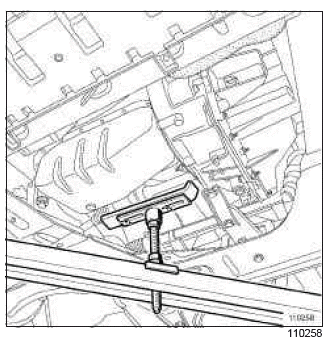
- Remove the lower engine support tool (Mot. 1672).
- Remove:
- the lower cover (see 10A, Engine and cylinder block assembly, Lower cover: Removal - Refitting, 10A-52),
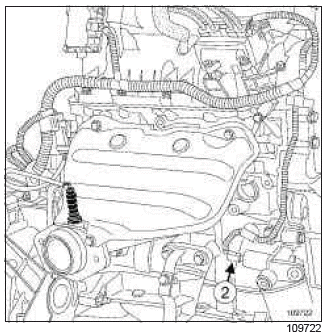
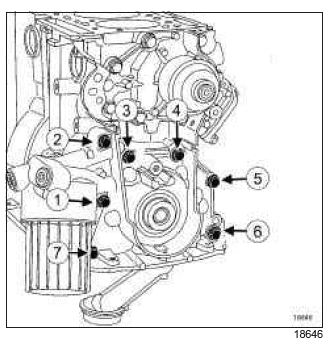
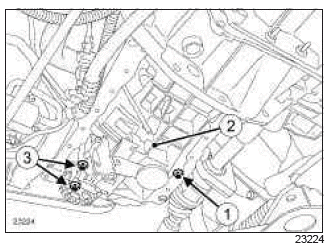
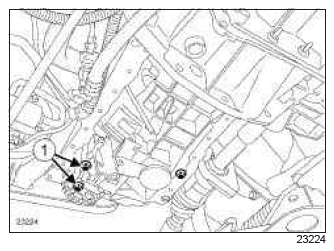
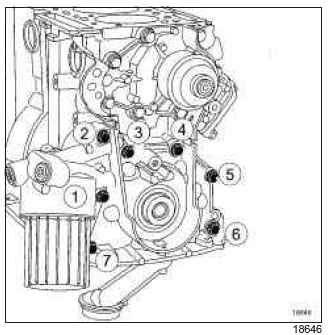
- Disconnect the oil pressure sensor connector (2).
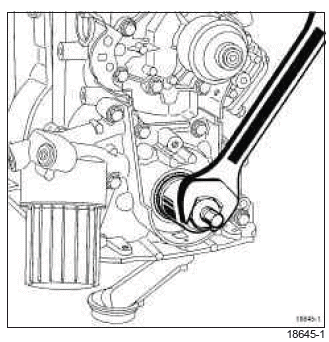
- Remove the crankshaft accessories pulley (see 11A, Top and front of engine, Crankshaft accessories pulley: Removal - Refitting, 11A-31).
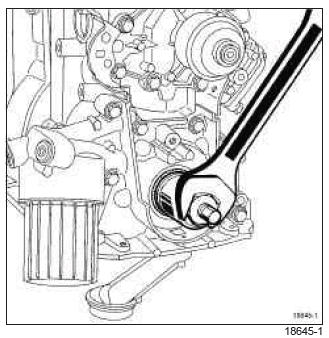
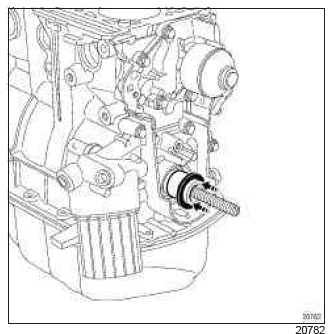
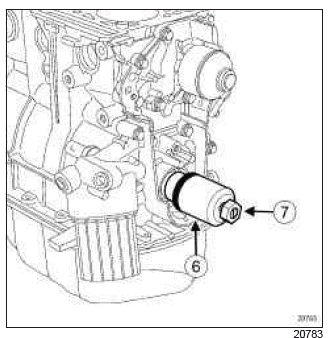
- Remove the crankshaft seal by turning tool (Mot.1374).
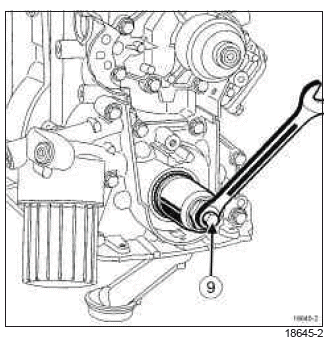
- Remove the seal by tightening the bolt (9) on the (Mot. 1374).
II - OPERATION FOR REMOVAL OF PART CONCERNED
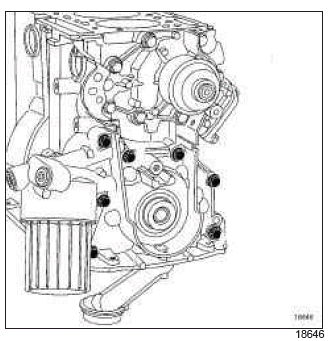
- Remove:
- the oil pump strainer,
- the oil pump mounting bolts,
- the oil pump.
REFITTING
I - REFITTING PREPARATION OPERATION
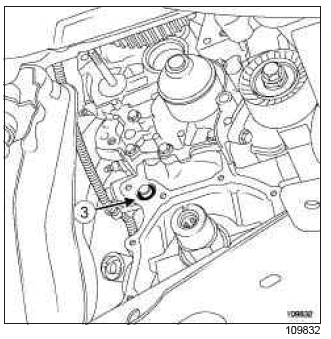
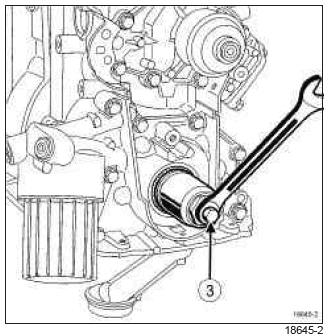
- Always replace:
- the O-ring (3),
- the crankshaft seal.
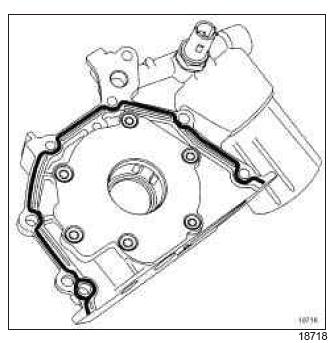
- Refit the oil pump.
WARNING
The sealing surfaces must be clean, dry and free from grease (avoid finger marks).
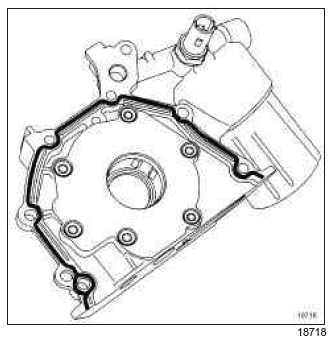
Apply a beading of SILICONE ADHESIVE SEALANT 77 11 227 484 with a width of 1.3 mm to seal the oil pump.
II - REFITTING OPERATION FOR PART CONCERNED
- Fit the oil pump, aligning the oil pump drive points with the flat surface of the crankshaft.
- Tighten to torque and in order the oil pump mounting bolts (9 N.m).
- Refit the oil pump strainer.
Note: The oil pump strainer does not have a seal.
III - FINAL OPERATION.
- Refit the crankshaft seal.
WARNING
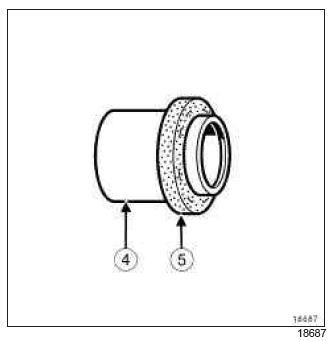
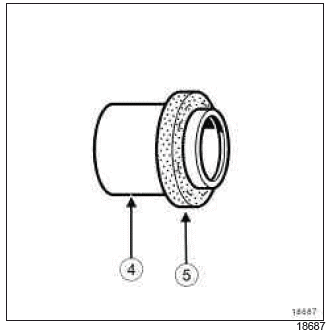
This type of seal is extremely fragile. When handling, it is essential to grip protective piece (4). It is strictly forbidden to touch seal; (5) this is to prevent any oil leaks once the oil seal is fitted to the engine.
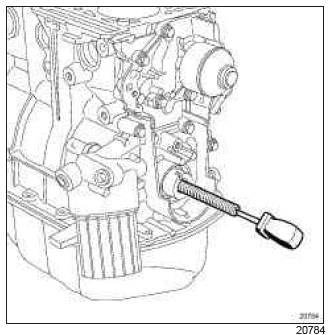
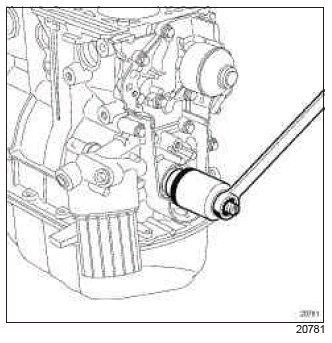
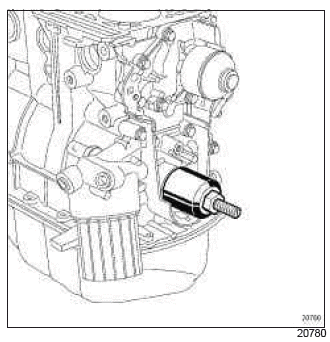
- Screw the threaded rod (Mot. 1626) into the crankshaft.
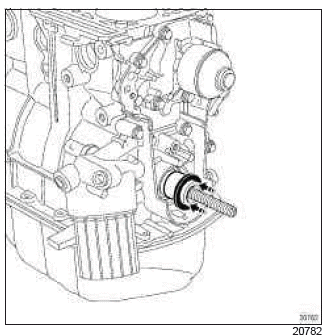
- Fit the seal and protector on the crankshaft, taking care not to touch the seal.

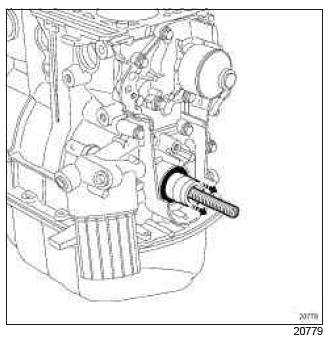
- Fit the cover (6) and the collar nut (7) of the (Mot.1626).
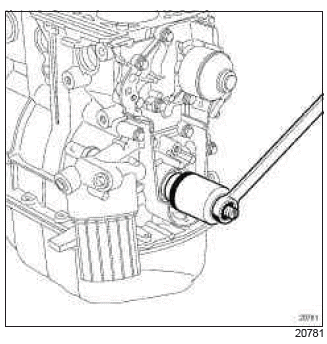
- Tighten the collar nut until the cap touches the crankshaft closure panel.

- Remove:
- the nut,
- the cover,
- the guard,
- the threaded rod.
- Refit the lower cover (see 10A, Engine and cylinder block assembly, Lower cover: Removal - Refitting, 10A-52).
- Refit the lower engine support (Mot. 1672).
- Remove:
- the right-hand suspended mounting support,
- the upper timing cover.
- Connect the oil pressure sensor connector.
- Refit:
- the timing belt (see 11A, Top and front of engine, Timing belt: Removal - Refitting, 11A-48),
- the accessories belt (see 11A, Top and front of engine, Accessories belt: Removal - Refitting, 11A-5),
- the dipstick,
- the engine undertray,
- the front right-hand wheel arch liner (see Front wheel arch liner: Removal - Refitting) (MR 393, 55A, Exterior protection),
- the front right-hand wheel (see Wheel: Removal - Refitting) (MR 392, 35A, Wheels and tyres).
- Top up the engine oil (see 10A, Engine and cylinder block assembly, Engine oil: Draining - Refilling, 10A-12).
- Connect the battery (see Battery: Removal - Refitting) (MR 392, 80A, Battery).
K4J or K4M
REMOVAL
I - REMOVAL PREPARATION OPERATION
- Position the vehicle on a two-post lift (see Vehicle: Towing and lifting) (02A, Lifting equipment).
- Disconnect the battery (see Battery: Removal - Refitting) (80A, Battery).
- Remove:
- the engine undertray bolts,
- the engine undertray.
- Drain the engine oil (see 10A, Engine and cylinder block assembly, Engine oil: Draining - Refilling, 10A-12).
- Remove:
- the dipstick,
- the front wheels (see Wheel: Removal - Refitting) (35A, Wheels and tyres),
- the front wheel arch liners (see Front wheel arch liner: Removal - Refitting) (55A, Exterior protection),
- the front bumper (see Front bumper: Removal - Refitting) (55A, Exterior protection),
- the radiator mounting cross member (see Radiator mounting cross member: Removal - Refitting) (41A, Front lower structure),
- the engine oil sump (see 10A, Engine and cylinder block assembly, Lower cover: Removal - Refitting, 10A-52).
II - OPERATION FOR REMOVAL OF PART CONCERNED
K4J - K4M, and 800 or 801 or 804
- Remove:
- the oil splash plate bolt (1),
- the oil splash plate (2),
- the oil pump bolts (3).
K4M, and 862
- Remove the oil pump.
REFITTING
I - REFITTING OPERATION FOR PART CONCERNED
- Refit:
- the oil pump,
- the oil pump bolts.
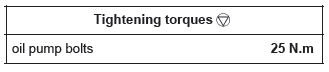
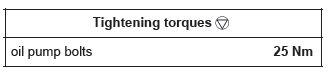
- Torque tighten the oil pump bolts (25 N.m).
K4J - K4M, and 800 or 801 or 804
- Refit:
- the oil splash plate,
- the oil splash plate bolt.
II - FINAL OPERATION
- Refit:
- the engine oil sump (see 10A, Engine and cylinder block assembly, Lower cover: Removal - Refitting, 10A-52),
- the radiator mounting cross member (see Radiator mounting cross member: Removal - Refitting) (41A, Front lower structure),
- the front bumper (see Front bumper: Removal - Refitting) (55A, Exterior protection),
- the front wheel arch liners (see Front wheel arch liner: Removal - Refitting) (55A, Exterior protection),
- the front wheels (see Wheel: Removal - Refitting) (35A, Wheels and tyres),
- the dipstick.
- Fill up the engine oil (see 10A, Engine and cylinder block assembly, Engine oil: Draining - Refilling, 10A-12).
- Refit the engine undertray.
- Connect the battery (see Battery: Removal - Refitting) (80A, Battery).
K9K
REMOVAL
I - REMOVAL PREPARATION OPERATION
- Position the vehicle on a two-post lift (see Vehicle: Towing and lifting) (MR 392, 02A, Lifting equipment).
- Disconnect the battery (see Battery: Removal - Refitting) (MR 392, 80A, Battery).
- Remove:
- the engine undertray,
- the sump (see 10A, Engine and cylinder block assembly, Lower cover: Removal - Refitting, 10A-52).
II - OPERATION FOR REMOVAL OF PART CONCERNED
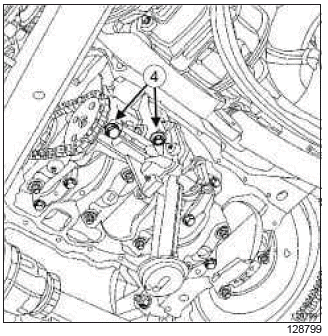
- Remove:
- the oil pump bolts (1),
- the oil pump.
REFITTING
I - REFITTING OPERATION FOR PART CONCERNED
- Refit the oil pump.
- Tighten the oil pump bolts (25 Nm).
II - FINAL OPERATION.
- Refit:
- the sump (see 10A, Engine and cylinder block assembly, Lower cover: Removal - Refitting, 10A-52),
- the engine undertray.
- Top up the engine oil (see 10A, Engine and cylinder block assembly, Engine oil: Draining - Refilling, 10A-12).
- Connect the battery (see Battery: Removal - Refitting) (MR 392, 80A, Battery).
M4R
- The engine and gearbox assembly must be removed to remove/refit the oil pump (see 10A, Engine and cylinder block assembly, Engine - gearbox assembly: Removal - Refitting, 10A-112).
- For the removal and refitting procedure for the oil pump (see ) and (see ) (Technical Note 6020A, 10A, Engine and peripherals).
F4R

REMOVAL
I - REMOVAL PREPARATION OPERATION
- Position the vehicle on a two-post lift (see Vehicle: Towing and lifting) (MR 392, 02A, Lifting equipment).
- Disconnect the battery (see Battery: Removal - Refitting) (MR 392, 80A, Battery).
- Remove:
- the dipstick,
- the engine undertray.
- Drain the engine oil (see 10A, Engine and cylinder block assembly, Engine oil: Draining - Refilling, 10A-12).
- Remove the sump (see 10A, Engine and cylinder block assembly, Engine oil: Draining - Refilling, 10A-12).
II - OPERATION FOR REMOVAL OF PART CONCERNED
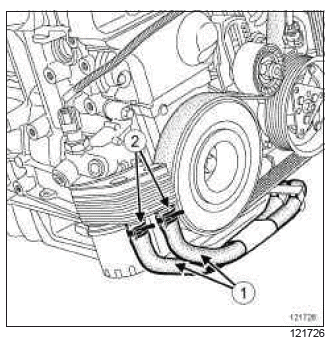
- Remove:
- the oil splash plate mounting bolt (1),
- the oil splash plate by sliding it in the direction of the arrow.
- Remove:
- the oil pump mounting bolts (2),
- the oil pump.
REFITTING
I - REFITTING OPERATION FOR PART CONCERNED
- Refit:
- the oil pump,
- the oil pump mounting bolts.
- Torque tighten the oil pump mounting bolts (24 Nm).
- Refit:
- the oil splash plate,
- the oil splash plate mounting bolts.
- Torque tighten the oil splash plate mounting bolts (24 Nm).
II - FINAL OPERATION
- Refit the sump (see 10A, Engine and cylinder block assembly, Lower cover: Removal - Refitting, 10A-52).
- Fill up the engine oil (see 10A, Engine and cylinder block assembly, Engine oil: Draining - Refilling, 10A-12).
- Connect the battery (see Battery: Removal - Refitting) (MR 392, 80A, Battery).
- Start the engine and let it run for 5 minutes after the engine oil warning light goes off.
- Check that there are no leaks between the cylinder block and the sump.
- Refit the engine undertray.
- Top up the engine oil level using the dipstick.
D4F, and 784 or 786
REMOVAL
I - REMOVAL PREPARATION OPERATION
- Position the vehicle on a two-post lift (see Vehicle: Towing and lifting) (MR 392, 02A, Lifting equipment).
- Disconnect the battery (see ) (MR 392, 80A, Battery).
- Remove the engine undertray.
- Drain the engine oil (see 10A, Engine and cylinder block assembly, Engine oil: Draining - Refilling, 10A-12).
- Remove:
- the dipstick,
- the front right-hand wheel (see Wheel: Removal - Refitting) (MR 392, 35A, Wheels and tyres),
- the front section of the front right-hand wheel arch liner (see Front wheel arch liner: Removal - Refitting) (MR 393, 55A, Exterior protection).
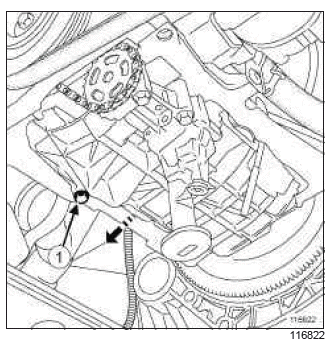
- Fit hose clamps (Ms. 583) onto the oil-coolant heat exchanger hoses (1).
- Release the clips (2) using the (Mot. 1448).
- Disconnect the oil cooler hoses.
- Fit the engine support tool (Mot. 1672) using the driveshaft relay bearing as a support.
- Remove:
- the accessories belt (see 11A, Top and front of engine, Accessories belt: Removal - Refitting, 11A-5),
- the crankshaft accessories pulley (see 11A, Top and front of engine, Crankshaft accessories pulley: Removal - Refitting, 11A-31),
- the right-hand suspended engine mounting (see 19D, Engine mounting, Right-hand suspended engine mounting: Removal - Refitting, 19D-22),
- the timing belt (see 11A, Top and front of engine, Timing belt: Removal - Refitting, 11A-48),
- the sump (see 10A, Engine and cylinder block assembly, Lower cover: Removal - Refitting, 10A-52).
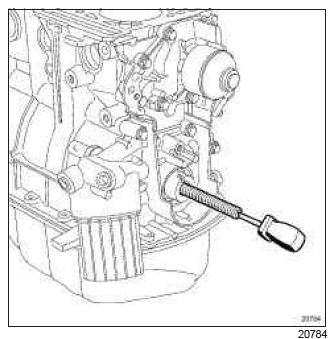
- Disconnect the oil pressure sensor connector.
- Remove the crankshaft seal by turning tool (Mot.1374).
- Remove the seal by tightening the bolt (3) on the (Mot. 1374).
II - OPERATION FOR REMOVAL OF PART CONCERNED

- Remove:
- the oil pump strainer bolts,
- the oil pump strainer,
- the oil pump bolts,
- the oil pump.
REFITTING
I - REFITTING PREPARATION OPERATION
- Clean the joint faces with SUPER CLEANING AGENT FOR JOINT FACES to dissolve any seal still adhering.
WARNING The joint faces must be clean, dry and free from grease (avoid finger marks).

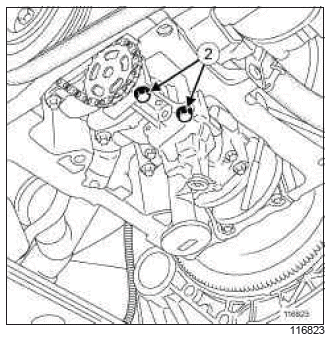
- Always replace:
- the O-ring (1),
- the crankshaft seal.
- Apply a bead of MASTIXO with a width of 1.3 mm to ensure that the oil pump is sealed.
II - REFITTING OPERATION FOR PART CONCERNED
- Fit the oil pump, aligning the oil pump drive points with the flat surfaces of the crankshaft.
- Refit the oil pump bolts.
- Tighten to torque and in order the oil pump bolts (10 Nm).
- Refit:
- the oil pump strainer,
- the oil pump strainer bolts.
- Torque tighten the oil pump strainer bolts (10 Nm).
III - FINAL OPERATION.
- Refit the crankshaft seal.
Note: This type of seal is extremely fragile. When handling, it is essential to hold the protective piece (4). It is strictly forbidden to touch the seal (5) ; this is to prevent any oil leaks once the oil seal is fitted to the engine.
- Screw the threaded rod (Mot. 1626) into the crankshaft.
- Fit the seal and protector on the crankshaft, taking care not to touch the seal.
- Fit the cover (6) and the collar nut (7) of the (Mot.1626).
- Tighten the collar nut until the cap touches the crankshaft closure panel.
- Remove:
- the nut,
- the cap,
- the guard,
- the threaded rod.
- Connect the oil pressure sensor connector.
- Refit:
- the sump (see 10A, Engine and cylinder block assembly, Lower cover: Removal - Refitting, 10A-52),
- the timing belt (see 11A, Top and front of engine, Timing belt: Removal - Refitting, 11A-48),
- the right-hand suspended engine mounting (see 19D, Engine mounting, Right-hand suspended engine mounting: Removal - Refitting, 19D-22),
- the crankshaft accessories pulley (see 11A, Top and front of engine, Crankshaft accessories pulley: Removal - Refitting, 11A-31),
- the accessories belt (see 11A, Top and front of engine, Accessories belt: Removal - Refitting, 11A-5).
- Remove the engine support tool (Mot. 1672).
- Connect the oil-coolant heat exchanger hoses.
- Refit the clips using the (Mot. 1448).
- Remove the hose clamps (Ms. 583).
- Refit:
- the front section of the front right-hand wheel arch liner (see Front wheel arch liner: Removal - Refitting) (MR 393, 55A, Exterior protection),
- the front right-hand wheel (see Wheel: Removal - Refitting) (MR 392, 35A, Wheels and tyres),
- the dipstick.
- Fill and bleed the cooling system (see 19A, Cooling, Cooling system: Draining - Refilling, 19A-16).
- Refit the engine undertray.
- Connect the battery (see ) (MR 392, 80A, Battery).
READ NEXT:
 Multifunction support:
Removal - Refitting
Multifunction support:
Removal - Refitting
D4F, and 740 or 742 or 764
REMOVAL
I - REMOVAL PREPARATION OPERATION
Position the vehicle on a two-post lift (see Vehicle:
Towing and lifting) (MR 392, 02A, Lifting equipment).
Disconnect the bat
K4M, and JH3 - K4J, and JH3 - K4M, and TL4
REMOVAL
I - REMOVAL PREPARATION OPERATION
Position the vehicle on a two-post lift (see Vehicle:
Towing and lifting) (02A, Lifting equipment).
Remove:
the battery (see Battery: Removal - Refitt
SEE MORE:
Driving
The Renault Clio IV (2014-2019) offers a satisfying driving experience with its nimble handling and responsive performance. Its compact size and maneuverability make it well-suited for urban driving and tight parking spaces. The precise steering and suspension tuning provide a balanced and confident
Your comfort
The Renault Clio IV (2014-2019) is designed with your comfort in mind. It features a well-crafted interior with quality materials and thoughtful ergonomics. The seats offer excellent support and adjustability, providing a comfortable driving experience. The cabin is designed to minimize noise and vi
