Renault Clio: Oil-coolant heat exchanger: Removal - Refitting
K9K, and 764 or 766 or 768
REMOVAL
I - REMOVAL PREPARATION OPERATION
- Position the vehicle on a two-post lift (see Vehicle: Towing and lifting) (02A, Lifting equipment).
- Remove:
- the engine protector,
- the front bumper (see Front bumper: Removal - Refitting) (55A, Exterior protection),
- the engine undertray,
- the intercooler (see 12B, Turbocharging, Intercooler: Removal - Refitting, 12B-21).
- Drain:
- the engine oil (see 10A, Engine and cylinder block assembly, Engine oil: Draining - Refilling, 10A-12),
- the cooling system (see 19A, Cooling, Cooling system: Draining - Refilling, 19A-16).
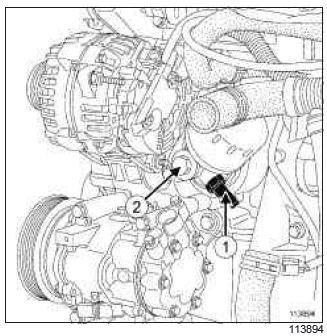
- Disconnect the oil pressure sensor connector (1).
- Remove:
- the bolt (2) from the oil filter support,
- the oil filter holder.
II - OPERATION FOR REMOVAL OF PART CONCERNED
- Remove:
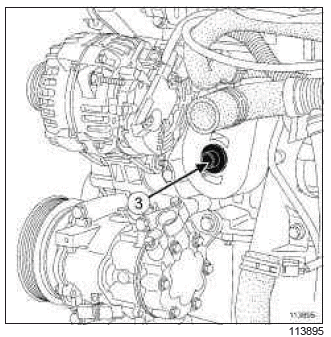
- the nipple (3) from the oil-coolant heat exchanger,
- the oil-coolant heat exchanger.
REFITTING
I - REFITTING PREPARATION OPERATION
- parts always to be replaced: coolant-engine oil heat exchanger seal on the cylinder block.
II - REFITTING OPERATION FOR PART CONCERNED
- Refit:
- new seals on the oil-coolant heat exchanger, previously lubricated with soapy water,
- the oil-coolant heat exchanger on the coolant inlet pipe.
- Put two drops of HIGH RESISTANCE THREAD LOCK on the nipple of the oil-coolant heat exchanger.
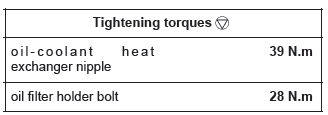
- Torque tighten the oil-coolant heat exchanger nipple (39 N.m).
III - FINAL OPERATION
- Refit the oil filter holder.
- Torque tighten the oil filter holder bolt (28 N.m).
- Top up the engine oil (see 10A, Engine and cylinder block assembly, Engine oil: Draining - Refilling, 10A-12).
- Wait 2 minutes.
- Fill and bleed the cooling system (see 19A, Cooling, Cooling system: Draining - Refilling, 19A-16).
- Refit:
- the intercooler (see 12B, Turbocharging, Intercooler: Removal - Refitting, 12B-21),
- the engine undertray,
- the front bumper (see Front bumper: Removal - Refitting) (55A, Exterior protection),
- the engine protector.
M4R
REMOVAL
I - REMOVAL PREPARATION OPERATION
- Position the vehicle on a two-post lift (see Vehicle: Towing and lifting) (02A, Lifting equipment).
- Remove:
- the engine undertray,
- the front bumper (see Front bumper: Removal - Refitting) (55A, Exterior protection),
- the front impact cross member (see Front impact cross member: Removal - Refitting) (41A, Front lower structure),
- the front end panel air resonator (see 12A, Fuel mixture, Air resonator: Removal - Refitting, 12A-10).
- Drain the engine oil (see 10A, Engine and cylinder block assembly, Engine oil: Draining - Refilling, 10A-12).
- Remove the oil filter (see 10A, Engine and cylinder block assembly, Oil filter: Removal - Refitting, 10A-19).
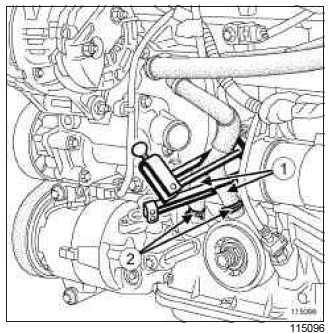
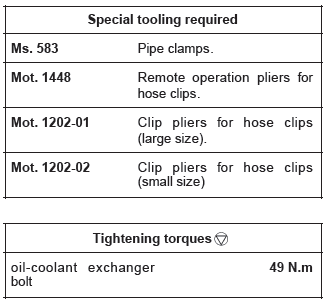
- Fit hose clamps (Ms. 583) onto the oil-coolant heat exchanger hoses (1).
- Separate the clips (2) on the oil-coolant heat exchanger inlet and outlet hoses, using the tool (Mot.1448) or (Mot. 1202-01) or (Mot. 1202-02).
- Connect the oil-coolant heat exchanger hoses.
II - OPERATION FOR REMOVAL OF PART CONCERNED
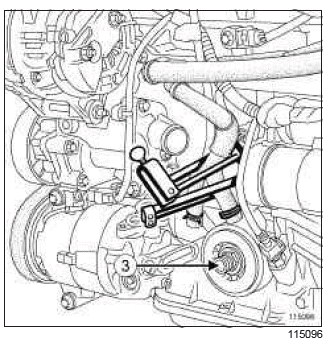
- the oil-coolant heat exchanger,
- the oil-coolant heat exchanger O-ring.
REFITTING
I - REFITTING PREPARATION OPERATION
- parts always to be replaced: coolant-engine oil heat exchanger seal on the cylinder block.
II - REFITTING OPERATION FOR PART CONCERNED
- Refit the oil-coolant heat exchanger equipped with a new seal.
- Torque tighten the oil-coolant exchanger bolt (49 N.m).
III - FINAL OPERATION
- Connect the oil-coolant heat exchanger inlet and outlet hoses.
- Fit the oil-coolant heat exchanger inlet and outlet hose clips using the tool (Mot. 1448) or (Mot. 1202- 01) or (Mot. 1202-02).
- Remove the hose clamps (Ms. 583) on the oil-coolant heat exchanger inlet and outlet hoses.
- Refit the oil filter (see 10A, Engine and cylinder block assembly, Oil filter: Removal - Refitting, 10A-19).
- Top up the engine oil (see 10A, Engine and cylinder block assembly, Engine oil: Draining - Refilling, 10A-12).
- Refit:
- the front end panel air resonator (see 12A, Fuel mixture, Air resonator: Removal - Refitting, 12A-10),
- the front impact cross member (see Front impact cross member: Removal - Refitting) (41A, Front lower structure),
- the front bumper (see Front bumper: Removal - Refitting) (55A, Exterior protection),
- the engine undertray.
- Fill and bleed the cooling system (see 19A, Cooling, Cooling system: Draining - Refilling, 19A-16).
F4R
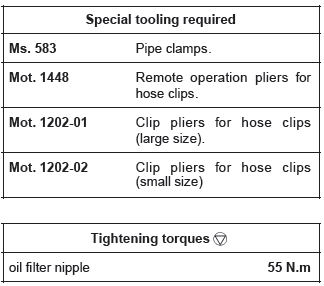
If there is an internal leak in the coolant-oil exchanger resulting in a coolant-oil mixture, you will need to:
- drain the engine oil (see 10A, Engine and cylinder block assembly, Engine oil: Draining - Refilling, 10A-12),
- drain the coolant (see 19A, Cooling, Cooling system: Draining - Refilling, 19A-16),
- replace the oil filter.
REMOVAL
I - REMOVAL PREPARATION OPERATION
- Position the vehicle on a two-post lift (see Vehicle: Towing and lifting) (02A, Lifting equipment).
- Remove:
- the engine undertray,
- the oil filter (see 10A, Engine and cylinder block assembly, Oil filter: Removal - Refitting, 10A-19).
II - OPERATION FOR REMOVAL OF PART CONCERNED
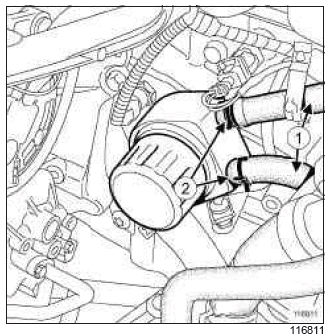
- Fit a hose clamp (Ms. 583) on the coolant hoses (1).
- Separate the hose clips (2) using the tool (Mot.1448) or (Mot. 1202-01) or (Mot. 1202-02).
- Disconnect the oil-water heat exchanger cooling hoses.
Note: Watch out for coolant outflow.
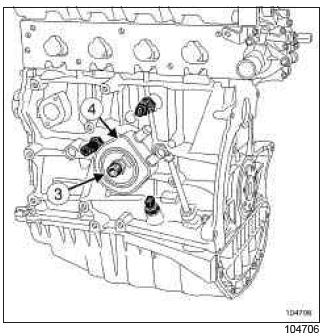
- It is essential to mark the position of the coolant-oil heat exchanger.
- Remove:
- the oil filter nipple (3),
- the coolant-oil heat exchanger (4),
- the coolant-oil exchanger seal.
Note: Watch out for the outflow of engine oil.
REFITTING
I - REFITTING PREPARATION OPERATION
- parts always to be replaced: coolant-engine oil heat exchanger seal on the cylinder block.
- Clean the sealing surfaces.
II - REFITTING OPERATION FOR PART CONCERNED
- Refit:
- a new seal on the oil-coolant heat exchanger,
- the oil-coolant heat exchanger with its new seal, observing its fitting position,
- the oil filter nipple, taking care not to alter the oil-coolant heat exchanger fitting position.
- Torque tighten the oil filter nipple (55 N.m).
III - FINAL OPERATION
- Connect the cooling hoses to the oil-coolant heat exchanger.
- Fit the clips on the hoses using the tool (Mot. 1448) or (Mot. 1202-01) or (Mot. 1202-02).
- Remove the hose clamp (Ms. 583).
- Refit the oil filter (see 10A, Engine and cylinder block assembly, Oil filter: Removal - Refitting, 10A-19) with a new seal.
- Perform the following operations:
- top up the engine oil level using the dipstick,
- fill and bleed the coolant circuit (see 19A, Cooling, Cooling system: Draining - Refilling, 19A- 16).
- Check that there are no leaks from the oil filter and the coolant-oil heat exchanger.
- Refit the engine undertray.
K9K, and 772
REMOVAL
I - REMOVAL PREPARATION OPERATION
- Position the vehicle on a two-post lift (see Vehicle: Towing and lifting) (02A, Lifting equipment).
- Remove:
- the engine cover,
- the engine undertray.
- Drain the cooling system (see 19A, Cooling, Cooling system: Draining - Refilling, 19A-16).
- Remove:
- the oil filter (see 10A, Engine and cylinder block assembly, Oil filter: Removal - Refitting, 10A-19),
- the front bumper (see Front bumper: Removal - Refitting) (55A, Exterior protection).
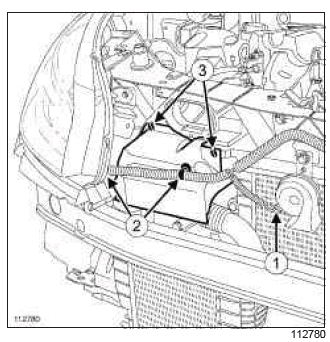
- Disconnect the horn connector (1).
- Unclip the electrical wiring from the air deflector at (2).
- Remove:
- the air deflector clips (3),
- the air deflector.
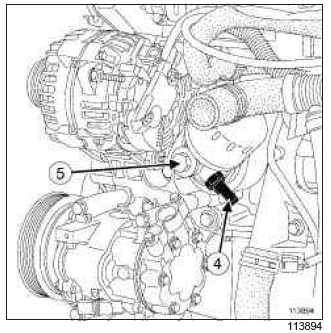
- Disconnect the oil pressure sensor connector (4).
- Mark the position of the oil filter holder on the coolant- oil heat exchanger.
- Remove:
- the oil filter holder hollow bolt (5),
- the oil filter holder.
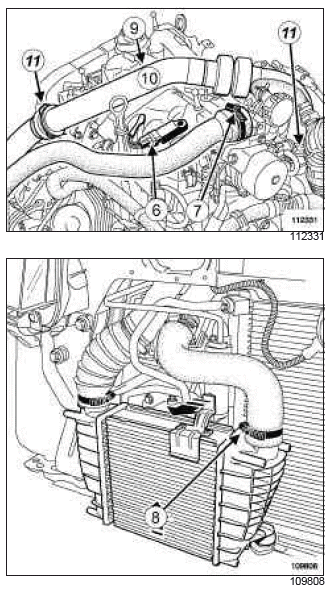
- Disconnect the inlet pressure sensor connector (6).
- Undo:
- the air duct clip (7) between the intercooler and the damper valve on the damper valve,
- the air duct clip (8) between the intercooler and the damper valve on the intercooler,
- the bolt (9) of the upper air duct between the turbocharger and the intercooler,
- the upper section of the air duct (10) between the turbocharger and the intercooler by moving aside the clips (11).
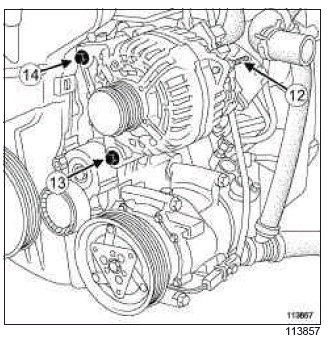
- Remove:
- the nut (12) from the air inlet ducts on the alternator,
- the air duct between the intercooler and the damper valve,
- the bolt from the upper air duct between the turbocharger and the intercooler,
- the upper section of the air duct between the turbocharger and the intercooler by separating the clips.
- Move the lower section of the duct between the turbocharger and the intercooler away from the alternator.
- Remove the accessories belt (see 11A, Top and front of engine, Accessories belt: Removal - Refitting, 11A-5).
- Loosen the alternator lower bolt (13).
- Remove the alternator upper bolt (14).
- Tip the alternator towards the front of the vehicle.
II - OPERATION FOR REMOVAL OF PART CONCERNED
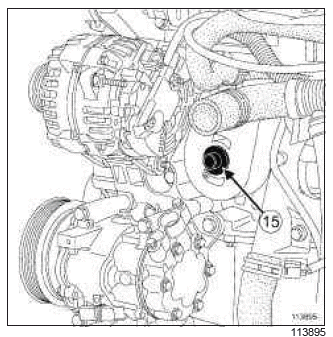
- Remove:
- the nipple (15) from the oil-coolant heat exchanger,
- the coolant-oil heat exchanger by releasing it from the coolant pump inlet pipe.
REFITTING
I - REFITTING PREPARATION OPERATION
- parts always to be replaced: coolant-engine oil heat exchanger seal on the cylinder block.
- Clean the bearing faces on the coolant-oil heat exchanger and the cylinder block.
- Refit new seals on the oil-coolant heat exchanger, previously lubricated with soapy water.
II - REFITTING OPERATION FOR PART CONCERNED
- Refit:
- the oil-coolant heat exchanger by connecting it to the coolant pump inlet pipe.
- the oil-coolant heat exchanger nipple.
- Put two drops of HIGH RESISTANCE THREAD LOCK on the nipple of the oil-coolant heat exchanger.
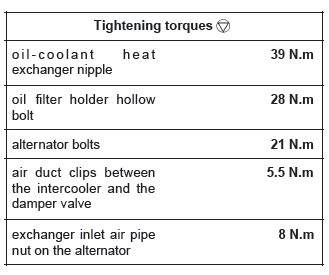
- Torque tighten the oil-coolant heat exchanger nipple (39 N.m).
III - FINAL OPERATION
- Refit:
- the oil filter holder,
- the hollow bolt to the oil filter holder with new seals.
- Tighten to torque the oil filter holder hollow bolt (28 N.m).
- Refit the oil filter (see 10A, Engine and cylinder block assembly, Oil filter: Removal - Refitting, 10A-19).
- Fit the alternator in place.
- Refit the alternator upper bolt.
- Torque tighten the alternator bolts (21 N.m).
- Position the lower section of the air duct between the turbocharger and the intercooler on the alternator.
- Refit:
- the air duct between the intercooler and the damper valve,
- the air duct nut on the alternator.
- Tighten to torque the air duct clips between the intercooler and the damper valve (5.5 N.m).
- Connect the inlet pressure sensor connector.
- Fit:
- the clip to the inlet of the lower section of the air duct between the turbocharger and the intercooler,
- the clip to the inlet of the upper section of the air duct between the turbocharger and the intercooler.
- Loosen the intercooler inlet air pipe nut on the alternator.
- Fit the air duct between the turbocharger and the intercooler air inlet pipe.
- Snap the air duct to the turbocharger and to the air pipe at the intercooler inlet.
- Tighten the bolt of the air duct on the rocker cover.
- Torque tighten the exchanger inlet air pipe nut on the alternator (8 N.m).
- Refit:
- the accessories belt (see 11A, Top and front of engine, Accessories belt: Removal - Refitting, 11A-5),
- the deflector above the intercooler,
- the deflector clips.
- Connect the horn connector.
- Clip the electrical wiring onto the deflector.
- Refit the front bumper (see Front bumper: Removal - Refitting) (55A, Exterior protection).
- Fill and bleed the cooling system (see 19A, Cooling, Cooling system: Draining - Refilling, 19A-16).
- Refit:
- the engine undertray,
- the engine cover.
K9K, and 750 or 752
REMOVAL
I - REMOVAL PREPARATION OPERATION
- Position the vehicle on a two-post lift (see Vehicle: Towing and lifting) (02A, Lifting equipment).
- Remove the engine undertray.
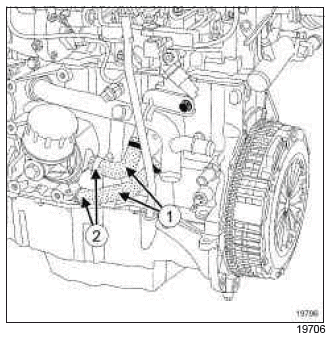
- Fit the hose clamps (Ms. 583) on the oil-coolant heat exchanger inlet and outlet hoses (1).
- Separate the clips (2) on the oil-coolant heat exchanger inlet and outlet hoses, using the tool (Mot.1448) or (Mot. 1202-01) or (Mot. 1202-02).
- Disconnect the oil-coolant heat exchanger inlet and outlet hoses.
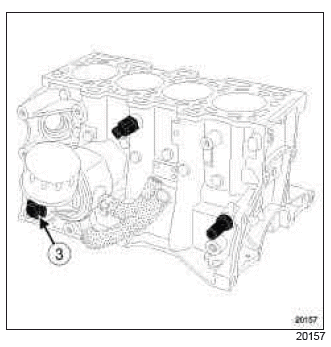
- Remove:
- the bolt (3) from the oil filter support,
- the oil filter holder.
II - OPERATION FOR REMOVAL OF PART CONCERNED
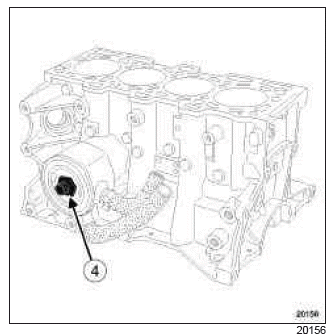
- Remove:
- the nipple (4) from the oil-coolant heat exchanger,
- the oil-coolant heat exchanger.
REFITTING
I - REFITTING PREPARATION OPERATION
- parts always to be replaced: coolant-engine oil heat exchanger seal on the cylinder block.
II - REFITTING OPERATION FOR PART CONCERNED
- Refit:
- a new exchanger seal by positioning the seal lip behind the exchanger tabs,
- the oil-coolant heat exchanger.
- Screw in the oil-coolant heat exchanger nipple, without tightening it.
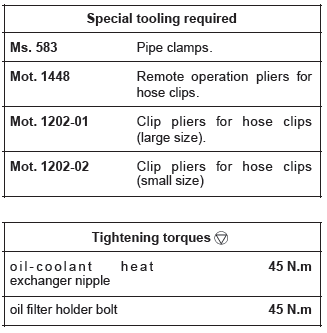
- Torque tighten the oil-coolant heat exchanger nipple (45 N.m).
III - FINAL OPERATION
- Refit the oil filter holder.
- Torque tighten the oil filter holder bolt (45 N.m).
- Connect the oil-coolant heat exchanger inlet and outlet hoses.
- Fit the oil-coolant heat exchanger inlet and outlet hoses clips using the (Mot. 1448) or (Mot. 1202-01) or (Mot. 1202-02).
- Remove the hose clamps (Ms. 583) on the oil-coolant heat exchanger inlet and outlet hoses.
- Fill and bleed the cooling system (see 19A, Cooling, Cooling system: Draining - Refilling, 19A-16).
- Refit the engine undertray.
D4F, and 784 or 786
REMOVAL
I - REMOVAL PREPARATION OPERATION
- Position the vehicle on a two-post lift (see Vehicle: Towing and lifting) (MR 392, 02A, Lifting equipment).
- Disconnect the battery (see Battery: Removal - Refitting) (MR 392, 80A, Battery).
- Remove:
- the engine undertray,
- the oil filter (see 10A, Engine and cylinder block assembly, Oil filter: Removal - Refitting, 10A-19).
II - OPERATION FOR REMOVAL OF PART CONCERNED
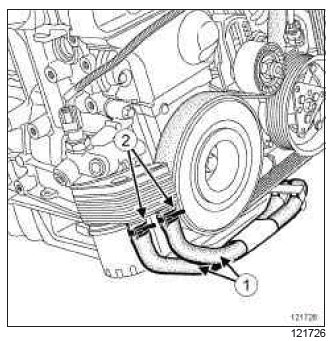
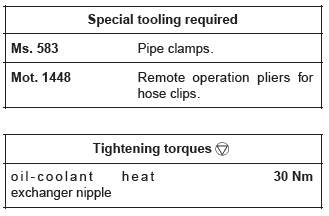
- Fit hose clamps (Ms. 583) onto the oil-coolant heat exchanger hoses (1).
- Release the clips (2) using the (Mot. 1448).
- Disconnect the oil cooler hoses.
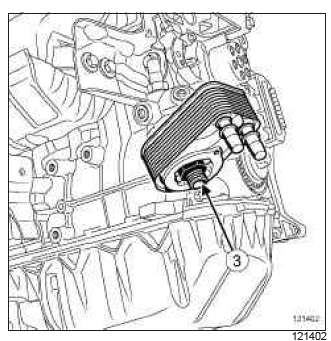
- Remove:
- the nipple (3) from the oil-water heat exchanger,
- the oil cooler.
REFITTING
I - REMOVAL PREPARATION OPERATION
- Clean the bearing faces on the coolant-oil heat exchanger and the cylinder block.
- Always replace the coolant-oil heat exchanger seals.
II - REFITTING OPERATION FOR PART CONCERNED
- Refit:
- the oil cooler,
- the oil-coolant heat exchanger fitting.
- Torque tighten the oil-coolant heat exchanger nipple (30 Nm).
- Connect the oil-coolant heat exchanger hoses.
- Refit the clips using the (Mot. 1448).
- Remove the hose clamps (Ms. 583).
III - FINAL OPERATION.
- Refit:
- the oil filter (see 10A, Engine and cylinder block assembly, Oil filter: Removal - Refitting, 10A-19),
- the engine undertray.
- Connect the battery (see Battery: Removal - Refitting) (MR 392, 80A, Battery).
- Fill and bleed the cooling system (see 19A, Cooling, Cooling system: Draining - Refilling, 19A-16).

