Renault Clio: Recirculation motor: Removal - Refitting
Renault Clio III (2005-2013) Service Manual / Air Conditioning / Heating / Recirculation motor: Removal - Refitting
LEFT-HAND DRIVE, and CLIMATE CONTROL

REMOVAL
I - REMOVAL PREPARATION OPERATION
- Lock the airbag computer using the Diagnostic tool (see Fault finding - Replacement of components) ( MR 394, 88C, Airbag and pretensioners).
- Disconnect the battery (see Battery: Removal - Refitting) (MR 392, 80A, Battery).
- Remove:
- the driver's front airbag (see Driver's frontal airbag: Removal - Refitting) (MR 392, 88C, Airbag and pretensioners),
- the steering wheel (see Steering wheel: Removal - Refitting) (MR 392, 36B, Power-assisted steering),
- the steering column switch (see Steering column switch assembly: Removal - Refitting) assembly (MR 392, 84A, Controls-Signals),
- the steering column (see Steering column: Removal - Refitting) (MR 392, 36B, Power-assisted steering),
- the centre console (see Centre console: Removal - Refitting) (MR 393, 57A, Interior equipment).
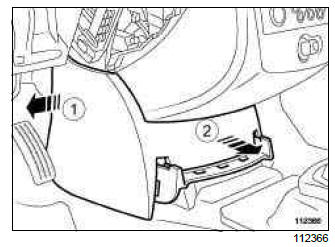
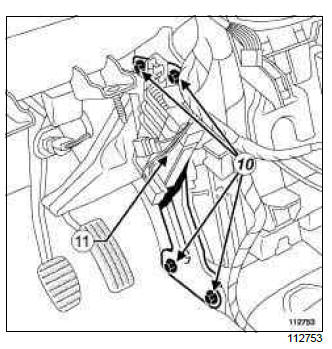
- Unclip the trim at (1) and (2) at the base of the dashboard.
- Lift the carpet to access the stiffener bolts.
- Unclip the fuse holder (3).
- Move the fuse holder to one side.
- Remove:
- the dashboard cross member reinforcement bolts (4),
- the dashboard cross member reinforcement.
II - OPERATION FOR REMOVAL OF PART CONCERNED
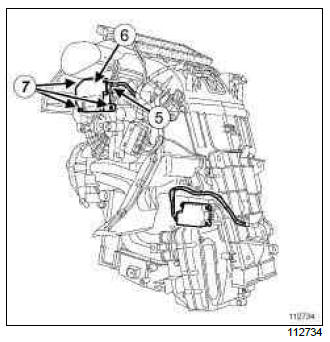
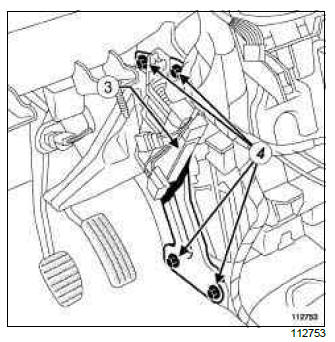
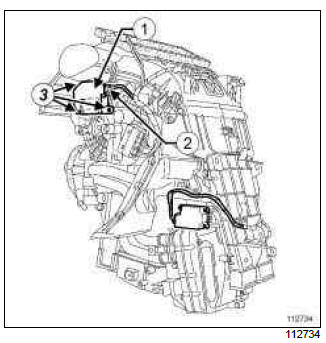
- Disconnect the connector (5) from the recirculation motor (6).
- Remove:
- the bolts (7) from the recirculation motor,
- the recirculation motor.
REFITTING
I - REFITTING OPERATION FOR PART CONCERNED
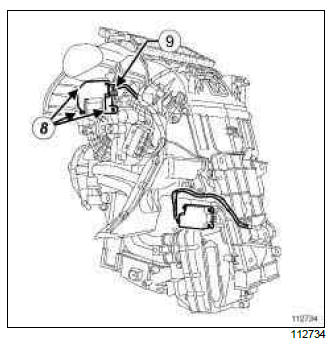
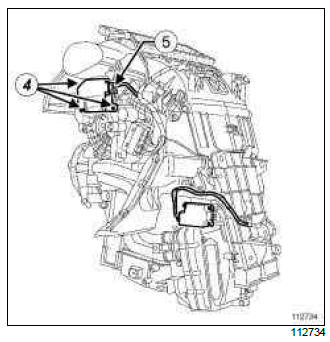
- Refit:
- the recirculation motor,
- the recirculation motor bolts (8),
- Connect the connector (9) to the recirculation motor.
II - FINAL OPERATION.
- Refit:
- the dashboard cross member reinforcement,
- the dashboard cross member reinforcement bolts (10).
- Clip on the fuse holder (11).
- Refit the floor carpet.
- Clip on the dashboard lower trim.
- Refit:
- the centre console (see Centre console: Removal - Refitting) (MR 393, 57A, Interior equipment),
- the steering column (see Steering column: Removal - Refitting) (MR 392, 36B, Power-assisted steering),
- the steering column switch (see Steering column switch assembly: Removal - Refitting) assembly (MR 392, 84A, Controls-Signals),
- the steering wheel (see Steering wheel: Removal - Refitting) (MR 392, 36B, Power-assisted steering),
- the driver's front airbag (see Driver's frontal airbag: Removal - Refitting) (MR 392, 88C, Airbag and pretensioners).
- Connect the battery (see Battery: Removal - Refitting) (MR 392, 80A, Battery).
- Unlock the airbag computer using the Diagnostic tool (see Fault finding - Replacement of components) ( MR 394, 88C, Airbag and pretensioners).
Note: Check that the floor carpet reaches under the accelerator pedal end-stop.
RIGHT-HAND DRIVE
REMOVAL
I - REMOVAL PREPARATION OPERATION
- Remove the glovebox (see Glovebox: Removal - Refitting) (MR 393, 57A, Interior equipment).
II - OPERATION FOR REMOVAL OF PART CONCERNED
- Disconnect the connector (2) from the recirculation motor (1).
- Remove:
- the recirculation motor bolts (3),
- the recirculation motor.
REFITTING
I - REFITTING OPERATION FOR PART CONCERNED
- Refit:
- the recirculation motor,
- the recirculation motor bolts (4),
- Connect the connector (5) to the recirculation motor.
II - FINAL OPERATION.
- Refit the glovebox (see Glovebox: Removal - Refitting) (MR 393, 57A, Interior equipment).
READ NEXT:
 Mixing motor: Removal - Refitting
LEFT-HAND DRIVE, and CLIMATE CONTROL
REMOVAL
I - REMOVAL PREPARATION OPERATION
Remove the centre console (see Centre console:
Removal - Refitting) (MR 393, 57A, Interior equipment).
Unclip the
Distribution motor: Removal - Refitting
LEFT-HAND DRIVE, and CLIMATE CONTROL
REMOVAL
I - REMOVAL PREPARATION OPERATION
Remove the centre console (see Centre console:
Removal - Refitting) (MR 393, 57A, Interior equipment).
Unclip the
Passenger compartment temperature sensor: Removal - Refitting
REMOVAL
I - REMOVAL PREPARATION OPERATION
Unclip the upper casing.
Unclip the lower casing (1).
II - OPERATION FOR REMOVAL OF PART
CONCERNED
Disconnect the passenger compartment temperature
SEE MORE:
Driving
The Renault Clio IV (2014-2019) offers a satisfying driving experience with its nimble handling and responsive performance. Its compact size and maneuverability make it well-suited for urban driving and tight parking spaces. The precise steering and suspension tuning provide a balanced and confident
Your comfort
The Renault Clio IV (2014-2019) is designed with your comfort in mind. It features a well-crafted interior with quality materials and thoughtful ergonomics. The seats offer excellent support and adjustability, providing a comfortable driving experience. The cabin is designed to minimize noise and vi
© 2016-2026 Copyright Renault Clio Owners Club - 0.004
