Renault Clio: Remote headlight beam adjustment actuator: Removal - Refitting
DOCUMENTATION PHASE 1
DISCHARGE LAMPS
IMPORTANT
To prevent burns, wait until the " computers - power unit " assemblies are cold before removal.
IMPORTANT
To prevent eye injuries:
- do not look at a xenon bulb when lit (voltage when lit 20000 V),
- do not light a bulb which has not been fitted into its headlight.
REMOVAL
I - REMOVAL PREPARATION OPERATION
- Position the vehicle on a two-post lift (see Vehicle: Towing and lifting) (02A, Lifting equipment).
DISCHARGE LAMPS
- Disconnect the battery (see 80A, Battery, Battery: Removal - Refitting, 80A-1).
- Remove:
- the front wheels (see Wheel: Removal - Refitting) (35A, Wheels and tyres),
- the front section of the front wheel arch liners (see Front wheel arch liner: Removal - Refitting) (55A, Exterior protection),
- the front bumper (see Front bumper: Removal - Refitting) (55A, Exterior protection),
- the headlight (see 80B, Headlights, Headlight: Removal - Refitting, 80B-7).
II - OPERATION FOR REMOVAL OF PART CONCERNED

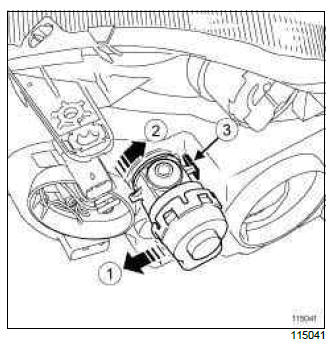
- Press on (1).
- Unclip the actuator (2) by rotating it a quarter of a turn clockwise while pressing the clip (3).
- Remove the actuator by unclipping the actuator ball joint from the clip groove.
REFITTING
I - REFITTING OPERATION FOR PART CONCERNED

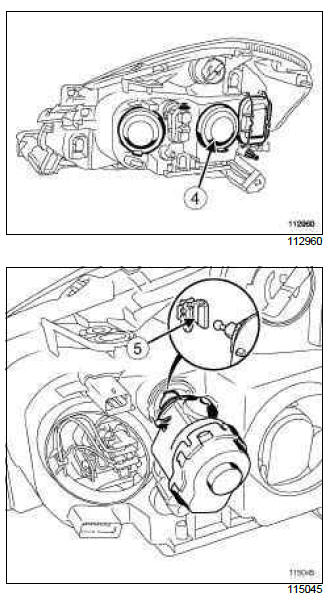
- Remove the sealing cover (4).
- Pull the reflector shell (headlight lens unit) towards you to bring the clip groove as close as possible to the ball joint.
- Insert the ball joint into clip groove (5)
Note: The ball joint should not just be in contact with the groove, it should be fitted into it.
- Clip in the actuator.
II - FINAL OPERATION
- Refit:
- the sealing cover,
- the headlight (see 80B, Headlights, Headlight: Removal - Refitting, 80B-7).
- Lower the vehicle.
DISCHARGE LAMPS
- Connect the battery (see 80A, Battery, Battery: Removal - Refitting, 80A-1).
- Adjust the headlight beam (see 80B, Headlights, Headlight: Adjustment, 80B-9).
- Refit:
- the front bumper (see Front bumper: Removal - Refitting) (55A, Exterior protection),
- the front section of the front wheel arch liners (see Front wheel arch liner: Removal - Refitting) (55A, Exterior protection),
- the front wheels (see Wheel: Removal - Refitting) (35A, Wheels and tyres).
DOCUMENTATION PHASE 2
REMOVAL
I - REMOVAL PREPARATION OPERATION
- Position the vehicle on a two-post lift (see Vehicle: Towing and lifting) (02A, Lifting equipment).
- Remove:
- the front wheels (see Wheel: Removal - Refitting) (35A, Wheels and tyres),
- the front section of the front wheel arch liners (see Front wheel arch liner: Removal - Refitting) (55A, Exterior protection),
- the front bumper (see Front bumper: Removal - Refitting) (55A, Exterior protection),
- the headlight (see 80B, Headlights, Headlight: Removal - Refitting, 80B-7).
II - OPERATION FOR REMOVAL OF PART CONCERNED

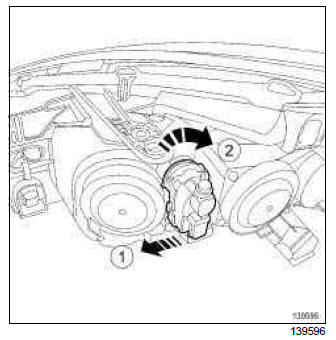
- Press on (1).
- Unclip the beam adjustment actuator (2) by turning it a quarter of a turn clockwise.
- Remove the beam adjustment actuator by unclipping the ball joint from the clip groove.
REFITTING
I - REFITTING OPERATION FOR PART CONCERNED

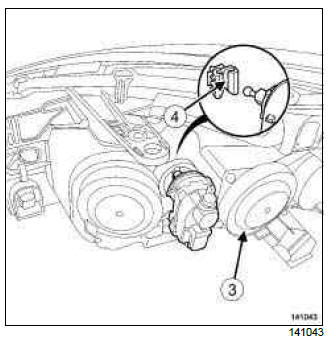
- Remove the sealing cover (3).
- Pull the reflector shell to bring the clip groove as close as possible to the ball joint of the beam adjustment actuator.
- Fit the beam adjustment actuator ball joint in the clip groove (4).
Note: The ball joint should not just be in contact with the groove, it should be fitted into it.
- Clip the beam adjustment actuator by turning it a quarter of a turn anti-clockwise.
II - FINAL OPERATION
- Refit:
- the sealing cover,
- the headlight (see 80B, Headlights, Headlight: Removal - Refitting, 80B-7).
- Adjust the headlight beam (see 80B, Headlights, Headlight: Adjustment, 80B-9).
- Refit:
- the front bumper (see Front bumper: Removal - Refitting) (55A, Exterior protection),
- the front section of the front wheel arch liners (see Front wheel arch liner: Removal - Refitting) (55A, Exterior protection),
- the front wheels (see Wheel: Removal - Refitting) (35A, Wheels and tyres).
READ NEXT:
 Headlight beam adjustment front sensor: Removal - Refitting
DISCHARGE LAMPS
REMOVAL
I - REMOVAL PREPARATION OPERATION
Position the vehicle on a lift (see Vehicle: Towing
and lifting) (MR 392, 02A, Lifting equipment).
Remove:
the front wheels (see Wheel:
 Xenon headlight high voltage unit: Removal - Refitting
REMOVAL
I - REMOVAL PREPARATION OPERATION
IMPORTANT
To prevent eye injuries, do not look at a xenon
bulb when lit (lighting voltage of 20,000 V).
Wait until the " computer-power unit " assemblies
SEE MORE:
 Driving advice, Eco-driving
Behaviour
Drive carefully for the first few miles
until the engine reaches its normal
operating temperature, rather than
let it warm up while the vehicle is stationary.
Speed is expensive.
Sporty driving uses a lot of fuel: drive
with a light right foot.
Do not overrev the engi
 Oil decanter: Removal -
Refitting
F4R
REMOVAL
I - REMOVAL PREPARATION OPERATION
Disconnect the battery (see Battery: Removal - Refitting)
(MR 392, 80A, Battery).
Remove:
the throttle valve (see 12A, Fuel mixture, Throttle
valve: Removal - Refitting, 12A-33),
the intake distributor (see 12A, Fuel mixture, Inlet
distribut
© 2016-2026 Copyright Renault Clio Owners Club

