Renault Clio: Headlight beam adjustment front sensor: Removal - Refitting
DISCHARGE LAMPS
REMOVAL
I - REMOVAL PREPARATION OPERATION
- Position the vehicle on a lift (see Vehicle: Towing and lifting) (MR 392, 02A, Lifting equipment).
- Remove:
- the front wheels (see Wheel: Removal - Refitting) (MR 392, 35A, Wheels and tyres),
- the front axle subframe (see Front axle subframe: Removal - Refitting) (MR 392, 31A, Front axle components).
II - OPERATION FOR REMOVAL OF PART CONCERNED
EQUIPMENT LEVEL EA1 or EQUIPMENT LEVEL EA2 or EQUIPMENT LEVEL EA3 or EQUIPMENT LEVEL EA4 or EQUIPMENT LEVEL EA5
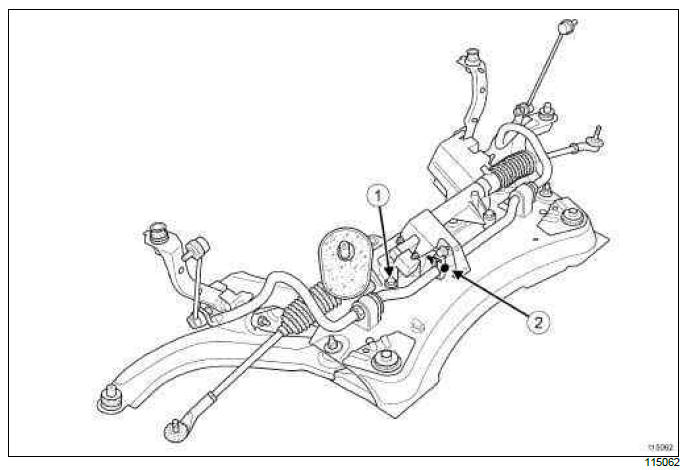
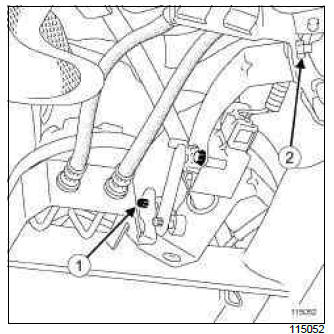
- Remove the nut (1) from the height sensor support.
- Undo the linkage bolt (2).
- Disconnect the height sensor connector.
- Remove the height sensor.
EQUIPMENT LEVEL SPORT
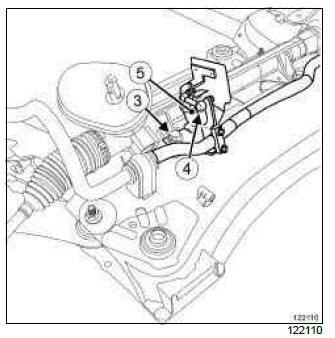
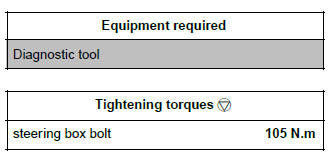
- Remove the steering box bolt (3).
- Unclip the bracket ball joint (4).
- Remove the headlight beam adjustment front sensor with its mounting (5).
REFITTING
I - REFITTING OPERATION FOR PART CONCERNED
EQUIPMENT LEVEL EA1 or EQUIPMENT LEVEL EA2 or EQUIPMENT LEVEL EA3 or EQUIPMENT LEVEL EA4 or EQUIPMENT LEVEL EA5
- Refit the headlight beam adjustment front sensor.
- Refit the linkage on the flat surface of the anti-roll bar.
- Refit the bolt of the height sensor support.
- Retighten the linkage bolt.
- Connect the headlight beam adjustment front sensor connector.
EQUIPMENT LEVEL SPORT
- Fit the headlight beam adjustment front sensor with its mounting.
- Refit the steering box bolt.
- Clip the ball joint onto the bracket.
- Torque tighten the steering box bolt (105 N.m).
II - FINAL OPERATION
- Refit:
- the front wheels (see Vehicle: Towing and lifting) (MR 392, 02A, Lifting equipment),
- the front axle subframe (see Front axle subframe: Removal - Refitting) (MR 392, 31A, Front axle components).
- If replacing the headlight beam adjustment front sensor, carry out the necessary operations using the Diagnostic tool (see MR 394 Fault finding, 80B, Headlights, Fault finding - Replacement of components).
Headlight beam adjustment rear sensor: Removal - Refitting
REMOVAL
I - REMOVAL PREPARATION OPERATION
- Position the vehicle on a two-post lift (see Vehicle: Towing and lifting) (MR392, 02, Lifting equipment).
II - OPERATION FOR REMOVAL OF PART CONCERNED
- Unlock the clip of the return linkage (1).
- Remove the rear height sensor support mounting bolt (2).
- Disconnect the rear height sensor.
- Remove the rear height sensor with its support.
REFITTING
I - REFITTING PREPARATIONS OPERATION
WARNING
The headlight beam adjustment sensor clip is very fragile. If the clip breaks during the removal operation, the whole headlight beam adjustment sensor must be replaced.
II - REFITTING OPERATION FOR PART CONCERNED
- Refit the rear height sensor with its support.
- Connect the rear height sensor.
- Refit the rear height sensor support mounting bolt.
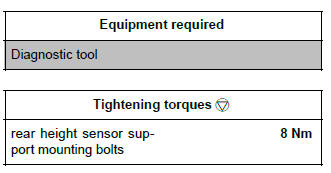
- Torque tighten the rear height sensor support mounting bolts (8 Nm).
- Clip on the return linkage clip.
- If replacing the rear height sensor, carry out the necessary operations using the Diagnostic tool (see Fault finding - Replacement of components) (MR 394, 80B, Headlights).
READ NEXT:
 Xenon headlight high voltage unit: Removal - Refitting
REMOVAL
I - REMOVAL PREPARATION OPERATION
IMPORTANT
To prevent eye injuries, do not look at a xenon
bulb when lit (lighting voltage of 20,000 V).
Wait until the " computer-power unit " assemblies
Rear lighting: List and location of components
I - LIST OF COMPONENTS
The rear lighting is composed of:
the rear lights on the wing (see 81A, Rear lighting,
Rear wing light: Removal - Refitting, 81A-5)
rear light bulbs (see 81A, Rear lighting,
SEE MORE:
Driving
The Renault Clio IV (2014-2019) offers a satisfying driving experience with its nimble handling and responsive performance. Its compact size and maneuverability make it well-suited for urban driving and tight parking spaces. The precise steering and suspension tuning provide a balanced and confident
Your comfort
The Renault Clio IV (2014-2019) is designed with your comfort in mind. It features a well-crafted interior with quality materials and thoughtful ergonomics. The seats offer excellent support and adjustability, providing a comfortable driving experience. The cabin is designed to minimize noise and vi
