Renault Clio: Silencer: Removal - Refitting
D4F or K4J or K4M or K9K or M4R
REMOVAL
I - REMOVAL PREPARATION OPERATION
- Position the vehicle on a two-post lift (see Vehicle: Towing and lifting) (MR 392, 02A, Lifting equipment).
- Cut the exhaust pipe (see 19B, Exhaust, Exhaust: Precautions for the repair, 19B-19) (see ) (MR 392, 19A, Exhaust).
II - OPERATION FOR REMOVAL OF PART CONCERNED
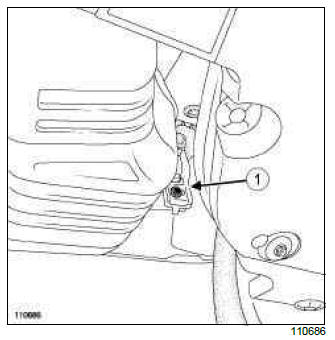
- Remove:
- the bolt (1) mounting the silencer on the rubber mounting bush support,
- the silencer.
Note: If the rubber mounting bushes are damaged, mark the position of the support on the body, then replace the " support - rubber mounting bush " assembly.
REFITTING
I - REFITTING OPERATION FOR PART CONCERNED
- Fit:
- the silencer,
- the sleeve (see 19B, Exhaust, Exhaust: Precautions for the repair, 19B-19) (MR 392, 19A, Exhaust).
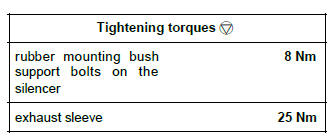
- Torque tighten:
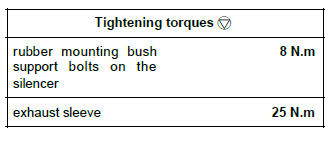
- the rubber mounting bush support bolts on the silencer (8 Nm),
- the exhaust sleeve (25 Nm) while lifting the exhaust pipe to ensure correct alignment.
II - FINAL OPERATION.
- Make sure that all the exhaust pipe heat shields are in place and properly secured.
- Make sure that there is no contact with the underbody.
WARNING
Make sure:
- that the sleeve " nut-bolt tightening " assembly is vertical, with the nut facing downwards, to prevent any risk of underbody contact,
- position the new component in such a way that the marks on the area to be cut are aligned,
- that the two marks are flush with the two ends of the sleeve,
- that an old sleeve is not reused.
- that the bolts securing the rubber mounting bushes to the exhaust pipe have been replaced with new ones.
F4R
REMOVAL
I - REMOVAL PREPARATION OPERATION
- Position the vehicle on a two-post lift (see Vehicle: Towing and lifting) (02A, Lifting equipment).
- Remove the diffuser on the rear bumper (see Aerodynamic diffuser: Removal - Refitting) (55A, Exterior protection).
II - OPERATION FOR REMOVAL OF PART CONCERNED
- Cut the exhaust pipe (see 19B, Exhaust, Exhaust: Precautions for the repair, 19B-19) in the designated area to be cut (see 19B, Exhaust, Exhaust: List and location of components, 19B-1).
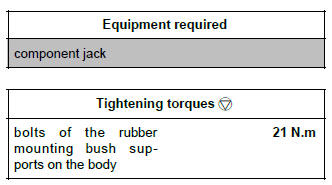
- Fit a component jack under the silencer.
WARNING
If removing the support from the rubber mounting bush on the body, mark its position on the body beforehand, using a pen.
F4R, and 830
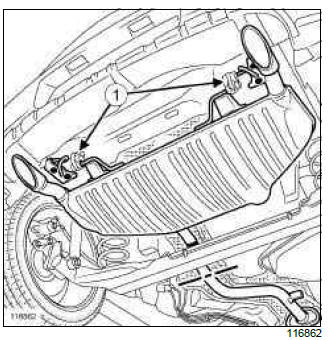
- Remove:
- the rubber mounting bushes (1) using the tool Mot.1857,
- the silencer.
F4R, and 832
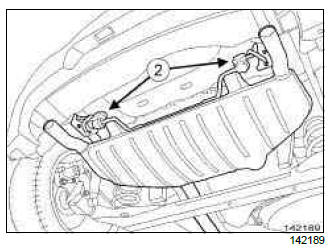
- Remove:
- the rubber mounting bushes (2) using the tool Mot.1857,
- the silencer.
REFITTING
I - REFITTING OPERATION FOR PART CONCERNED
- Fit the silencer and hold it with a component jack.
- If removing the supports from the rubber mounting bushes, fit the mounting bolts of the rubber mounting bush supports on the body without tightening them.
- Fit the retaining rubber mounting bushes of the silencer.
Note: Lubricate inside the holes of the rubber mounting bush using brake cleaner (see ) to fit it more easily on the support on the body and on the silencer.
- Fit the exhaust trunking (see 19B, Exhaust, Exhaust: Precautions for the repair, 19B-19).
- Adjust the silencer in relation to the rear bumper in order to align the splines horizontally.
- Torque tighten the bolts of the rubber mounting bush supports on the body (21 N.m) if they were removed.
II - FINAL OPERATION
- Check that the exhaust pipe heat shields are in place and properly attached.
- Check that there are no leaks.
WARNING
Check that the exhaust pipe is not touching the body.
Check that all the heat shields are present.
- Refit the diffuser on the rear bumper (see Aerodynamic diffuser: Removal - Refitting) (55A, Exterior protection).
EQUIPMENT LEVEL EAG
REMOVAL
I - REMOVAL PREPARATION OPERATION
- Position the vehicle on a two-post lift (see Vehicle: Towing and lifting) (02A, Lifting equipment).
- Cut the exhaust pipe (see 19B, Exhaust, Exhaust: Precautions for the repair, 19B-19) in the designated area to be cut (see ) (19A, Exhaust).
II - OPERATION FOR REMOVAL OF PART CONCERNED
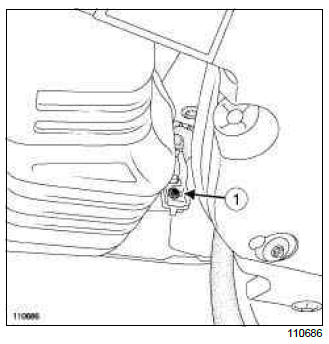
- Remove the silencer bolts (1) on the rubber mounting bush support.
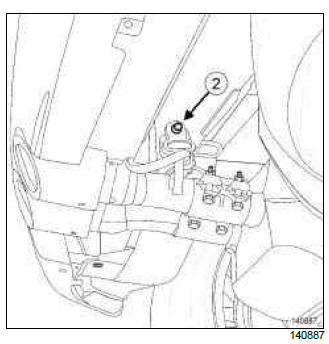
- Unclip the silencer from the rubber mounting bush at (2).
- Remove the silencer.
Note: If the rubber mounting bushes are damaged, mark the position of the support on the body, then replace the " support - rubber mounting bush " assembly.
REFITTING
I - REFITTING OPERATION FOR PART CONCERNED
- Refit the silencer.
- Clip the silencer onto the rubber mounting bush.
- Fit a new After-Sales sleeve between the expansion chamber and the silencer (see 19B, Exhaust, Exhaust: Precautions for the repair, 19B-19).
WARNING
Position the " nut and bolt securing the sleeve " assembly so that the assembly cannot come into contact with the underbody.
- Tighten to torque:
- the rubber mounting bush support bolts on the silencer (8 N.m),
- the exhaust sleeve (25 N.m) whilst supporting the exhaust pipe.
II - FINAL OPERATION
- Check:
- that all the exhaust pipe heat shields are in place and properly attached,
- that there is no contact with the underbody,
- that there are no leaks.

