Renault Clio: Steering column adjustment handle: Removal - Refitting
REMOVAL
I - REMOVAL PREPARATION OPERATION
- Disconnect the battery (see Battery: Removal - Refitting).
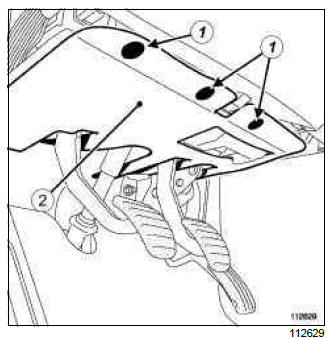
- Remove:
- the mounting clips (1) on the lower trim of the driver's side dashboard,
- the lower trim (2) of the driver's side dashboard.
- Remove:
- the bolt-cover protective strip,
- the instrument panel's side cover.
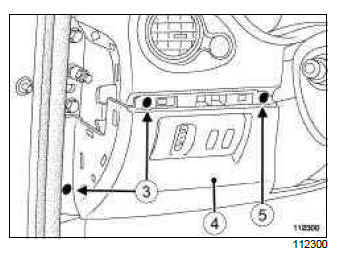
- Remove:
- the lower cover mounting bolts (3),
- the lower cover mounting clip (or bolt) (5).
- Unclip lower cover (4).
- Disconnect the various connectors (depending on equipment level).
- Remove the lower cover.
- Remove the mounting bolts of the half shells (see Steering column switch assembly: Removal - Refitting).
Note: Do not remove the steering wheel switch assembly.
- Unclip the two half shells.
- Remove the lower half shell.
II - OPERATION FOR REMOVAL OF PART CONCERNED
VEHICLE WITH KEY
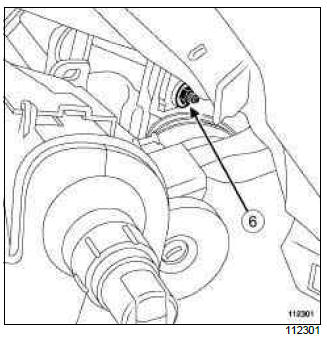
- Remove:
- the nut (6) on the adjustment handle shaft,
- the locking mechanism,
- the adjustment handle.
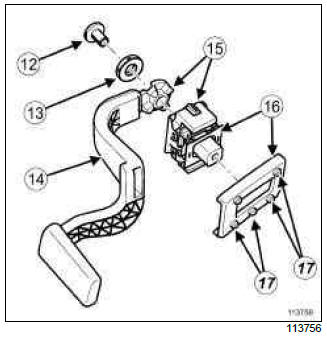
VEHICLE WITH CARD
- Remove:
- the nut (12) on the adjustment handle shaft using an 18 mm spanner,
- the washer,
- the adjustment handle,
- the locking mechanism.
Note: the connecting shaft is trapped on the steering column.
REFITTING
I - REFITTING PREPARATION OPERATION
VEHICLE WITH KEY

- Handle
- Indexed adjustment plates
- Connection shaft
- Locking mechanism
- Adjustment handle shaft nut
Note: When the handle is refitted, ensure the two indexed adjustment plates and retaining spring are correctly positioned.
VEHICLE WITH CARD
- Adjustment handle shaft nut
- Washer
- Handle
- Indexed adjustment plates
- Locking mechanism
Note: When refitting the handle, make sure that the studs (17) of the indexed adjustment plates are correctly positioned and that the direction of the locking mechanism is correct.
II - OPERATION FOR REFITTING PART CONCERNED
VEHICLE WITH KEY
- Refit:
- the adjustment handle.
- the locking mechanism,
- the adjustment handle mounting nut.
Note: The amount of effort required to operate the handle is determined by how much it is tightened.
Test to determine the correct tightening.
VEHICLE WITH CARD
- Refit:
- the locking mechanism,
- the adjustment handle,
- the washer,
- the nut on the adjustment handle shaft.
Note: The amount of effort required to operate the handle is determined by how much it is tightened.
Test to determine the correct tightening.
III - FINAL OPERATION
- Reattach the two half shells.
- Refit the mounting bolts of the half shells.
- Refit the lower cover.
- Connect the various connectors (depending on equipment level).
- Engage the lower cover clips.
- Refit:
- the lower cover mounting clip (or bolt),
- the lower cover mounting bolts,
- the instrument panel's side cover,
- the bolt-cover protective strip,
- the lower trim of the driver's side dashboard,
- the mounting clips on the lower trim of the driver's side dashboard.
- Connect the battery (see Battery: Removal - Refitting).
READ NEXT:
 Steering wheel: Removal - Refitting
IMPORTANT
Consult the safety and cleanliness advice and operation
recommendations before carrying out any repair (see Steering: Precautions for
the repair).
REMOVAL
I - REMOVAL PREPARATION OPERATIO
Power Assisted Steering
Power-assisted steering: Function
Assistance varies according to vehicle speed.
IMPORTANT
Do not remove any steering column component.
Note:
During fault finding, the Service warning light
flashes at
SEE MORE:
Driving
The Renault Clio IV (2014-2019) offers a satisfying driving experience with its nimble handling and responsive performance. Its compact size and maneuverability make it well-suited for urban driving and tight parking spaces. The precise steering and suspension tuning provide a balanced and confident
Your comfort
The Renault Clio IV (2014-2019) is designed with your comfort in mind. It features a well-crafted interior with quality materials and thoughtful ergonomics. The seats offer excellent support and adjustability, providing a comfortable driving experience. The cabin is designed to minimize noise and vi
