Renault Clio: Wheel rim: Identification
IDENTIFICATION
1 - Marking
There are two types of identification marking on the wheel rims:
- engraved marking for steel wheel rims,
- cast marking for alloy wheel rims.
The marking gives the main dimensional specifications of the wheel rim.
This marking may be:
- complete, for example 6 J 15 5 CH 36,
- simplified, for example 6 J 15.
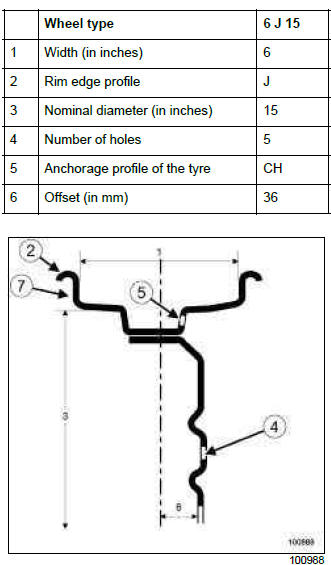
There are 3 types of wheel rim edges (2) :
- those with two flat edges,
- those with two raised edges,
- those with one flat edge and one raised edge.
2 - Installation diameter for the wheel bolts
The wheel bolts are positioned with a pitch circle diameter of:
- 5 holes: 108 mm,
- 4 holes: 100 mm.
3 - Rim run-out
The maximum run-out is measured at the wheel rim edge (7).
Steel wheel rims: 0.8 mm
Alloy wheel rims: 0.3 mm
4 - Out-of-roundness
The maximum out-of-round value is measured on the tyre bead bearing surface.
0.7 mm
Emergency spare wheel winch: Removal - Refitting
IMPORTANT
Only manipulate the emergency spare wheel lashing system when the vehicle is on the ground.
REMOVAL
I - REMOVAL PREPARATION OPERATION
- Open the vehicle's boot.
- Lift the luggage compartment carpet.
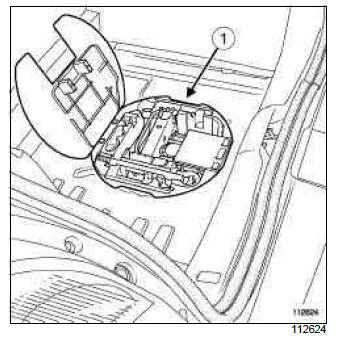
- Remove the emergency spare wheel cover (1).
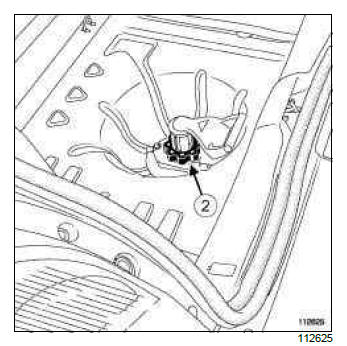
- Fully undo the white wheel (2).
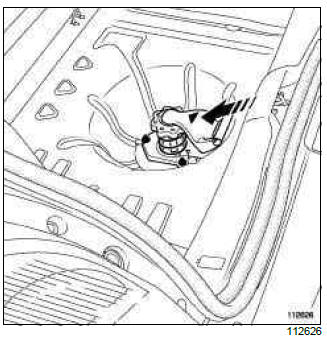
- Press the arrow several times until the emergency spare wheel falls on to the ground.
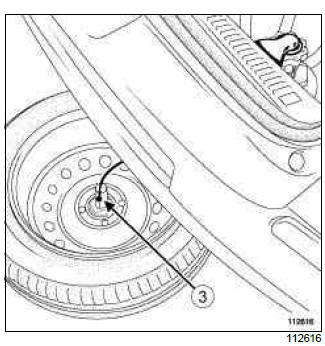
- Remove the winch cable (3) from its housing.
- Remove the emergency spare wheel.
II - OPERATION FOR REMOVAL OF PART CONCERNED
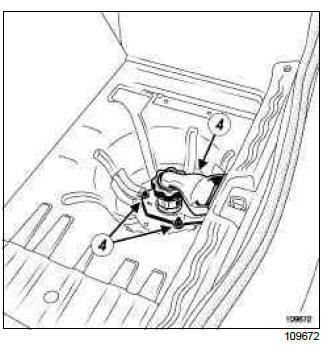
- Remove:
- the winch mounting nuts (4),
- the emergency spare wheel winch.
REFITTING
I - REFITTING PREPARATIONS OPERATION
Note: The handle and winch are sold unassembled when purchased as a spare part. Assemble the two components for fitting operations.
To assemble, clip the plastic cup located at the end of the cable onto the winch.
II - REFITTING OPERATION FOR PART CONCERNED
- Refit:
- the emergency spare wheel winch,
- the winch mounting nuts.
- Torque tighten the emergency spare wheel winch mounting nuts (21 Nm).
III - FINAL OPERATION.
- Check that there is a spacer under the floor; this should only be used for an emergency spare wheel fitted with a 165 tyre.
- Place the winch cable back into the housing.
- Pull the winch lever to reposition the emergency spare wheel.
- Tighten the white wheel whilst holding the lever.
- Continue tightening until you hear a click.
- Check that the emergency spare wheel has been correctly attached.
- Refit the emergency spare wheel cover.
- Refit the boot carpet.
- Close the boot.
READ NEXT:
 Tyre Pressure Monitor
Tyre pressure monitor: List and location of components
TYRE PRESSURE SENSOR
The system consists of:
four pressure sensors (1) built into the valves (one per
wheel); the sensors transmit a radio si
Steering box: Removal - Refitting
REMOVAL
I - REMOVAL PREPARATION OPERATION
Position the vehicle on a two-post lift (see Vehicle:
Towing and lifting) (02A, Lifting equipment).
Remove:
the front wheels (see 35A, Wheels and tyres,
SEE MORE:
Driving
The Renault Clio IV (2014-2019) offers a satisfying driving experience with its nimble handling and responsive performance. Its compact size and maneuverability make it well-suited for urban driving and tight parking spaces. The precise steering and suspension tuning provide a balanced and confident
Your comfort
The Renault Clio IV (2014-2019) is designed with your comfort in mind. It features a well-crafted interior with quality materials and thoughtful ergonomics. The seats offer excellent support and adjustability, providing a comfortable driving experience. The cabin is designed to minimize noise and vi
